background image

2

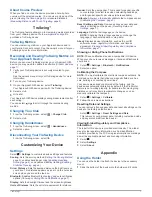
To remove the device, slide the device out of the holder.

Installing the Cart Mount

For the best GPS reception, position the mount so the front of 

the device is oriented toward the sky. You can install the mount 

on any bar that is approximately 19 mm to 38 mm (0.75 in. to 

1.5 in.).

1

Select a secure location to mount the device where it does 

not interfere with the safe operation of your vehicle.

2

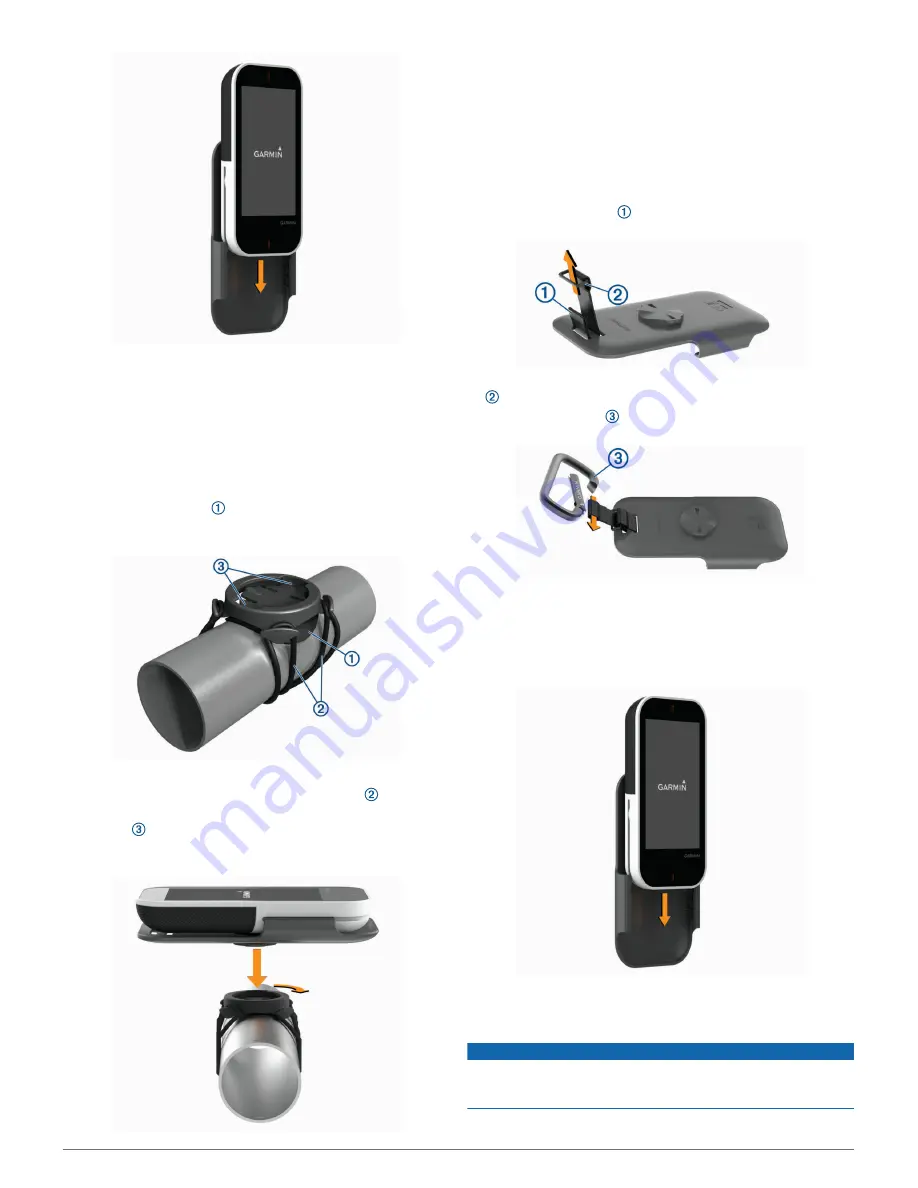
Place the rubber disk   on the back of the mount.
The rubber tabs align with the back of the mount so it stays in 

place.

3

Place the mount on the bar.

4

Attach the mount securely using the two bands  .

5

Align the tabs on the back of the holder with the mount 

notches  .

6

Press down slightly and turn the holder clockwise until it locks 

into place.

Replacement O-rings

Replacement bands (O-rings) are available for the mounts.

NOTE: 

Use Ethylene Propylene Diene Monomer (EPDM) 

replacement bands only. Go to 

http://buy.garmin.com

, or contact 

your Garmin dealer.

Attaching the Lanyard Carabiner

You can use the lanyard carabiner to attach the device to a bag 

or belt loop.

1

Thread the fabric end   of the lanyard through the slots on 

the back of the clip or holder.

2

Thread the fabric end of the lanyard through the plastic loop 

 on the opposite end of the lanyard.

3

Insert the carabiner   through the fabric loop on the end of 

the lanyard.

Using the Clip

You can use the clip to attach the device to your belt, pocket, or 

bag. Go to 

www.garmin.com/golf

 to purchase accessories for 

your device.

1

Slide the bottom of the device into the clip until it clicks.

2

To remove the device, slide the device out of the clip.

Device Care

NOTICE

Do not store the device where prolonged exposure to extreme 

temperatures can occur, because it can cause permanent 

damage.

8

Appendix

Summary of Contents for APPROACH G80

Page 1: ...APPROACH G80 Owner sManual...

Page 2: ...l information concerning the use of this product Garmin the Garmin logo and Approach are trademarks of Garmin Ltd or its subsidiaries registered in the USA and other countries Garmin Connect Garmin Ex...

Page 3: ...Ending a Round 4 Radar Features 4 Using the Radar Features 4 Setting the Roll Factor 5 Warm Up Mode 5 Tempo Training Mode 5 About Tempo Tones 5 The Ideal Swing Tempo 5 Starting Target Practice 5 Targ...

Page 4: ......

Page 5: ...cess to these services for Garmin devices Software updates Course updates Data uploads to Garmin Golf Product registration Setting Up Garmin Express 1 Connect the device to your computer using a USB c...

Page 6: ...when selected for measuring distance with touch targeting Displays a close view of the green for adjusting the pin location Viewing the Green While playing a round you can take a closer look at the g...

Page 7: ...for up to four players 1 Begin playing a round Playing Golf page 1 2 Select Scorecard 3 Select an option Select a player s name to edit it Select to enter the number of strokes for the selected hole...

Page 8: ...n selected Displays the current total score Displays the individual scorecard when selected Displays the actual strokes for the hole Allows you to enter the number of strokes for the hole when selecte...

Page 9: ...ng Displays the tempo timing backswing to downswing time ratio Changes the tempo timing when selected Displays your swing tempo NOTE Your swing tempo and swing times are highlighted in different color...

Page 10: ...ound settings such as disabling audible tones and allows you to end the round when selected Virtual Round Scoring During a virtual round the device calculates your score using a method similar to stro...

Page 11: ...e unit of measurement for distance Gender Sets the user gender This is used for gender specific course ratings for select tees when calculating handicaps and for gender specific par values where avail...

Page 12: ...bands O rings are available for the mounts NOTE Use Ethylene Propylene Diene Monomer EPDM replacement bands only Go to http buy garmin com or contact your Garmin dealer Attaching the Lanyard Carabine...

Page 13: ...hscreen to turn on the backlight NOTE Alerts and messages also activate the backlight Change the backlight timeout and brightness Settings page 7 Specifications Battery type Rechargeable built in lith...

Page 14: ...anging 2 I installing 8 K keys 1 L locations deleting 3 locking screen 2 M maps symbols 1 6 updates 1 measurements 7 measuring a shot 2 menu 1 mounting the device 7 8 mounts 8 optional 7 N notificatio...

Page 15: ......

Page 16: ...support garmin com January 2019 190 02353 00_0A...

Reviews: