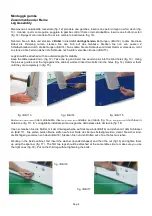
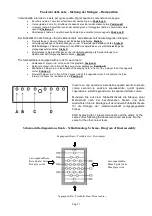
Garlando 11 134 8721 Assembly Instructions Manual Download Page 5

Pag. 5 


MONTAGGIO 

Importante: tenere lontani i bambini durante tutte le operazioni di montaggio. 


AUFBAU 

Wichtig: Achten Sie bitte darauf, dass beim Aufbau keine Kleinkinder beteiligt sind.


TABLE SETUP 

Important: children should be kept away of the table during the assembling operations 
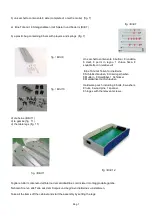


fig./ Bild 1 

 
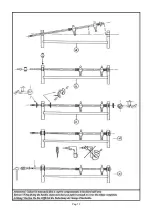
Fig.  2  –  Rimuovere  il  pannello  in  legno  che  trattiene 
gli  oggetti  all’interno  del  mobile:  è  soltanto  di  una 
parte dell’imballo, di cui non si avrà più bisogno. 
 
Bild 2 – Lösen Sie die beiden Kreuzschlitz Schrauben 
und  entfernen  das  Holzbrett.  Dies  ist  nur  zum 
Transport  eingeschraubt.  Sie  benötigen  es  nicht 
mehr. 
 
Fig.  2  –  Remove  the  wood  panel  keeping  the  table 
items : this is a part of the packing  only and will not 
be needed anymore. 


fig. / Bild 2 

Summary of Contents for 11 134 8721

Page 1: ......

Page 2: ...portico o una veranda Potete anche portarlo in casa per poterlo utilizzare tutto l anno Il tavolo non fatto per restare sotto la neve per lunghi periodi ATTENZIONE una volta effettuato il montaggio le...

Page 3: ...hmutz zu sch tzen der die Kugellager der Spielerstangen blockieren kann und verhindert dass sie einwandfrei gleiten Bitte benutzen Sie die Abdeckung 2 Lassen Sie Ihren Fu balltisch nicht im Winter dra...

Page 4: ...ter season when you do not use it anyhow You may keep it in your home to enjoy it indoors or you may also leave it protected under a veranda The table should not stand in snow for protracted periods I...

Page 5: ...ssembling operations fig Bild 1 Fig 2 Rimuovere il pannello in legno che trattiene gli oggetti all interno del mobile soltanto di una parte dell imballo di cui non si avr pi bisogno Bild 2 L sen Sie d...

Page 6: ...tstoff Handgriffe Bild 4 2 Balleinwurf Bild 5 2 W rfel Torz hler Bild 6 8 Kugellager Bild 6a 16 Innere Halblagerschalen Bild 6b 8 u ere Lagerschale Bild 6c 10 wei e Kunststoffb lle Schrauben f r die B...

Page 7: ...Sie nun alle Teile aus dem Korpus und beginnen die Beine zu installieren Take all the items off the cabinet and start the assembly by setting the legs fig Bild 11 Un sacchetto contenente 8 bulloni 8...

Page 8: ...pins into the blind holes fig 13 Using the pins as guides rest the leg against the cabinet wall and insert two bolts into the holes fig 14 Hammer them until they are completely in fig 15 Lavorando dal...

Page 9: ...eigen Bild 20 Fit in the central panel into the leg grooves fig 19 making sure that the panel has its curve upward and that the holes in the panel are inwards fig 20 fig Bild 19 fig Bild 20 fig Bild18...

Page 10: ...le viti entro i fori e avvitare fig 26 Fare lo stesso con l altro bocchettone Stecken Sie die Einwurfschale in das Einwurfloch Bild25 und schrauben die Kreuzschlitzschrauben in die vorgebohrten L che...

Page 11: ...each team Goalkeeper 1 player rod at the end of the playfield Position A Defence 2 player rod in front of the same colour goalkeeper Position B Mid fielder 5 player rod in the middle of the playing fi...

Page 12: ...semiflangie appoggiarle sull asta tenendole inclinate in modo che la protuberanza A si trovi davanti all incavo B quindi portarle in verticale esercitando una leggera pressione Zum Zusammensetzen der...

Page 13: ...Pag 13...

Page 14: ...tic feels cold If this should be the case warm them a little before installing them Start by manually inserting a handle onto the bar without covering the knurl distinctly marked in fig 41 Delicately...

Page 15: ...d in den folgenden Teilen Ger st Holz MDF Stahl Beine Holz Stahl Spielfeld Holz Glas Stangen Stahl PP moplen Zubeh rteile ABS PE PVC Verzierung Aluminium ABS W hrend der Vernichtung des Fu balltisches...

Page 16: ...Pag 16...

Reviews: