


Pag. 14
Montaggio delle manopole / Griff Installation / Handles Assembly
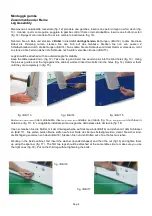
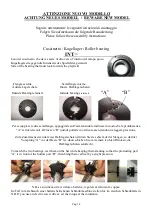
Attenzione: non inserire le manopole se la plastica è fredda. In questo caso si raccomanda di scaldarle appena
prima di installarle.
Cominciare con l’inserire manualmente la manopola sull’asta senza coprire la zigrinatura (chiaramente visibile in
fig. 41). Premere delicatamente con il martello (fig. 42) finché la manopola nasconde completamente la zigrinatura
(fig. 43).
Achtung: sollten die Griffe kalt sein, wärmen Sie diese auf Zimmertemperatur.
Schieben Sie die Griffe bis zur Rändelung auf die Stange. (Bild 41). Leicht mit dem Hammer (Bild 42) einklopfen,
bis der Griff über der Rändelung sitzt (Bild 43). Halten Sie hierbei die Stange fest.
Caution: do not put on handles if the plastic feels cold. If this should be the case, warm them a little before
installing them.
Start by manually inserting a handle onto the bar without covering the knurl (distinctly marked in fig. 41). Delicately
hammer it (fig. 42) until the handle completely hides the knurl (fig. 43).
fig. /bild. 44
fig. / bild 43
fig. / bild. 41
fig. / bild. 42
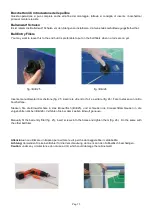
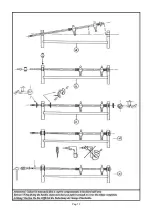
Completare
l’assemblaggio
fissando
i
segnapunti, accertandosi che il segnapunti sia
dello stesso colore del portiere posto sullo
stesso lato (fig. 44).
Il calciobalilla è ora pronto per essere utilizzato.
Garlando Vi augura buon divertimento. Non
dimenticate però di seguire i consigli per la
pulizia e manutenzione
Beenden
Sie
den
Aufbau
mit
dem
Anschrauben der Zähler (Bild 44).
Nun wünschen wir Ihnen viel Spaß mit dem
neuen Sportschaukicker!
End assembly by fixing the score counters,
making sure that at each side of the score
counter color is the same as the goalkeeper
(fig. 44).
Your table is now ready for playing: enjoy it !


