


24
ENGLISH
2 people with little assembly experience can easily assemble the chalet in
1 or 2 days.
BEFORE STARTING THE ASSEMBLY
CHECK THE CONTENTS OF THE PACKAGE:
Upon receipt and before starting assembly, please ensure the package is complete. Check
the product for damage or missing parts. If you notice any missing or damaged parts,
please contact your seller. You may check the contents of the package by using the
enclosed Parts List (section B). All dimensions are approximate.
RECOMMENDATIONS:
It is very important to prepare the foundation correctly. It must be perfectly leveled and
straight in order to avoid problems such as :
• Doors and windows that won’t open;
• Wooden boards that can expand freely when damp and then contract back to their original
shape, which causes gaps between the boards.
Depending on the soil type, we recommend you to dig a trench 15-20 cm deep, fill it with
sand, seal it and then lay the floor slabs framed with concrete edge or pour a concrete
slab over the entire surface (perfect solution). The level of the foundation should always be
above the level of the ground.
PRE-TREATMENT OF LOGS FOR UNTREATED WOODEN GARDEN SHEDS:
If you’ve purchased an untreated wooden garden shed, you’ll need to treat the raw wood
with a woodstain or other wood-protecting product before starting assembly.. This product
should be UV-resistant and also protect the wood against moisture and biological factors.
The boards must be completely dry before assembly. (ATTENTION! Do not paint the board
joints, protrusions and grooves).
After assembling the garden shed, we recommend the following maintenance routine:
• Apply a second coat of colored stain or paint with high UV protection. Clear/transparent
stain often provides slightly less UV protection than a colored stain. The darker the shade,
the better the protection.
• Follow the paint/stain manufacturer’s instructions.
If you notice that the wood begins to “leak”, repeat the staining or painting process.
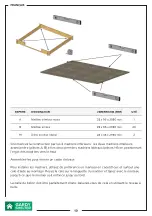
NECESSARY TOOLS
Ladder, stain or paint, brush, roller, knife, hammer, rubber mallet, Phillips and flathead
screwdriver, spirit level, saw, cordless screwdriver, drill machine, safety goggles.
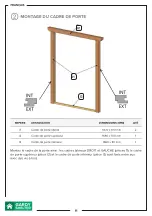
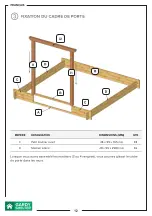
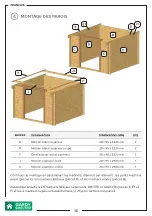
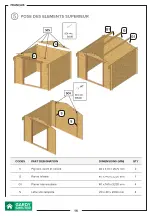
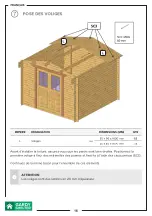
ATTENTION! This step-by-step plan is a universal, general copy and may differ from the
model purchased. However, the steps shown apply to all models.
Summary of Contents for 3365
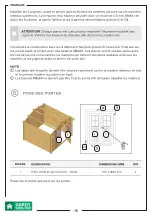
Page 9: ...9 FRAN AIS POSE DE LA BASE PLAN DE MONTAGE PAR TAPES DESSINS A B H1 H1 OUTILS NECESSAIRES...
Page 17: ...17 FRAN AIS POSE DU FEUTRE BITUME 4 x 330 cm M M M M 1 2 P Q Q 3 4...
Page 29: ...29 ENGLISH FITTING THE BASE STEP BY STEP ASSEMBLY PLAN SKETCHES A B H1 H1 NECESSARY TOOLS...
Page 37: ...37 ENGLISH LAYING BITUMEN FELT 4 x 330 cm M M M M 1 2 P Q Q 3 4...
Page 57: ...57 DEUTSCH VERLEGUNG DER BITUMEN DACHPAPPE 4 x 330 cm M M M M 1 2 P Q Q 3 4...
Page 77: ...77 ESPA OL COLOCACI N DE FIELTRO BITUMINOSO 4 x 330 cm M M M M 1 2 P Q Q 3 4...
Page 89: ...89 ITALIANO INSTALLAZIONE DELLA BASE FASI DI MONTAGGIO DISEGNI A B H1 H1 STRUMENTI NECESSARI...
Page 97: ...97 ITALIANO INSTALLAZIONE DEL FELTRO BITUMATO 4 x 330 cm M M M M 1 2 P Q Q 3 4...
Page 109: ...109 POLSKI U O ENIE PODSTAWY PLAN MONTA U KROK PO KROKU RYSUNKI A B H1 H1 WYMAGANE NARZ DZIA...
Page 117: ...117 POLSKI UK ADANIE PAPY BITUMICZNEJ 4 x 330 cm M M M M 1 2 P Q Q 3 4...
Page 137: ...137 PORTUGU S COLOCA O DO FELTRO BETUMINOSO 4 x 330 cm M M M M 1 2 P Q Q 3 4...


