background image

22

GB

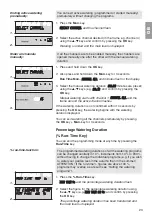
5.2 Special Functions 

If 

Program Off

is selected as program memory location for a

channel, the respective channel is blocked and the watering 
programs of the channel are no longer executed. The programs
of the channel are retained. 

You can end the programming mode at any time by pressing the

Channel

key. 

1.  Press the 

Channel

key.


SELECT CHANNEL 

and the channel flash. 

2.  Select the channel using the 

-

keys (e.g. channel 

2

) and

confirm by pressing the 

OK

key. 


Channel

appears on the display (e.g.

2

) and 

Select Program

and the program memory location flash. 

3.  Select the program memory location 

Off

using the 

-

keys

and confirm by pressing the 

OK

key. 


Select CHANNEL

flashes in the display. 

4.  Press the 

Channel

key. 

   CHANNEL OFF

and the channel (e.g. channel 

2

) is shown in 

the display. 

If several channels are blocked, 

Channels off

is displayed. 

If the run time % is not equal to 100, the display alternates 
every 3 seconds between 

Channel off

and 

Run Time %

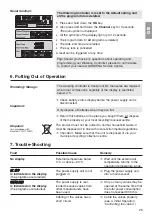
Manual Watering (Man Key) 

The manual watering duration can be set between 0 to 59 min.
Channels which are already open are displayed in frames. 

1.  Press the 

Man.

key. 

   SELECT CHANNEL 

and the channel flash. 

2.  Select the channel desired using the 

-

keys (e.g. channel 4)

and confirm by pressing the 

OK

key. 


Run Time  Man. 

and minutes flash in the display. 

3.  Select the manual watering duration (

00 : 30

minutes are 

preset) using the 

-

keys (e.g. 

00 : 15

) and confirm by 

pressing the 

OK

key. 

    Manual watering starts and the frame around the active 

channel flashes. 

If the watering duration is not confirmed within 10 seconds by
pressing the 

OK

key, the watering begins with the watering 

duration selected. 

Blocking a channel : 

1. 

2. 

3. 

4. 

Manual watering : 

1. 

2. 

3. 

Summary of Contents for 4030

Page 1: ...F Mode d emploi Programmateur NL Gebruiksaanwijzing Besproeiingscomputer S Bruksanvisning Kontrollpanel DK Brugsanvisning Vandingskontrol system FIN Brugsanvisning Kastelunohjauslaite N Brugsanvisning Vanningstimer kontrollenhet I Istruzioni per l uso Centralina E Manual de instrucciones Programación de riego P Instruções de utilização Comando de rega ...

Page 2: ... Please keep these instructions in a safe place 1 Where to Use your GARDENA Watering Controller 15 2 Safety Instructions 16 3 Function 16 4 Initial Operation 17 5 Operation 19 6 Putting Out of Operation 25 7 Trouble Shooting 25 8 Technical Data 26 9 Service Warranty 26 1 Where to Use Your GARDENA Watering Controller The Watering Controller is suitable for use indoors and in outdoor locations prote...

Page 3: ...s the battery is almost empty and has to be replaced When the Low Battery display appears the battery is empty or no battery has been inserted The Low Battery display is re set once the new battery has been inserted The Watering Controller must be used only for controlling commercially available 24 V AC valves The electric power consumption per channel must not exceed 600 mA a GARDENA Irrigation V...

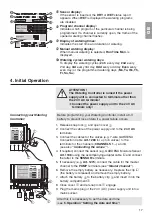
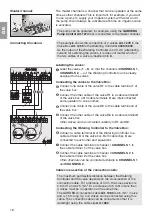
Page 4: ... 24 V AC terminals only Before programming your Watering Controller install a 9 V battery to prevent loss of data if a power failure occurs 1 Release snap lock 1 and open cover 2 2 Connect the cable of the power supply unit to the 24 V AC terminals 3 Connect the cables for the valves e g 7 wire GARDENA Connection Cable Art 1280 for up to 6 valves to the terminals for the channels CHANNELS 1 and C ...

Page 5: ...ble terminals C are interconnected and equivalent to one another 4 Connect one cable of the valve V2 to the cable terminal 2 of the valve box 5 Connect the other cable of the valve V2 to a cable terminal C of the valve box Other valves can be connected similarly to V1 and V2 Connecting the Watering Controller to the Valve Box 6 Connect a cable terminal C of the Watering Controller to a cable termi...

Page 6: ...he week is selected automatically using the date When the Time key is pressed all the valves are clo sed as a precaution 1 Plug in the power supply unit or press the Time key YEAR and date year flash in the display 2 Select the date year using the keys e g 2010 and confirm by pressing the OK key MONTH and date month flash 3 Select the date month using the keys e g 05 and confirm by pressing the OK...

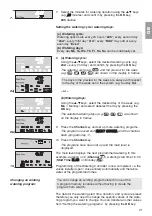
Page 7: ...hannel key SELECT CHANNEL and the channel flash You can end the programming mode at any time by pressing the Channel key 2 Select the channel using the keys e g channel 2 and confirm by pressing the OK key Channel appears on the display e g 2 and Select Program and the program memory location flash 3 Select the program memory location using the keys e g program memory location 3 and confirm by pre...

Page 8: ...e OK key The selected watering days e g Mo We Fr are shown on the display in frames 9 Press the Channel key and set up more watering programs The program is saved and SELECT CHANNEL and the channel flash program step 1 10 Press the Channel key The programs have been set up and the main level is displayed The main level displays the next programmed watering In this example watering on 2 Channel 2 w...

Page 9: ...nnel e g channel 2 is shown in the display If several channels are blocked Channels off is displayed If the run time is not equal to 100 the display alternates every 3 seconds between Channel off and Run Time Manual Watering Man Key The manual watering duration can be set between 0 to 59 min Channels which are already open are displayed in frames 1 Press the Man key SELECT CHANNEL and the channel ...

Page 10: ... confirmed within 10 seconds by pressing the OK key the watering begins with the watering duration displayed You can exit watering all the channels prematurely by pressing the OK key Man key for 3 seconds Percentage Watering Duration Run Time Key You can end the programming mode at any time by pressing the Run Time key The programmed watering durations of all the watering programs can be changed c...

Page 11: ...eak 1 to 9 or they can all be blocked Off in which case manual watering is still possible 1 Press the Rain Off key Rain Off and Off is displayed 2 Using the keys set the desired break e g 3 days 3 Day Delay and the frame flash 3 Confirm the break by pressing the OK key The selected break e g 3 days 3 Days Off is displayed and the programs are suspended for the break selected From 2 days onwards th...

Page 12: ...OFF The power supply unit is not v Plug the power supply unit is indicated on the display plugged in into a mains socket the programs are retained Overload The power supply is over v Only so many valves may be is indicated on the display loaded because valves from opened at the same time that the programs are retained other manufacturers have the total power consumption been used does not exceed 8...

Page 13: ...on of the problem directly to one of the GARDENA Service Centres listed on the back of this leaflet A In the event of other faults please contact GARDENA Service Repairs should only be carried out by GARDENA service centres or dealers authorised by GARDENA 8 Technical Data Power supply from power supply unit 24V AC 800 mA sufficient for 5 simultaneously open GARDENA Watering Valves Art 1278 Power ...

Reviews: