


TF0401
TF0304
TF0306
TF0307
TF0403
TF0405
TF0301
TF0302
TF0303
-
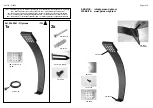
De lampen worden aan de kabel verbonden d.m.v. van een schroefverbinding.
(Foto TF0301)
-
Verwijder de dop van de aansluiting op de kabel die u wilt gebruiken om een lamp op aan te sluiten.
(Foto TF0303)
-
Druk de stekker van de lamp zo ver mogelijk in de aansluiting op de hoofdkabel.
(Foto TF0304)
-
Draai de afdichtring zo ver mogelijk aan.
(Foto TF0307)
-
Die Verbindungen sind alle mit Stecker und Kupplung ausgeführt.
(s. Bild TF0301)
-
Nehmen Sie die Abdichtungsschraube von dem Stecker.
(s. Bild TF0303)
-
Drücken Sie den Stecker der Leuchte in den Stecker des Haubtkabels.
(s. Bild TF0304)
-
Drehen Sie die Abdichtungsschraube der Verbindung so fest wie möglich.
(s. Bild TF0307)
-
IP44 Schutz ist nur garantiert wenn die Leuchten am Kabel verbunden sind oder Kappen auf die Stecker gedreht sind.
-
Svítidla jsou ke kabelu pøipojena pomocí šroubového závitu.
(Fotografie TF0301)
-
Pokud chcete svítidlo pøipojit, odstraòte kryt svorkovnice na kabelu.
(Fotografie TF0303)
-
Zatlaète zástrèku svítidla co možná nejvíc do kontaktu na hlavním kabelu.
(Fotografie TF0304)
-
Utáhnete co možná nejvíc tesnící kroužek.
(Fotografie TF0307)
-
Svjetiljke se na kabel prièvršæuju vijkom.
(Foto TF0301)
-
Uklonite poklopac utiènice koju želite koristiti kao prikljuèak za svjetiljku.
(Foto TF0303)
-
Utikaè svjetiljke gurnite èim dublje u prikljuèak na glavnom kabelu.
(Foto TF0304)
-
Zategnite vijak koliko god možete.
(Foto TF0307)
-
Le lampade vengono collegate al cavo tramite una vite.
(Foto TF0301)
-
Elimina la protezione del cavo che si vuole utilizzare per collegarci la lampada.
(Foto TF0303)
-
Premere la spina della lampada il piú possibile nella connessione del cavo primario.
(Foto TF0304)
-
Gira la guarnizione il piú possibile.
(Foto TF0307)
-
Les lampes sont raccordées à la câble par moyen d'une connexion vissée.
(Photo TF0301)
-
Enlevez le bouchon du raccord sur la câble, que vous voulez utiliser pour y embrancher une lampe.
(Photo TF0303)
-
Poussez la fiche mâle de la lampe autant que possible dans le raccord sur la câble principale.
(Photo TF0304)
-
Serrez la rondelle d'étanchéité autant que possible.
(Photo TF0307)
-
Lamporna förbinds genom skruvkopplingar.
(Foto TF0301)
-
Avlägsna en kabelanslutningshatt som ni vill använda för att ansluta lampan.
(Foto TF0303)
-
Tryck ihop kontakt från lampan så långt i som möjligt i anslutning till huvudkabeln.
(Foto TF0304)
-
Skruva åt skruvkopplingen så långt som går.
(Foto TF0307)
-
The wire of the lamps are connected to the main cable with a screw connection.
(Foto TF0301).
-
Remove the cover from the plug on the main cable where you want to attach the cable of the light fixture.
(Foto
TF0303)
-
Push the plug of the cable from the fixture as far as possible in the plug attached to the main cable.
(Foto TF0304)
-
Screw the sealing ring as far as possible on the plug.
(Foto TF0307)
-
Las lámparas se conectan al cable mediante una unión roscada.
(Foto TF0301)
-
Retire el tapón de la conexión del cable que usted desea utilizar para conectar una lámpara al mismo.
(Foto TF0303)
-
Introduzca lo más posible el enchufe de la lámpara en el conector del cable principal.
(Foto TF0304)
-
Enrosque lo más posible la junta redonda.
(Foto TF0307)
-
Lamperne forbindes med kablet vha. en skrueforbindelse.
(Foto TF0301)
-
Fjern hætten fra tilslutningen på det kabel som du vil bruge til at tilslutte en lampe i.
(Foto TF0303)
-
Tryk lampestikket så langt som muligt ind i tilslutningen på hovedkablet.
(Foto TF0304)
-
Stram tætningsringen mest muligt.
(Foto TF0307)
NOTE:
This product should not be disposed of with household waste.
Please recycle where facilities exist.
Check with your local authority for recycling advice.
LET OP:
Dit product mag niet met het huishoudelijk afval
worden weggegooid.
Dit product laten recyclen als daar faciliteiten voor zijn.
Vraag uw lokale overheid om advies inzake recycling.
ACHTUNG:
Dieses Produkt darf nicht mit dem Haushaltsabfall
weggeworfen werden
Recycle dieses Produkt falls Fazilitäten vorhanden sind.
Erkundigen Sie sich bei der Lokalen Behörde über recycling.
This product falls within the scope of the Waste Electrical & Electronic Equipment Directive 2002/96 EC.
Dit product valt binnen het kader van de Afgedankte Elektrische & Elektronische Apparatuur richtlijn AEEA 2002/96/EG.
Dieses Produkt befindet sich im Rahmen der verbrauchten Elektro- und Elektronik-Altgeräte Richtlinie EEA 2002/96/EG.
MI3132 - 210406
Page 3 of 8


