


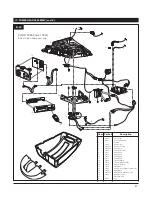


34
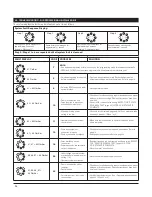
20. TROUBLESHOOTING - FOR PROFESSIONAL INSTALLER ONLY
The system displays the fault(s) automatically one at a time as follows:
System Fault Sequence Display:
Step 1
Step 2
Step 3
Step 4
Step 1
Step 2
Step 3
Step 4
Step 1
Step 2
Step 3
Step 4
Step 1
Step 2
Step 3
Step 4
Message number is displayed for
approximately 3 seconds
(example: Message 15).
Pause between messages for
approximately 1 second.
Operating mode is displayed for
approximately 3 seconds
(example: Operating voltage).
Pause between messages for
approximately 1 second.
Step 5 : Steps 1 to 4 are repeated until all system fault is clearned.
FAULT DISPLAY
CODE
PROBLEM
SOLUTION
#7 Flashes
#8 Flashes
#1 + #8 Flashes
#2 + #8 Flashes
#3 + #8 Flashes
#7 + #8 Flashes
#1, #7 + #8 Flashes
#5, #6, #7 + #8 Flashes
#2, #5, #6, #7 +
#8 Flashes
7
NOTE:
• If no buttons are pressed within 120 seconds, the programming mode terminates automatically.
• OPEN and CLOSED door positions programmed without passing the reference point.
#7 Flashes
#8 Flashes
#1 + #8 Flashes
#2 + #8 Flashes
#3 + #8 Flashes
#7 + #8 Flashes
#1, #7 + #8 Flashes
#5, #6, #7 + #8 Flashes
#2, #5, #6, #7 +
#8 Flashes
8
• Adjustments setting interrupted
before completion.
• Door can be operated normally. Recheck adjustments if
adjustment settings were not completed. Refer to page 19.
#7 Flashes
#8 Flashes
#1 + #8 Flashes
#2 + #8 Flashes
#3 + #8 Flashes
#7 + #8 Flashes
#1, #7 + #8 Flashes
#5, #6, #7 + #8 Flashes
#2, #5, #6, #7 +
#8 Flashes
9
• Defective RPM sensor/ operator
system blocked.
• Have operator serviced.
#7 Flashes
#8 Flashes
#1 + #8 Flashes
#2 + #8 Flashes
#3 + #8 Flashes
#7 + #8 Flashes
#1, #7 + #8 Flashes
#5, #6, #7 + #8 Flashes
#2, #5, #6, #7 +
#8 Flashes
10
• Door movement too stiff.
• Force required to move door
exceeded set force level.
• Maximum driving power
setting is too low.
• Check door for obstructions, proper manual operation, proper
balance, or broken springs. Clear obstructions or have door
serviced.
• If door is OK, increase force setting. REPEAT THE “SAFETY
REVERSAL TEST” (page 23) AFTER ADJUSTMENT IS
COMPLETE.
• Vérifiez la force maximale programmée (Voir « programmation
avancée », page 22 / Menu 1 et 2)
#7 Flashes
#8 Flashes
#1 + #8 Flashes
#2 + #8 Flashes
#3 + #8 Flashes
#7 + #8 Flashes
#1, #7 + #8 Flashes
#5, #6, #7 + #8 Flashes
#2, #5, #6, #7 +
#8 Flashes
11
• Operator exceeded maximum
run time limit.
• Make sure rail is connected to operator head and belt or
chain is moving.
#7 Flashes
#8 Flashes
#1 + #8 Flashes
#2 + #8 Flashes
#3 + #8 Flashes
#7 + #8 Flashes
#1, #7 + #8 Flashes
#5, #6, #7 + #8 Flashes
#2, #5, #6, #7 +
#8 Flashes
15
• Photo eye system not
connected properly.
• Photo eye sensors not aligned.
• Check photo eye sensors wiring and connections. Refer to
page 14.
• Realign photo eye sensors. Refer to page 24.
#7 Flashes
#8 Flashes
#1 + #8 Flashes
#2 + #8 Flashes
#3 + #8 Flashes
#7 + #8 Flashes
#1, #7 + #8 Flashes
#5, #6, #7 + #8 Flashes
#2, #5, #6, #7 +
#8 Flashes
16
• Force watchdog circuit
found error.
• Power sensor for the automatic
cut-out is defective.
• Readjust force and run operator up and down twice. REPEAT
THE “SAFETY REVERSAL TEST” (page 23) AFTER
ADJUSTMENT IS COMPLETE.
• Have the motor unit checked.
#7 Flashes
#8 Flashes
#1 + #8 Flashes
#2 + #8 Flashes
#3 + #8 Flashes
#7 + #8 Flashes
#1, #7 + #8 Flashes
#5, #6, #7 + #8 Flashes
#2, #5, #6, #7 +
#8 Flashes
26
• Undervoltage, operator system
overloaded at maximum power
setting (16).
• Operator system overloaded.
• Have the external power supply checked.
#7 Flashes
#8 Flashes
#1 + #8 Flashes
#2 + #8 Flashes
#3 + #8 Flashes
#7 + #8 Flashes
#1, #7 + #8 Flashes
#5, #6, #7 + #8 Flashes
#2, #5, #6, #7 +
#8 Flashes
28
• Door movement too stiff or
irregular.
• Door blocked.
• Automatic cut-out is set to be
too sensitive.
• Check door for obstructions, proper manual operation, proper
balance, or broken springs. Clear obstructions or have door
serviced. If needed.
• Vérifiez l’arrêt automatique. (voir « Programmation avancée »,
page 22 / Menu 3 et 4).
Summary of Contents for CarGO 500
Page 1: ......