Guntermann & Drunck GmbH
Installationsanleitung CATCenter
Seite 20
12V DC/5A
USB
Keyb. Mouse
PS/2
Ethernet A
Ethernet B
Service
ISDN
COM 1
Red. Power
Main Power
AC 100-240 V, 47-63 Hz
Transmission
Monitor
12V DC/3A Network A
Network B
5
6
7
8
Console
1
2
3
4
Console
1
2
3
4
5
6
7
8
CPU
9
10
11
12
13
14
15
16
17
18
19
20
21
22
23
24
CPU
25
26
27
28
29
30
31
32
Red.
Power
Main Power
AC 100-240 V, 47-63 Hz
6
7
2
3
Read instruction
carefully before
installing!
Avoid misuse!
KVM Switch.
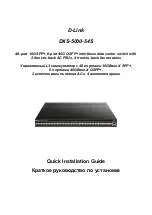
2.2.5.2
Anschluss der lokalen Konsole
Für den Anschluss der lokalen Konsole am UCON-IP-System beachten Sie
bitte folgende Installationsschritte:
12V DC/5A
USB
Keyb. Mouse
PS/2
Ethernet A
Ethernet B
Service
ISDN
COM 1
Red. Power
Main Power
AC 100-240 V, 47-63 Hz
Transmission
Monitor
•
Schließen Sie die Mouse an der Buchse PS/2 Mouse an.
•
Schließen Sie das Keyboard an der Buchse Keyb. an.
•
Schließen Sie Ihren Monitor an der Buchse Monitor an.
2.2.5.3
Anschluss an eine ISDN-Anlage
Wenn Sie das UCON-IP über ISDN erreichen wollen, müssen Sie das UCON-
IP mit Ihrer Telefonanlage verbinden.
12V DC/5A
USB
Keyb. Mouse
PS/2
Ethernet A
Ethernet B
Service
ISDN
COM 1
Red. Power
Main Power
AC 100-240 V, 47-63 Hz
Transmission
Monitor
Verwenden Sie hierzu ein CAT-x-basiertes Patchkabel. Stecken Sie das eine
Ende (RJ45-Stecker) in die Schnittstelle
ISDN
des UCON-IP und das andere
Ende (RJ45-Stecker) in einen SO-Bus (Protokolltyp EURO-ISDN) Ihrer TK-
Anlage.
Verbindung über ein CAT-x-Kabel