background image

Printer Components

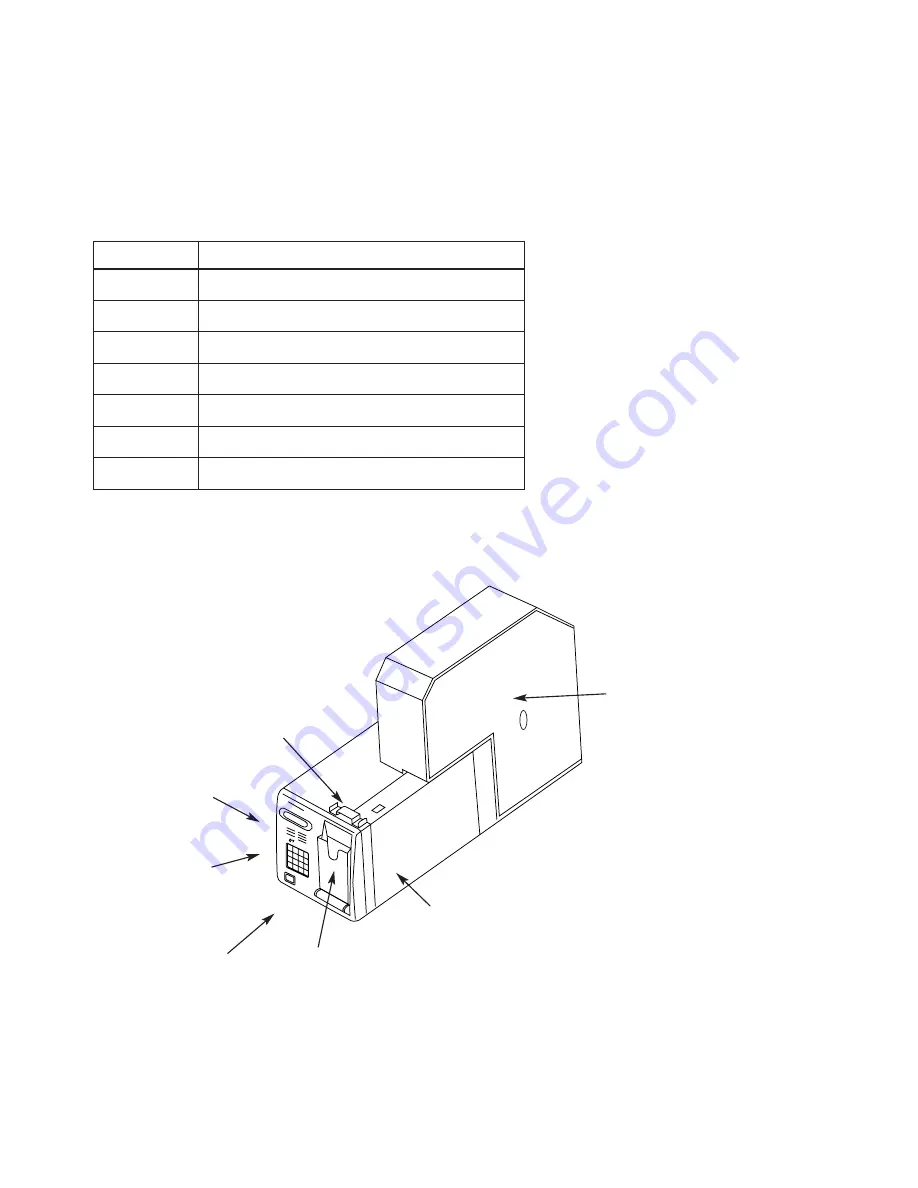
The following pages contain illustrations to help familiarize you with the ADP 3000 printer components, and
their functions.

External Components

Figure 1 shows the external components of the ADP 3000

3

Number:

Is the:

1

Power switch

2

Control Panel

3

Status Panel

4

Locking latch for printer side door

5

Door of secure ticket bin (optional)

6

Printer side door

7

Stacker (without optional Lockable Cover)

1

2

3

4

6

7

5

Figure 1: External components of ADP 3000

Summary of Contents for ADP 3000

Page 1: ...s or comments please send a message to training development galileo com 2002 Galileo International All Rights Reserved Galileo Apollo the Globe Device are either registered trademarks trademarks or se...

Page 2: ...ing ARC Ticket Stock 3100 8 Loading Blank Document Cards 9 Loading Blank Document Cards in Bin 2 9 Entering Number of Documents Loaded 9 Installing the Locking Cover 3000 10 To Install locking Cover 1...

Page 3: ...ctions External Components Figure 1 shows the external components of the ADP 3000 3 Number Is the 1 Power switch 2 Control Panel 3 Status Panel 4 Locking latch for printer side door 5 Door of secure t...

Page 4: ...ponents of the ADP 3000 4 4 3 2 1 5 Number Is the 1 Bin 1 for ARC ticket stock only 2 Bin 2 for Blank Document Cards only 3 Cover A for prefeed areas 4 Document advance knobs marked C and E 5 Floppy d...

Page 5: ...less than 50 documents When bin has less than 2 documents left light stays lit and alarm will beep Error Red Lit when any error occurs The error description also displays on the LCD Ready Green Lit w...

Page 6: ...1 Press MOD 2 Press 0 1 Press MOD 2 Press 2 Press C 1 Press MOD 2 Press 4 3 Press MOD 4 Press 1 Press MOD 2 Press TST Press ENT 1 Press power switch O to power off to power on To Adjust print alignme...

Page 7: ...s 9 3 Press 1 4 Press 1 Press MOD 2 Press 9 3 Press 6 4 Press 1 Press MOD 2 Press 9 3 Press 3 4 Press 1 Press MOD 2 Press 9 3 Press 4 4 Press 1 Press MOD 2 Press 9 3 Press 2 4 Press To Ready LED on on...

Page 8: ...e printed side is facing up 6 Hold coupon at an angle level with the prefeed slot The prefeed slot is located directly below the green release lever 7 Push coupon firmly into the prefeed slot until th...

Page 9: ...f more than 500 cards are loaded in the bin 4 Ensure that green side of stock is facing up and staple stub is to the left front of printer 5 Locate spring loaded bottom plate in Bin 2 e 6 Hold cards i...

Page 10: ...facing up and to the rear of printer Open side will be facing down toward printer 2 Turn key clockwise right until it stops 3 Line up the Locking Cover so the sides of cover slide along the guides on...

Page 11: ...from LCD display see above First digit is from bin location second digit is jam location 5 Remove jammed document s If jam is between numbered areas use the document advance knobs marked C and E to mo...

Page 12: ...pper left hand corner 3 Press diskette eject button located at the bottom right of the disk drive 4 Diskette will pop out of the disk drive 5 Pull diskette straight out of the disk drive 6 Close print...

Page 13: ...s in paper paths and under print head 3 Remove the jammed document 4 Close the side door 5 Press ENT to resume printing 6 Open the secure ticket bin and ensure the leading coupon is still inserted in...

Page 14: ...pletely empty 1 Load ARC ticket stock in Bin 1 See the Loading ARC Ticket Stock section on page 9 for instructions 1 Load Blank Document Cards in Bin 2 See the Loading Blank Document Cards section pag...

Page 15: ...front of the unit The dimensions of the combined printer and stand are 29H x 12W x 27D Stand weight 25 lbs The stand has a lockable storage door for 2 boxes same as the ADP2800 of 1 000 documents The...

Reviews: