background image

247

                                                                                                 
Gala hydromassage baths are manufactured using top quality materials. Before reaching its destination, 
each hydromassage bath has been subjected to strict technical and safety controls.

In order to ensure the correct operation of your hydromassage bath, please follow the instructions below:

1. 

The  installation  must  be  carried  out  by  qualified  personnel  and  in  accordance  with  the  current   

regulations of each country.

2. 

The bath’s protective elements must remain in place until the installation work has been  completed in 

order to prevent the risk of damage. The bath must be lifted by its frame, not dragged or lifted by its pipes.

3.

 Before installing the bath, check that no damage has occured during transportation or handling.

The hydromassage  bath  must  be installed  in accordance  with  the INSTALLATION  INSTRUCTIONS 
corresponding  to  each  model,  which  are  enclosed  with  the  bathtub,  paying  special  attention  to  the 
following points:

1. 

Before  installing  the  bath,  fill  it  with  water  and  check  that  there  are  no  leaks  and  that  all  the             

hydromassage bath elements operate correctly.

2. 

When applying silicone respect the indicated measures in order to avoid the small vibrations that  can 

cause the motor of the bathtub during the normal functioning

THE BATHTUB MAY BE FRONTED IN TWO DIFFERENT WAYS:

1- MASONRY WALL


.

BATHTUB INSTALLATION

 English

Installation manual  

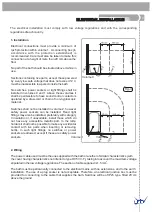
1. 

Take  care  to  leave  a  2-3  mm.  space 

between the bath and the wall in order to be 
able to seal the joint with silicone   (Fig. 1).

2.

 The  motor  area  must  be enclosed,  but 

accessible  for  possible  repairs.  A  grille 
must also be provided for ventilation of the 
hydromassage bath equipment.

3 mm

Fig-1

INTRODUCTION

Summary of Contents for LAGUNA

Page 1: ...English Installation manual Hydromassage bathtubs Manual de Instalación Bañeras de hidromasaje Español NEXUS LAGUNA MITTA ...

Page 2: ...2 ESPAÑOL Manual de instalación ENGLISH Installation manual Manual del Instalación Installation manual 7 3 INDICE CONTENTS ...

Page 3: ... hidromasaje se realizará de acuerdo con las INSTRUCCIONES DE MONTAJE de cada modelo que se adjunta con la bañera presentando especial atención a los siguientes puntos 1 Antes de proceder a su instalación llenar la bañera y comprobar que no existen fugas y que todos los elementos del hidromasaje funcionan correctamente 2 Cuando se proceda a siliconar la bañera respetar las cotas indicadas con el f...

Page 4: ...camente debe ser realizada por personal cualificado Servicio de Asistencia Técnica correspondiente 1 La instalación hidráulica debe cumplir la normativa vigente de cada país 2 Para la instalación de la grifería debe consultarse las INSTRUCCIONES DE MONTAJE específicas de cada bañera donde se aconseja la ubicación de la misma 3 El desagüe automático se conectará a la red de evacuación mediante un m...

Page 5: ... Igualmente se tendrá la precaución de realizar esta conexión situándola a 20 mm por encima del suelo Ninguna parte de la bañera debe de estar localizada por encima de la misma durante su uso Las partes que contengan elementos activos excepto los alimentados con muy baja tensión de seguridad que no exceda de 12 V deben ser inaccesibles para una persona dentro de la bañera En los volúmenes 0 y 1 no...

Page 6: ... el caso que se produjese un estirón el último cable en desconectarse de la regleta sería el de tierra no perdiéndose así la protección eléctrica en ningún momento 3 Protección La bañera dispone de una conexión equipotencial entre sus elementos metálicos Esta conexión situada en la placa de fijación del motor deberá conectarse a la instalación equipotencial del cuarto de 2 2 baño Este cable de con...

Page 7: ...ng The hydromassage bath must be installed in accordance with the INSTALLATION INSTRUCTIONS corresponding to each model which are enclosed with the bathtub paying special attention to the following points 1 Before installing the bath fill it with water and check that there are no leaks and that all the hydromassage bath elements operate correctly 2 When applying silicone respect the indicated meas...

Page 8: ... country 2 For the installation of taps please consult the INSTALLATION INSTRUCTIONS corresponding to each bath which advise on how best to position them 3 The automatic plug must be connected to the effusion system by means of an elastic joint The bath skirt will always be firmly fitted requiring a tool for its removal This tool should only be handled by qualified personnel corresponding Technica...

Page 9: ...are must also be taken to make this connection at a height of more than 20 mm above the floor No switches power sockets or light fittings shall be installed in volumes 0 and 1 Above these volumes it shall be permissible to have sound control contactors operated by a draw cord or chain of non hygroscopic material Switches shall not be installed in volume 2 however safety power sockets can be instal...

Page 10: ...ons The latter will be provided with an omnipolar disconnection and with an opening distance of at least 3 mm Both circuit breakers must be located outside the protection volumes of the bathroom If this cable is replaced remember that the yellow green earth wire must be at least 40 mm longer than the live and neutral wires This will ensure that if the cable is jerked the last wire to disconnect wi...

Page 11: ...24 15 NOTAS NOTES ...

Page 12: ...3 e mail general gala es Las medidas e información son a título orientativo y susceptibles de modificación sin previo aviso Este documento anula los anteriores All information and dimensions should be considered merely approximate and are subject to modification without notice This document cancels the former ones 24417 06 08 10 ...

Reviews: