background image

24

4. Adjustment Knob

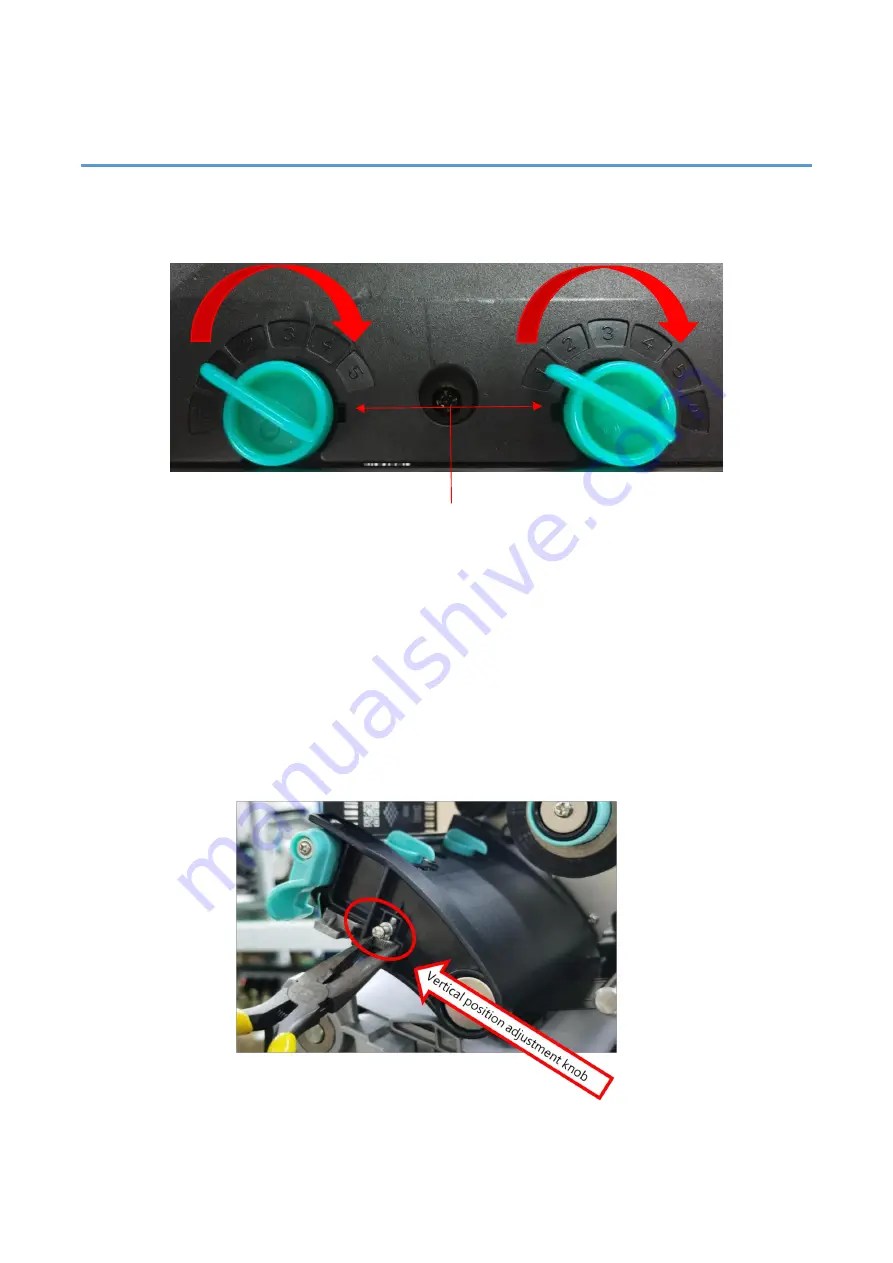
4.1 Print Head Pressure Adjustment Knob

The print head pressure adjustment knob has 5 levels of adjustment. Press down the adjustment
knob and turn the adjustment knob left and right to adjust the print head pressure.

Note: For the label width less than 2 inches, please fix the Print head pressure adjustment knob inside the edge
of the label as possible (prevent the unnecessary friction between the print head and platen roller).

4.2 Vertical position adjustment knob on the right side of the print

head

Because the printer’s paper alignment is to the left side of mechanism, different media widths require
the different pressure to print the label correctly. Therefore, it may require to adjust the vertical
position adjustment knob on the right side of the print head and get the best print quality.

Print Head Pressure Adjustment Knob

Summary of Contents for INTELLIGENT Series

Page 1: ...INTELLIGENT SERIES GI 2408T PLUS GI 3406T PLUS 4 Industrial Thermal Transfer Barcode Printer USER S MANUAL Ver 1 0 1...

Page 2: ...and can radiate radio frequency energy and if not installed and used in accordance with the manufacturer s instruction manual may cause harmful interference with radio communications Operation of thi...

Page 3: ...es 5 1 2 1 Printer Standard Features 5 1 2 2 Printer Optional Features 7 2 Operations Overview 8 2 1 Unpacking and Inspection 8 2 2 Printer Overview 9 2 2 1 Front View 9 2 2 2 Interior View 10 2 2 3 F...

Page 4: ...External Label Roll Mount Installation Option 23 4 Adjustment Knob 24 4 1 Print Head Pressure Adjustment Knob 24 4 2 Vertical position adjustment knob on the right side of the print head 24 4 3 Mecha...

Page 5: ...LUS GI 3407T PLUS Series Empower 32 7 1 Enter the Menu 32 7 2 Menu Overview 33 8 Communication interfaces 36 1 USB A Type 36 2 USB B Type 36 3 Serial Port 37 4 Ethernet Port 37 9 Troubleshooting 38 9...

Page 6: ...s built in Ethernet 1 or 3 USB hosts for keyboard and scanner connections USB 2 0 serial interfaces optional internal Bluetooth module and WIFI module Fonts and bar codes can be printed in four direct...

Page 7: ...16mm 40 2 286mm 90 1 016mm 40 CPU 600 MHZ 32 bits ARM9 Memory RAM 128 MB SDRAM 256 MB SDRAM Memory ROM 128 MB Flash Memory 256 MB Flash Memory Interface USB 2 0 High Speed 480Mbps USB Host 2 0 for sca...

Page 8: ...sy PostCode Telepen 2D Barcode QR Code Micro QR Code PDF417 Micro PDF417 MaxiCode Aztec Code Data Matrix Rotation Font and barcode support 0 90 180 270 degree Printer language Compatible to TSPL EPL Z...

Page 9: ...for the linerless cutter all regular heavy duty care label cutters DO NOT cut on media with glue Safety regulation FCC Class A Voltage specification is 110V 200V is not supported CE Class A CCC BIS C...

Page 10: ...ing materials in case you need to reship the printer Unpacking the printer the following items are included in the carton One printer unit One quick installation guide One power cord One Windows label...

Page 11: ...US and GI 3406T PLUS Series Empower GI 2410T PLUS GI 3407T PLUS Series 1 Media view window 2 Printer cover handle 3 Paper exit chute 4 Front panel buttons and indicator 1 Media view window 2 Printer c...

Page 12: ...4 Ribbon supply spindle 5 Label roll guard 6 Label supply spindle 7 Ribbon sensor 8 Ribbon guide bar 9 Damper 10 Backing paper rewind spindle 11 Vertical position adjustment knob on the right side of...

Page 13: ...2 2 3 Front View Standard GI 2408T PLUS and GI 3406T PLUS Series Contains LED indicator s function introduction LED Indicator Event Description 1 ONLINE 2 RIBBON 3 ERROR 4 Comm 5 PAUSE 6 FEED 1 3 5 4...

Page 14: ...label gap black can t be found a beep sound will be made and Red ERROR Blue ONLINE flash Cutter error When cutter can t be found a beep sound will be made and Blue ONLINE Red ERROR Both flash alternat...

Page 15: ...s LCD monitor operation introduction Printer status FE Ver printer firmware version Emulation Simulation instruction category ETH IP Ethernet IP address WIFI IP Wi Fi IP address time dat e Printer mod...

Page 16: ...e machine will spit a sheet of paper PAUSE button In the printing state press this button the machine will stop immediately Main page icons Indicated icon Indication Ethernet is connected USB HID is c...

Page 17: ...Rear view All series 1 2 3 4 5 6 7 1 Ethernet 10 100Mbps interface 2 RS 232 interface 3 USB interface 4 USB host For USB keyboard or scanner 5 Power switch 6 Power cord socket 7 External label entran...

Page 18: ...USB cable 4 Plug the power cord into the AC power cord socket at the rear of the printer and then plug the power cord into a properly grounded power outlet NOTE Please switch OFF printer power prior...

Page 19: ...I 2408T PLUS GI 2410T PLUS 300 dpi please install GI 3406T PLUS GI 3407T PLUS 1 Read the license agreement click I accept the terms in license agreement and click Next 2 Select a installation director...

Page 20: ...6 Select printer model name click to install and click Next 7 Please use a USB cable to connect the printer to the computer click the corresponding USB interface and click Next 8 Change the printer n...

Page 21: ...s b Check from Control Panel Devices and Printers 12 Users can change printer interface through the following ways a In Windows 10 Windows Settings Printers and Scanners Devices select the correspondi...

Page 22: ...bbon supply spindle and ribbon rewind spindle 3 Pull the Print head release lever to open print head mechanism 4 Thread ribbon below the ribbon guide bar through ribbon sensor slot See the Ribbon Load...

Page 23: ...izontally to the end of label spindle then flip down the label roll guard 2 Place the media roll on the label supply spindle and use label roll guard to fix it 3 Pull the Print head release lever to o...

Page 24: ...x the media position 6 Close the print head mechanism on both sides and make sure the latches are engaged securely Set media sensor type and calibrate the selected sensor 3 4 2 Media loading path Mode...

Page 25: ...3 4 3 External Label Roll Mount Installation Option 1 Attach the external stent on the bottom of the printer 2 Insert a label spindle into a paper roll Then install it on the external paper roll moun...

Page 26: ...t knob inside the edge of the label as possible prevent the unnecessary friction between the print head and platen roller 4 2 Vertical position adjustment knob on the right side of the print head Beca...

Page 27: ...ust until the pressure on both sides are equal The left side of the label is unclear The right side of the label is unclear If the right side of label is unclear it means the pressure on the left side...

Page 28: ...w the instructions below to adjust the printer parts Adjustabl e Printer Parts Print Head Pressure Adjustment Knob has 5 positions for adjustment The vertical position adjustment knob on the right sid...

Page 29: ...the print head pressure adjustment knob per 1 level again to check if the wrinkle is gone If the wrinkle on the label starts from the lower right side to upper left side please do following adjustmen...

Page 30: ...ton to print Print next When the button Demand function is activated the printer will stop after printing and wait for the user to press this button before printing the next label Pause button Print m...

Page 31: ...aded with paper and close the printer cover C Press and hold the PAUSE and FEED buttons at the same time for two seconds then turn on the printer s power When the online Blue and the error Red are on...

Page 32: ...r Utility 1 Please mouse over Printer Utility icon Printer Utility exe image Double click left mouse button 2 After opening the main screen you can see the following function items NOTE If you need mo...

Page 33: ...n and close the printer general settings screen 2 Click the Load Button to bring out all printer general setting information through the selected communication interface Click the Set button to write...

Page 34: ...32 7 LCD Menu Function for GI 2410T PLUS GI 3407T PLUS Series Empower 7 1 Enter the Menu...

Page 35: ...r the menu You can easy to set the settings of the printer without connecting the computer Please refer to below for more details Button icon function This Setting option can set the printer function...

Page 36: ...34 This Interface option can set the interface...

Page 37: ...35 This System option can set the system parameters This Tools option can set the printer operation tool This Information option can inquire about the printer information...

Page 38: ...36 8 Communication interfaces 1 USB A Type 2 USB B Type Pin No Pin Name 1 VBUS 2 D 3 D 4 GND Pin No Pin Name 1 VBUS 2 D 3 D 4 GND...

Page 39: ...me Description 1 2 TXD Transmit Data 3 RXD Receive Data 4 Connect to Pin6 Equipment to Judge 5 GND System Ground 6 Connect to Pin4 Equipment to Judge 7 CTS Clear to Send 8 RTS Request to Send 9 5VDC O...

Page 40: ...bon to reinstall Out of paper Out of paper The paper installation path is incorrect Gap black mark sensor detection is incorrect Install new paper Follow the steps for installing the paper to reinstal...

Page 41: ...k sensor by blower The printing position of small label is incorrect Media sensor sensitivity is not set properly Label size is incorrect The vertical offset setting in the driver is incorrect Calibra...

Page 42: ...y with 100 ethanol and a cotton swab or lint free cloth Tear Bar Peel Bar Use the lint free cloth with 100 ethanol to wipe it Sensor Compressed air or vacuum Exterior Wipe it with water dampened cloth...

Page 43: ...41 11 Revise History Date Version Content 2022 7 21 Ver 1 0 1 Modify GI 2408T PLUS GI 3406T PLUS rename GI 2410T PLUS GI 3407T PLUS...

Reviews: