background image

47

English

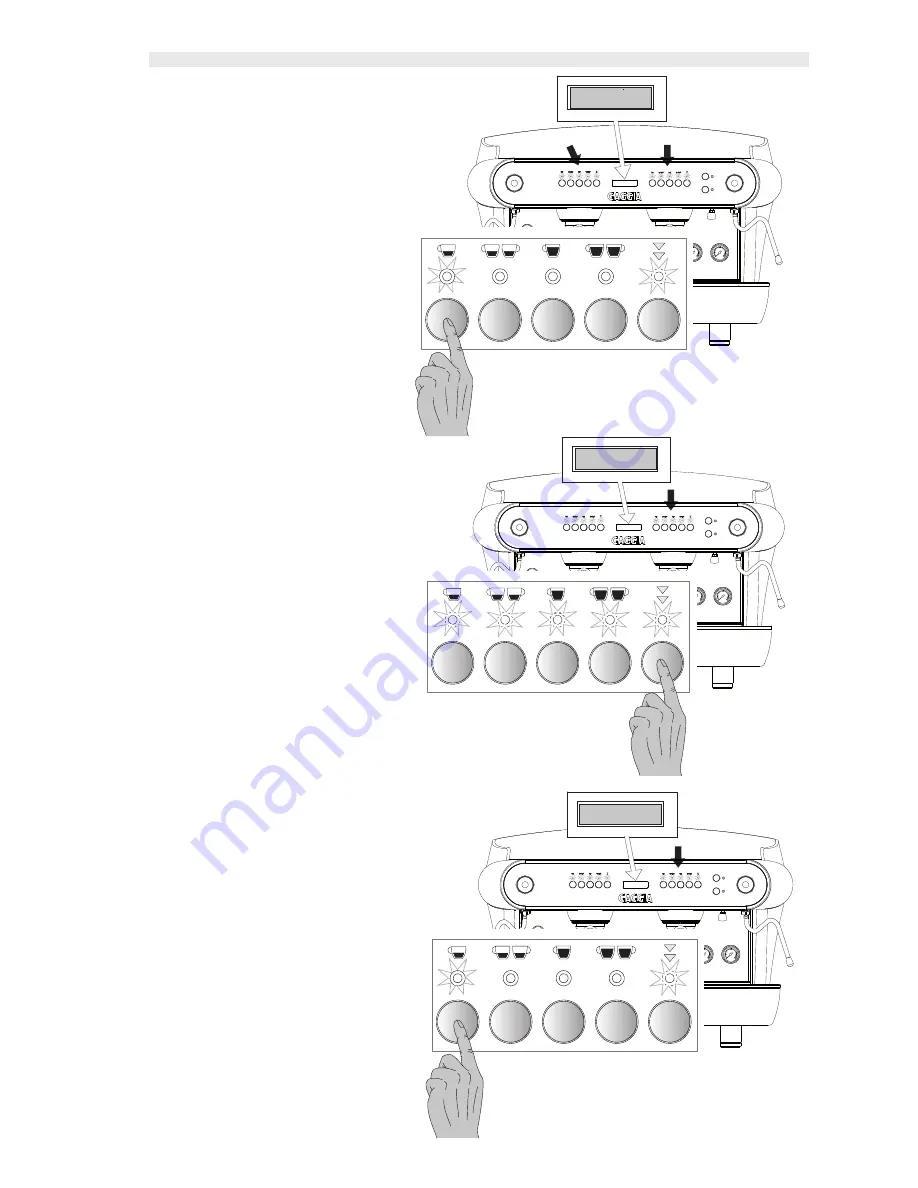
T1

Espresso

Programming

Delivery  starts  after  key  T1  has  been 
pressed, then press key T1 again after the 
desired coffee dose has been reached, or 
any one of the other keys on the keyboard 
of the unit that is being programmed to 
interrupt  the  coffee  dose  delivery.    The 
new value of the dose expressed in im-
pulses is stored on the EPROM with this 
procedure.  Both the solenoid valve and 
the  pump  are  de-energised,  interrupting 
the product delivery.

Repeat  the  same  operations  performed 
using the key T1 in the same sequence to 
proceed with a new programmed setting 
for the other coffee doses T2-T3-T4, (pro-
viding  the  programming  time-out  of  30 
seconds has not been exceeded).

Press key T5 again to exit the program-
ming phase immediately.

WARNING!   

The  dosage  procedure, 

however  enables  this  function  during 
the  programming  phase  if  the  “PRE-
INFUSION”  function  is  active  (refer  to 
paragraph 7.5).  Therefore, wait until the 
pre-infusion phase has terminated before 
interrupting the delivery in progress.

NOTE:

  the  operation  of  the  other  units 

and tea dispensing are disabled during 
the programming phase of a given unit.

Press  the  specific  programming  key  for 
each  unit  to  programme  the  other  units, 
and  proceed  with  the  same  operations 
performed  on  unit  1.    In  this  case  any 
changes in the dose become applicable 
to the single unit that is being used.

T5

Programming

Selection in 30secs.

T1

Espresso

Gr. 2 Programming

The LED corresponding to key T5 remains 
energised  on  all  the  keyboards  and  in 
addition  also  the  LED  that  refers  to  the 
dose  being  programmed  is  also  energi-
sed (on all the keyboards). The solenoid 
valve and the pump are energised in this 
phase, and remain energised for the entire 
duration of the coffee dose programming 
procedure.

Note: 

the programming mode is disabled 

automatically if none of the dose keys are 
pressed within 30 seconds.

Summary of Contents for Deco

Page 1: ...TENANCE MODE D EMPLOI ET D ENTRETIEN BETRIEB UND WARTUNG USO Y MANTENIMIENTO MANUALE DI MANUTENZIONE PER L ASSISTENZA TECNICA TECNICHAL SERVICE MANUAL SERVICE UND REPARATURANLEITUNG MANUEL D ASSISTANCE TECHNIQUE MANUAL DE ASISTENCIA TÉCNICA ...

Page 2: ...lettromagnetica EMC Parte 4 Tecniche di prova e misura Sezione 6 Immunità ai disturbi condotti indotti da campi a radiofrequenza EN61000 4 6 Compatibilità elettromagnetica EMC Parte 4 Tecniche di prova e misura Sezione 11 Prove di immunità a cadute di tensione microint e variazioni di tensione EN61000 4 11 Safety of household and electrical appliances General requirements EN 60335 1 1 2002 A1 2004...

Page 3: ...da installare li può rilevare dalla targhetta dati posta sull apparecchiatura stessa Esempio Ci congratuliamo con lei per l acquisto di questa macchina per caffè espresso e La ringraziamo per la fiducia e disponibilità che ci ha dimostrato Prima di mettere in funzione la macchina Le consigliamo di leggere attentamente le istruzioni per l uso che Le spiegano come utilizzarla pulirla e mantenerla in...

Page 4: ...ß Sie lange und mit Zufriedenheit die Qualität unserer Maschine schätzen werden können Wir bitten Sie aufmerksam die im Handbuch enthaltenen Hinweise bezüglich der richtigen Verwendung unseres Produktes in Übereinstimmung mit den wesentlichen Sicherheitsvorschriften zu lesen Cher client Nous vous remercions de la confiance que vous nous avez manifestée en achetant notre produit Si vous suivez atte...

Page 5: ... Achtung Besonders wichtige und oder gefährliche Arbeitsgänge Attention Opérations particulièrement importantes et ou dangereuses Atención Operaciones particularmente importantes y o peligrosas Importante Interventi necessari al buon funzionamento Important Operations essential to guarantee efficient function Wichtig Für eine gute Funktionsweise erforderliche Maßnahmen Important Interventions néce...

Page 6: ...36 English ITALIANO 8 35 ENGLISH 36 63 DEUTSCH 64 91 FRANÇAIS 92 119 ESPAÑOL 120 147 ...

Page 7: ...MMING MODEL D INTRODUCTION 53 9 1 Language 53 9 2 Name 53 9 3 Telephone Support 54 9 4 Keyboard Type 54 9 5 Dose Programming 54 9 6 Continuous button 54 9 7 Tea mixed Hot Water 54 9 8 Pre infusion 54 9 8 1 Pre infusion parameters 54 9 9 Sensitivity 55 9 10 Maintenance Cycles 55 9 11 Temperature 55 9 12 Number of Units 55 9 13 Units temperature 55 9 14 PID type thermostat control 55 9 15 PID contro...

Page 8: ...ata plate This manual reflects the technical features at the date of preparation the manufacturer reserves the right to upgrade the production and the subsequent manuals without being under an obligation to also update previous versions The manufacturer accepts no liability in the following ca ses improper or incorrect use of the coffee machine use that does not comply with the information express...

Page 9: ...nt any possible hazard Do not expose the machine to weathering sun rain etc Prolonged inactivity machine not operating at a tempera ture of less than 0 C zero degrees centigrade can cause serious damage or failure of the pipes and of the boiler drain the hydraulic circuit completely before every extended period of inactivity Removing the protection and or safety devices foreseen on the machine is ...

Page 10: ...d by boiler heating resistor 240 415 V 3 N W 4760 4760 5950 5950 7140 230 400 V 3 N W 4370 4370 5465 5465 6555 Power absorbed by boiler resistor ECO max 240 415 V 3 N W 3170 3170 3970 3970 4750 230 400 V 3 N W 2910 2910 3640 3640 4370 Pump motor W 165 165 165 165 165 UL CSA pump motor W 330 330 330 330 Total power absorbed 240 415 V 3 N W 5400 5400 6760 6760 8050 230 400 V 3 N W 5000 5000 6000 600...

Page 11: ...at there is a clearance of at least 30 cm around the machine Then proceed with the installation following the succession of operations as described below N B It is advisable that the higher surface of the equipment is at least at 1 5 m from the ground level N B ONLY FOR NSF HIGH RAISED GROUPS VERSION Replace the appliance feet with the ones supplied fig 2a Warning Water and waste connections shall...

Page 12: ...appli cable regulations Verify that the power supply cable is undamaged and com plies with National and European safety standards The user is responsible for supplying electric power to the machine and protecting the power line using an adequate safety disconnecting switch cut out switch in compliance with the regulations applicable in the country where the machine is to be installed Connect the p...

Page 13: ...t is energised when in the OFF mode All the functions are disabled except the technical parameters programmes The display will indicate the current time in hours and mi nutes fig 4 IMPORTANT press key T5 with key T3 of unit 1 to change from ON mode to OFF mode 7 0 2 ON MODE Model D Press key T3 fig 4 01 to change from OFF mode to ON mode Model D only hh mm OFF fig 4 Model D 7 0 3 ON MODE Model E N...

Page 14: ...ncrease the pump pressure and anticlockwise to decrease the pressure Check the pump calibration after the adjustment has been completed by dispensing one or more doses of coffee Z Pump pressure regulating screw Warning The filter holder bowl may not be aligned perpendi cular to the machine when the machine is new as indicated in the next figure however this does not compromise the machine s correc...

Page 15: ...ble coffee brewings The figure on the side shows the various possible distances from the cup holder grill H in relation to the different types of spouts assembled on the filter holder 7 5 High raised group spouts supplied with the machine 2 types of spouts are supplied with the machine The figure on the side shows the va rious possible distances in relation to the different types of spouts and cup...

Page 16: ... whereas by pressing key T5 of another unit only the unit that has been selected is programmed WARNING The settings on unit 1 using the first keyboard are automatically copied also on all the other units Press the key corresponding to the dose to be programmed within 30 seconds programming time out for example key T1 T5 Programming Selection in 30secs T1 Single espresso coffee T2 Double espresso c...

Page 17: ...ming phase if the PRE INFUSION function is active refer to paragraph 7 5 Therefore wait until the pre infusion phase has terminated before interrupting the delivery in progress NOTE the operation of the other units and tea dispensing are disabled during the programming phase of a given unit Press the specific programming key for each unit to programme the other units and proceed with the same oper...

Page 18: ... illuminated Press key T6 Tea 1 or key T7 Tea 2 within 30 seconds programming time out The dose of tea water is delivered in this way Press key T6 or key T7 again after the de sired dose has been obtained to interrupt the water delivery In this way the new delivery time for the Tea water is stored in the memory Press key T5 again to switch the machine to standby mode in order to exit the pro gramm...

Page 19: ...ne 8 4 Continuous coffee dose Press key T5 on the keyboard correspon ding to the unit to be used to obtain con tinuous delivery of the coffee dose The LED corresponding to key T5 remains ON all the time the coffee is delivered while the other Leds will be off IMPORTANT Avoid pressing the button for more than 5 seconds because the machine will switch to programming mode in this case The coffee will...

Page 20: ... distribution is not volumetric Contiuno Tea T8 T9 8 5 Hot water deliveries PThe corresponding delivery solenoid val ves are activated for the time necessary to reach the quantity of product programmed previously timer control by pressing the corresponding key T6 or key T7 The LED corresponding to the TEA dose key selected remains ON for the duration of the hot water delivery time while the other ...

Page 21: ...ess the setting sub menu start will appear on the display This function will be excluded by selecting NO the times setting function will be accessed by selecting YES and by pressing key T5 The display will show the following T3 Start ON OFF hh1 mm1 hh2 mm2 where ON start time OFF stop time hh1 mm1 start time hour and minute hh2 mm2 stop time hour and minute Press key T1 or key T2 to change the par...

Page 22: ...s displayed and the totals for the single doses of each unit are shown Where y represents the unit zzzzzz is the type of coffee xxxx is the number of coffees distributed Press key T5 to review all the units and the types of coffee until exiting the user programming phase SPECIAL FUNCTIONS This machine has a number of special functions PRE INFUSION MIXED TEA which we will describe be low Pre infusi...

Page 23: ...ed key T3 ENTER Confirmation function of a number of operations during the programming procedure key T5 MENU Selection function choice of parameter to be program med NOTE key T1 or key T2 have a fast scrolling function The increase or decrease action is more rapid if one of these keys is pressed down when used The first TECHNICAL parameter is shown on the display when the TECHNICAL PROGRAMMING fun...

Page 24: ...ixed water XX 9 3 TELEPHONE SUPPORT A telephone number can be entered which is displayed in the case of certain alarms The display shows the following where XXXXXXXX represent the digits composing the tele phone number Press key T5 to proceed to the next menu 9 4 KEYBOARD TYPE The type of PUSHBUTTON STATION used for dosing can be set and this is applicable for all pushbutton stations The machine i...

Page 25: ...TURE This function enables the temperature to be displayed ex pressed in C or F The display shows the following where X may be C or F Sensitivity XXXXX Mainten cycles XXXXXX Temperature X 9 12 NUMBER OF UNITS This function enables the number of units comprising the machine to be set The display shows the following where X is a value that can be selected from 1 4 Press key T1 or key T2 if the param...

Page 26: ...play that will mean that the number of litres to be treated has been exceeded and therefore the water softener needs to be replaced refer to the ALARMS paragraph The TECHNICAL PROGRAMMING phase can be exited by pressing key T5 again PID control X C Filling Time Out XXX Water Filter XXX Note once the TECHNICAL PROGRAMMING mode has been accessed this mode can be exceeded by scrolling through all the...

Page 27: ...Ω Medium sensitivity 400KΩ High sensitivity 1MΩ Press keys T8 if the parameters need to be changed Pressing key T9 enables the next setting to be accessed The machine is pre set to a MEDIUM sensitivity level which covers the majority of uses Language XXXXXXXX mixed water XX Sensibilità XXXXX 10 4 MAINTENANCE CYCLES This function enables the number of cycles which can be performed to be set dispens...

Page 28: ...table value ranges between 10 250 in 1 sec steps Unit 2 temp XXX C kP kI kD XX X Y YY ZZ Z PID control X C Filling Time Out XXX Press keys T8 if the parameter needs to be changed Pressing key T9 enables the next setting to be accessed WARNING the machine is pre set with a value equal to 120 sec A recommendation is made not to exceed this value when the settings are changed because the pump could o...

Page 29: ...ill be disabled if the filling phase remains energised continuously for a time that exceeds the time out value set in the TECHNICAL PROGRAMMING phase The display indicates The alarm conditions are reset by switching the machine Off and then On Boiler Filling Time Out Alarm NOTE The LEDs in the pushbutton station in the case of Model D start to flash intermittently to give the user a visual warning...

Page 30: ...has been interrupted The alarm disappears when the temperature returns to ac ceptable values or the probe is replaced if broken The alarm does not involve blocking the dispensing unit however the coffee prepared will be cold Avoid using the unit when the probe alarm has been trig gered and a recommendation is made to call the technical support immediately Probe Alarm Units X 13 RESETTING DOSE TOTA...

Page 31: ...r pipe E Move levers C and D from left to right as indicated in fig 8 2 remove the cover by unscrewing knob G introduce 1 5 kg of sodium chloride large grade kitchen salt into the 8 litres type water softener and 2 kg into the 12 litres type water softener Replace the cover and return lever C from right and left as indicated in fig 8 3 allow the salt water to discharge from pipe F until the water ...

Page 32: ... normal filter and complete a number of dispensing operations using only water Prepare a coffee to eliminate unpleasant tastes The filters C and filter holders D should be rinsed daily in hot water or preferably allow them to soak overnight in water that is initially hot to dissolve the coffee fat Leaving the filter holder bowl with the coffee grounds in the unit during the working day is recommen...

Page 33: ... in the boiler 1 the motor driven pump remains engaged 1 contact specialized personnel 2 perforated exchanger 2 contact specialized personnel 3 automatic charge solenoid valve blocked 3 contact specialized personnel Signs of water leakage on bench 1 dirty drain tray 1 clean the try 2 drainage pipe clogged or detached 2 replace the drainage pipe 3 other leakage 3 contact specialized personnel Wet c...

Reviews: