


22
en
Home Connect
Setting up the Home Connect app
Note:
You require a mobile device with the latest
version of the relevant operating system.
1
On your mobile device go to the App Store (Apple
devices) or to the Google Play Store (Android
devices).
2
Enter "Home Connect" in the search field.
3
Select the Home Connect app and install on your
mobile device.
4
Start the app and create your Home Connect login
details. The app will guide you through the
registration process. Make a note of your e-mail
address and password.
Opening or closing the Home Connect
settings menu
To connect your appliance to Home Connect or run Wi-
Fi connection settings, you must open the Home
Connect settings menu on your appliance.
Note:
It is important to carry out the following operating
steps without interruption, one after the other.
1
Push in any control knob and turn one notch anti-
clockwise to the
Ž
position. Keep the control
knob pressed in.
2
Turn the control knob two notches clockwise to
position
ª
or
¹
. Keep the control knob pressed
in.
3
Turn the control knob one notch anti-clockwise to
position
0
.
Note:
If you select settings in the Home Connect
settings menu, you must exit the Home Connect menu in
the same way to save the settings.
Displays on the illuminated ring around the control knob
▯
While you are in the Home Connect menu, the
illuminated ring around the control knob lights up
blue.
▯
While the appliance is establishing a connection
with the Wi-Fi, the illuminated ring around the
control knob flashes blue.
▯
If the appliance has established a connection with
the Wi-Fi, the illuminated ring around the control
knob lights up green.
▯
If the appliance was not able to establish a
connection with the Wi-Fi, the illuminated ring
around the control knob lights up red. Start the
connection process again.
Overview of the Home Connect
settings menu
▯
Manually logging in to the home network (Wi-Fi): To
log in to the home network (Wi-Fi) manually, you
require the network name (SSID) and password
(key) for your home network.
~
"Manual
registration in the home network" on page 23
▯
Log in to the home network (Wi-Fi) with a WPS-
enabled router.
~
"Logging in to your home
network automatically (WPS)" on page 24
▯
Direct connection to a compatible extractor hood.
~
"Connecting appliances directly" on page 27
W
PLQ
66,'
3DVVZRUG
W
PLQ
:36
W
V
23
Home Connect
en
▯
Switch Wi-Fi off and on, e. g. while on holiday.
~
"Switching Wi-Fi off and on" on page 25
▯
Reset the Home Connect connections, e. g. for a
new router, changing to a new Internet service
provider.
~
"Resetting the Home Connect
connections" on page 25
Connecting the appliance to your
home network (Wi-Fi)
1
Carry out the following operating steps one after
the other without interruption.
2
Open the Home Connect settings menu.
~
"Opening or closing the Home Connect
settings menu" on page 22
The illuminated ring on the control knob lights up
blue.
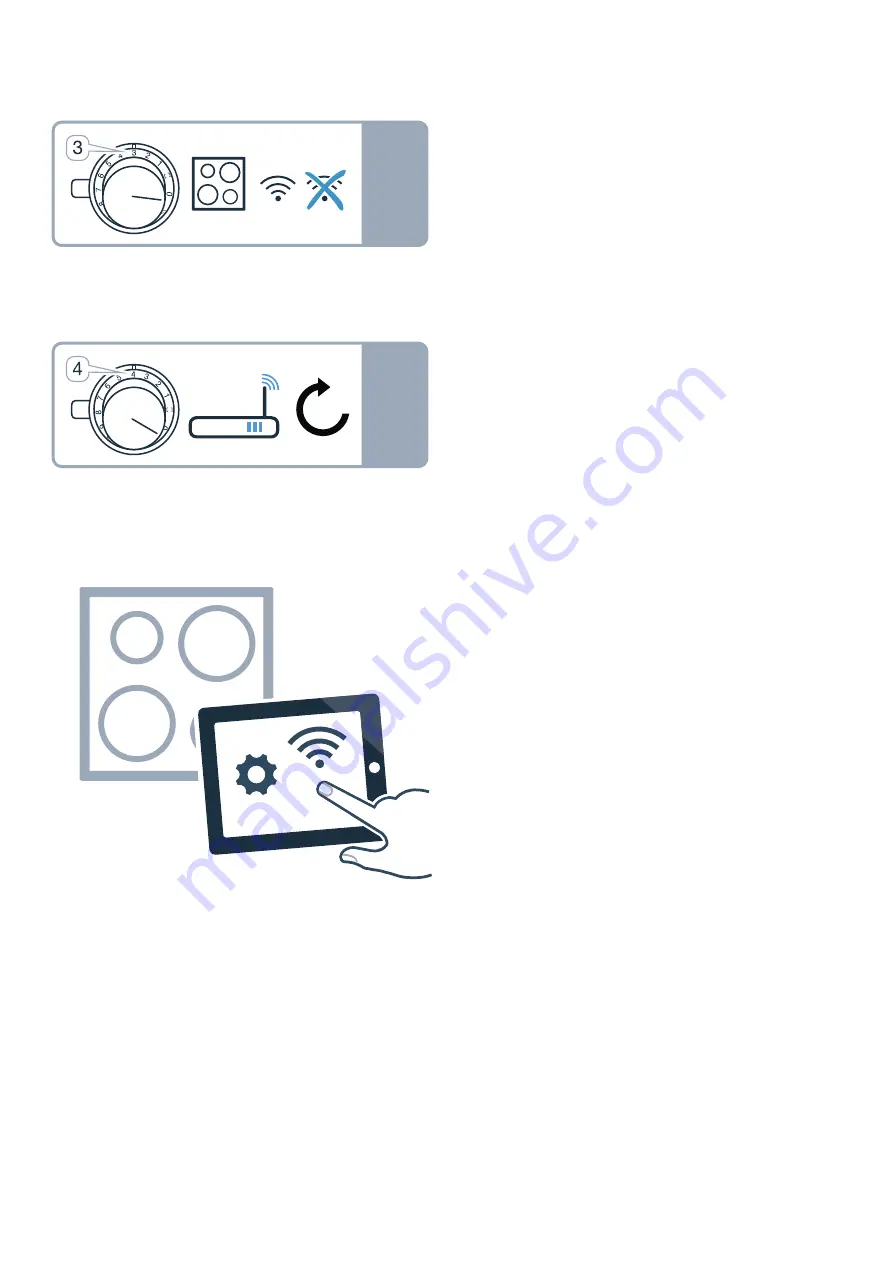
Manual registration in the home
network
Note: To log in to the home network (Wi-Fi) manually,
you require the network name (SSID) and password
(key) for your home network.
1
Turn the control knob clockwise to position
ª
or
¹
. After around 5
seconds, the illuminated ring
around the control knob flashes blue and yellow
alternately.
’‹¯ ƒ
is displayed on the control
panel.
The appliance is now in manual mode.
2
Switch to the general settings menu of your mobile
device and call up the Wi-Fi settings.
On your mobile device, the "HomeConnect" Wi-Fi
connection is available for around 20
minutes.
3
Connect to the "HomeConnect" Wi-Fi connection
(password: "HomeConnect").
4
Launch the Home Connect app on your mobile
device and follow the instructions for network login.
Enter the password (key) of the home network.
Following successful connection to the router, the
illuminated ring around the control knob lights up
green for around 3
seconds.
˜‘‚
and
Ö
are
displayed on the control panel.
5
The illuminated ring around the control knob
flashes blue and white alternately. The connection
to the mobile device is being established.
The appliance is available in the app on the mobile
device once the illuminated ring around the control
knob lights up green. If the illuminated ring around
the control knob lights up red, it was not possible to
establish a connection.
6
To save the connection, exit the Home Connect
settings menu.
~
"Opening or closing the Home
Connect settings menu" on page 22
Connection to the router unsuccessful
1
If a connection could not be established, check the
router and turn the control knob to another position
and then back to position
ª
or
¹
.
The illuminated ring on the control knob lights up
blue. After around 5
seconds, the illuminated ring
around the control knob flashes blue and yellow.
’‹¯
ƒ
is displayed on the control panel.
2
Switch to the general settings menu of your mobile
device and start the Wi-Fi connection again.
3
Check that the password has been entered
correctly.
W
V
W
V
Summary of Contents for VI 422 10
Page 1: ...Instruction manual VI 422 10 VI 422 11 Hob ...
Page 2: ...2 ...
Page 34: ......
Page 35: ......