background image

7

Switching on

• Open the appliance cover. Fit the frying basket

holder into the two clips on the edge of the basin
and secure the holder in the clamp on the cover. 

• Fill the frying basin either with 3 - 3.5 l of heat-

resistant oil (e.g. peanut oil, palm oil or special
deep frying oil) or 2.5 - 3 kg of heat-resistant fat
(e.g. coconut fat, lard or special frying fat). Cut the
fat into approx. 250 g pieces if necessary and 
place these evenly in the frying basin. The fat
should be room or fridge temperature, but on no
account frozen.

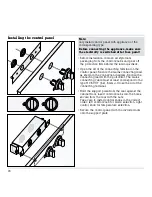
• Press down the left control knob and turn it to the

oil or fat setting required. 

• Press down the right control knob and turn it to the

required temperature between 135 and 190 °C. 

• The luminous disc behind the control knob 

flashes, while the appliance is heating up. When
the required temperature is reached, the luminous
disc lights constantly.  

• When using fat, although the required tempera-

ture has been reached, some fat may remain hard
in the cold oil zone. This does not affect the frying
result. You can start frying, when the luminous disc
behind the right control knob lights constantly. 

• Fill the frying basket at the side of the appliance

and insert the basket into the hot oil.

• When the food is ready (see settings table), take

out the deep frying basket, shake it lightly and
hang it on the frying basket holder. This will make
sure that the oil can drip off faster. Use the upper
three runs of the frying basket holder. When using
two frying baskets simultaneously, hang them side
by side (only the two top runs) or one above the
other onto the frying basket holder.   

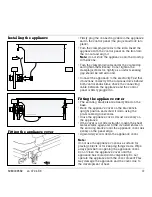
Important: Never switch on the deep fryer
empty. 

The oil/fat level in the frying basin should

always be between the two marking lines. 

Switching on

cleaning setting fat setting

oil setting

Summary of Contents for VF 411

Page 1: ...Operation and assembly instructions VF 411 Electric deep fryer...

Page 2: ...f Page 8 Residual heat display Page 8 Holiday safeguard Page 8 Draining the deep frying oil or fat Page 8 Visual signals Page 9 4 Practical tips Page 10 5 Settings table Page 11 6 Cleaning and care Pa...

Page 3: ...will serve to ensure your personal safety and the lasting value of your appliance You will find notes on Page 4 that you ought to observe before operating the appliance for the first time The chapters...

Page 4: ...adjacent to a hob ventilator If a fire should break out switch off the elec tricity at fuse point and close the appliance cover Smother burning fat or oil Never extinguish a deep fryer with water Swit...

Page 5: ...at tends to foam over easily and has a lower ignition temperature Built in overheating protection prevents overheating of the appliance and of surrounding kitchen furniture In the event of malfunction...

Page 6: ...Minimum maximum level marker 5 Foaming edge 6 Heating element 3 000 W 7 Control knob to select fat oil cleaning setting 8 Temperature control knob You can order the following special accessories FK 0...

Page 7: ...f food which break away during frying fall through the basket and sink to this cold zone The lower temperature in this zone prevents the oil breaking down and considerably prolongs the time for which...

Page 8: ...hen the required temperature is reached the luminous disc lights constantly When using fat although the required tempera ture has been reached some fat may remain hard in the cold oil zone This does n...

Page 9: ...the deep fryer can be switched on again as normal Draining the deep frying oil or fat Drain used oil only after the residual heat display has gone off Avoid contact with the oil or fat Use a temperat...

Page 10: ...mpty any or not enough fat or oil Oil or overheating setting was used with fat protection Turn right control knob to 0 and let the appliance cool down fast flashing of holiday safeguard The appliance...

Page 11: ...not to be confused with water steam which occurs when frying moist food After every use of the deep fryer remove any resulting remainders of food e g bread crumbs from the oil or fat If you would like...

Page 12: ...d Viennese style 170 175 2 5 6 Cordon bleu pork 175 2 6 7 Chicken legs breaded 160 4 25 30 Turn frequently Pieces of ham in sparkling wine dough 175 150 g 3 4 Fish and seafood Fritto Misto 155 160 2 3...

Page 13: ...10 litres to collect the water If you should wish to repeat the operation due to heavy soiling refill the basin with clean water and turn the right control knob to the 0 position and then back to the...

Page 14: ...Specify the appliance type The serial number and type of the appliance can be found on the quality control slip which is included with these instructions Repairs may only be carried out by authorised...

Page 15: ...ectrical appliances in the proximity of cooking surfaces make sure that connecting cables do not come into contact with hot cooking surfaces The installation technician is responsible for the correct...

Page 16: ...l recesses as long as a minimum clearance of 50 mm is kept to between the appliances As shown in the installation sketch drill the 35 mm holes to secure the control knobs in the cabinet front If the c...

Page 17: ...pond to the type H 05 VV F 3 x 1 5 mm2 Close the lid of the connecting terminal Hold the support plate from the rear against the cabinet front insert control knobs into the holes secure from the rear...

Page 18: ...e control panel is firmly plugged in Fitting the appliance cover The securing brackets are already fitted on the base Place the appliance cover on the brackets in upright position and screw it down us...

Reviews: