background image

22

Vacuuming in the bag

Vacuum the food in a suitable vacuuming bag in order to 
preserve the food for longer, to marinate it or to prepare 
it for sous-vide cooking.

Suitable vacuuming bag

Use the original vacuuming bags that are enclosed with 
the appliance or can be ordered as accessories. These 
bags are suitable for a temperature range of -40 °C –
 100 °C. This means that they can be used for storing 
food at low temperatures and also for cooking the 
vacuum-sealed food that is contained in the bags. The 
optimum heat-sealing time for this bag is level 2. The 
bags are suitable for use in the microwave. Pierce the 
bag before you heat it up in the microwave.

Only use bags that are suitable for vacuuming food. 
Commercially available products are different when it 
comes to the quality of the food, temperature 
resistance, material and surface. Ensure that the bag is 
used only for the purpose for which it is intended.

The heat-sealing time for the vacuuming bag always 
depends on the material from which it is made. In most 
cases, heat-sealing level 1 is sufficient for heat-sealing 
thin bags. Vacuuming bags that are made from a thicker 
material require a longer heat-sealing time at heat-
sealing level 2 or higher.

The length of the heat-sealing column limits the size of 
the vacuuming bag that can be used. You should 
therefore only use bags with a maximum width of 
240 mm.

Filling the bag

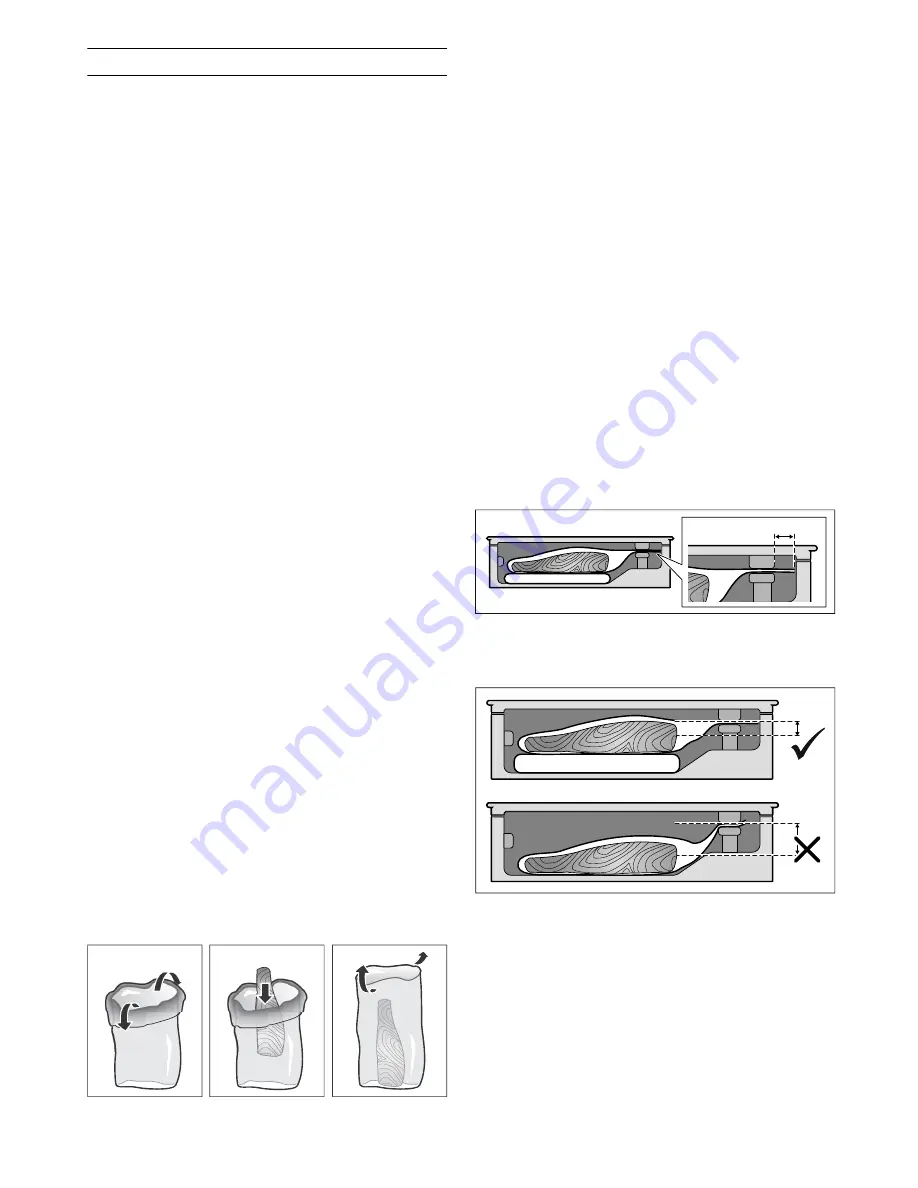
Where possible, position the items of food in the 
vacuum-sealing bag next to each other and not on top of 
each other.

To ensure that the sealing seam is perfect, it is 
important that the edge of the bag is clean and dry. To 
ensure that the seam is perfect during the heat-sealing 
process, it is important that there is no food residue 
around the seam on the edge of the bag. Before you fill 
the bag, you should therefore fold over its edge by 
approx. 3 cm. Unfold the edge again once the bag has 
been filled.

To ensure that you can keep track of your bags and the 
food that is vacuumed within them, we recommend that 
you make a note on the bag of the date of the vacuuming 
along with the contents.

Proceed as follows:

1

Open the glass lid.

2

Place the vacuuming bag in the compartment.

Notes

Ensure that the food is at the lowest possible 
initial temperature – within the range of 1  –  8  °C 
is best.

Ensure that the air outlet is not covered. This 
means that the pump can extract the air from the 
chamber.

Ensure that the centre of the bag and the ends 
of the bag lie flat on top of the heat-sealing 
column. This ensures that the heat-sealing seam 
is perfectly closed.

Ensure that the open end of the bag protrudes 
over the heat-sealing column by approx. 3  cm but 
that it is not resting on the lid seal.

Note: 

If required, use the raised vacuuming 

platform so that the bag does not slip.

3

Touch the 

°

 symbol to select the vacuuming level.

4

Touch the 

±

 symbol to select the heat-sealing 

time.

5

Tightly close the glass lid and hold it there.

6

Touch the 

²

 symbol to start the vacuuming 

process.

The vacuuming process starts. The vacuuming level 
indicators pulsate in orange one after the other until the 
selected value has been reached.

1

2

0LQPP

Summary of Contents for DV 461

Page 1: ...Gaggenau Gaggenau Gebrauchsanleitung Instruction manual DV 461 DVP 221 Vakuumierschublade Vacuuming drawer ...

Page 2: ...2 Inhaltsverzeichnis 3 Table of contents 17 ...

Page 3: ...8 Vorzeitig verschweißen 9 Vakuumiervorgang abbrechen 9 Im Behälter vakuumieren 9 Geeignete Vakuumierbehälter 9 Vakuumiervorgang abbrechen 10 Trocknung durchführen 10 Anwendungen 10 Vakuumieren für das Sous vide Garen 10 Vakuumieren von Glasflaschen 11 Schnelles Marinieren und Aromatisieren 11 Lagerung und Transport 11 Empfohlene Einstellungen 12 Pflege und Reinigung 13 Störungen was tun 14 Kunden...

Page 4: ...n berühren Kinder fernhalten Stromschlaggefahr Eindringende Feuchtigkeit kann einen Stromschlag verursachen Keinen Hoch druckreiniger oder Dampfreiniger verwen den Stromschlaggefahr Ein defektes Gerät kann einen Stromschlag verursachen Nie ein defektes Gerät ein schalten Netzstecker ziehen oder Siche rung im Sicherungskasten ausschalten Kundendienst rufen Stromschlaggefahr Unsachgemäße Reparaturen...

Page 5: ...eckel mit Hilfe von Werkzeug zu öffnen Warten Sie bis die Stromversorgung wiederherge stellt ist und starten Sie den Vakuumiervorgang erneut Vakuumieren Sie Lebensmitteln nicht in ihrer Ver kaufspackung nachdem sie diese geöffnet haben Verwenden Sie ausschließlich Beutel die für das Vakuumieren geeignet sind Im Vakuum beginnen Flüssigkeiten bereits bei nied rigen Temperaturen zu sieden Dabei tritt...

Page 6: ...n und umschließt das Lebensmit tel Danach öffnet sich der Glasdeckel der Schublade Mit den Vakuumierstufen von 1 bis 3 können unter schiedliche Vakuumgrade erzeugt werden Die dabei erreichten Grade unterscheiden sich nach Anwendungs fall Beim Vakuumieren im Behälter sind die Vakuum grade niedriger und damit für bestimmte Lebensmittel besser geeignet Die Vakuumierschublade erkennt mit dem Aufsetzen...

Page 7: ...r flaches Vakuumier gut in der Kammer Sie lässt sich öffnen Darin befinden sich der externe Vakuumieradapter die Flaschenverschlüsse der Fla schen Adapter sowie der Vakuu mierschlauch Externer Vakuumieradapter Der Adapter wird auf den Luftaus lass der Vakuumierschublade gesteckt um Vakuumierbehälter oder Flaschen zu vakuumieren Flaschenverschlüsse Flaschenverschlüsse werden auf Flaschen gesteckt u...

Page 8: ...nsmittel im Vakuumierbeutel mög lichst nebeneinander und nicht aufeinander Ein sauberer und trockener Beutelrand ist wichtig für eine einwandfreie Verschlussnaht Damit diese Naht beim Verschweißen gelingt ist es wichtig dass sich am Beutelrand im Bereich der Naht keine Rückstände von Lebensmitteln befinden Bevor Sie den Beutel befüllen stülpen Sie dessen Rand deshalb um ca 3 cm um Stül pen Sie den...

Page 9: ...ierens das Symbol um den Vorgang zu beenden und den Beu tel vorzeitig zu verschweißen Das Gerät zeigt die Vakuumierstufe an die bis dahin erreicht wurde Am Ende des Vorgangs wird die Kammer belüftet ein Signalton erklingt Sie können den Glasdeckel nun öff nen und den verschweißten Vakuumierbeutel aus der Kammer nehmen Hinweis Zum Verschweißen des Beutels benötigt die Vakuumierschublade einen besti...

Page 10: ... Feuchtigkeit im Pumpensystem Warten Sie bis das Symbol nicht mehr leuchtet und starten Sie den Trocknungsvorang erneut Anwendungen In diesem Kapitel erfahren Sie wie Sie Ihre Vakuumier schublade in verschiedenen Anwendungsfällen einset zen können Vakuumieren für das Sous vide Garen Mit Ihrer Vakuumierschublade können Sie Lebensmittel für das Sous vide Garen vorbereiten Sous vide Garen bedeutet Ga...

Page 11: ...Stufe Vakuumieren Sie keine kohlesäurehaltigen Flüs sigkeiten wie beispielsweise Schaumwein 5 Symbol berühren um den Vakuumiervorgang zu starten Der Vakuumiervorgang startet Die Anzeigen der Vakuu mierstufen pulsieren nacheinander orange bis der gewählte Wert erreicht ist Die Vakuumierstufen hören auf zu pulsieren sobald der Zielwert erreicht ist Die erreichte Vakuumierstufe leuchtet und ein Signa...

Page 12: ...hlungen zu Vakuumierstufen für verschiedene Lebensmittel Beach ten Sie besondere Hinweise zu den empfohlenen Vakuu mierstufen sowie zur Vorbereitung der Lebensmittel Hinweise Verwenden Sie ausschließlich frische Lebensmittel Kontrollieren Sie Lebensmittel vor dem Vakuumie ren auf ihre Qualität Vakuumieren Sie ausschließlich kalte Lebensmittel im besten Fall mit einer Temperatur im Bereich von 1 C ...

Page 13: ...t Glasreiniger und einem weichen Tuch Verwenden Sie keine kratzenden Scheuerschwämme oder Glasschaber Vakuumierkammer aus Edelstahl Entfernen Sie Kalk Fett Stärke und Eiweißflecken immer sofort Unter solchen Flecken kann sich Korros ion bilden Benutzen Sie zur Reinigung Wasser und etwas Spülmittel Trocknen Sie die Fläche mit einem weichen Tuch nach Bedienblende aus Kunststoff Verwenden Sie keine k...

Page 14: ...en Flüssigkeiten beginnen bei steigen den Temperaturen zu sieden Das Vakuum wird nicht weiter aufge baut Vakuumieren Sie nur kalte Flüssig keiten Falls die Vakuumierkammer feucht ist wischen Sie sie trocken Verschweißen Sie den Vakuumier beutel vorzeitig sobald sich größere Bläschen bilden Wählen Sie eine niedrigere Vakuu mierstufe Der Vakuumiervorgang lässt sich nicht starten Das Symbol erscheint...

Page 15: ...h Flüssigkeiten Fette oder Krümel entlang der Schweißnaht Der Beutel hat Falten entlang der Schweißnaht Stellen Sie sicher dass der Beutel trocken ist und dass er faltenfrei und vollständig auf dem Ver schweißbalken aufliegt Nehmen Sie einen anderen Beutel Stülpen Sie den Rand des Beutels um 3 cm um bevor Sie ihn befüllen Der Deckel lässt sich nicht öffnen Es hat sich ein leichtes Vakuum gebildet ...

Page 16: ... die Telefon nummer des Kundendienstes eintragen Beachten Sie dass der Besuch des Kundendiensttech nikers im Falle einer Fehlbedienung auch während der Garantiezeit nicht kostenlos ist Die Kontaktdaten aller Länder für den nächstgelegenen Kundendienst finden Sie hier bzw im beiliegenden Kun dendienst Verzeichnis Reparaturauftrag und Beratung bei Störungen Vertrauen Sie auf die Kompetenz des Herste...

Page 17: ...s 22 Heat sealing in good time 23 Cancelling the vacuuming process 23 Vacuuming in the container 23 Suitable vacuuming containers 23 Cancelling the vacuuming process 24 Carrying out the drying program for vacuum pump24 Applications 24 Vacuum for sous vide cooking 24 Vacuuming glass bottles 25 Fast marinating and flavouring 25 Storage and transport 25 Recommended settings 26 Care and cleaning 27 Wh...

Page 18: ...ep children away from the appliance Risk of electric shock Do not use any high pressure cleaners or steam cleaners which can result in an electric shock Risk of electric shock A defective appliance may cause electric shock Never switch on a defective appliance Unplug the appliance from the mains or switch off the circuit breaker in the fuse box Contact the after sales service Risk of electric shoc...

Page 19: ... the power supply has been re established and restart the vacuuming process Do not vacuum food in its original packaging after you have opened it Only use bags that are suitable for vacuuming food In the vacuum liquids start to boil at low temperatures This produces vapour and may cause the appliance to malfunction Ensure that the food to be vacuumed is at the lowest possible initial temperature w...

Page 20: ...and encloses the food The drawer s glass lid then opens Different degrees of vacuum can be created with vacuuming levels 1 to 3 The degrees that are reached here vary depending on the use case When vacuuming in the container the degrees of vacuum are lower and therefore better suited for the particular food When the external vacuuming adaptor is attached the vacuuming drawer automatically detects ...

Page 21: ...as a surface for flat food that is to be vacuumed in the con tainer It can be opened It con tains the external vacuuming adaptor the plugs for vacuuming bottles the adaptor for bottle plugs and the vacuum hose External vacuuming adaptor The adaptor is attached to the air outlet on the vacuuming drawer in order to vacuum vacuuming con tainers or bottles Plug for vacuuming bottles Plugs for vacuumin...

Page 22: ...ag next to each other and not on top of each other To ensure that the sealing seam is perfect it is important that the edge of the bag is clean and dry To ensure that the seam is perfect during the heat sealing process it is important that there is no food residue around the seam on the edge of the bag Before you fill the bag you should therefore fold over its edge by approx 3 cm Unfold the edge a...

Page 23: ...al the bag in good time The appliance displays the vacuuming level until it is reached At the end of the process the chamber is ventilated and an acoustic signal sounds You can now open the glass lid and remove the heat sealed vacuuming bag from the chamber Note To heat seal the bag the vacuuming drawer requires a specific degree of vacuum If you touch the symbol first the vacuuming drawer pumps a...

Page 24: ...l find out how you can use your vacuuming drawer in different use cases Vacuum for sous vide cooking You can use your vacuuming drawer to prepare food for sous vide cooking Sous vide cooking is a method of cooking under a vacuum at low temperatures between 50 95 C and in 100 steam or in a bain marie The vacuuming drawer is used to heat seal the food in a special air tight heat resistant cooking ba...

Page 25: ...ing bottles Fast marinating and flavouring You can use your vacuuming bag to quickly add flavour to or marinate food such as meat fruit and vegetables Marinating your food in the traditional way usually takes a long time and is not particularly intensive When you vacuum in a bag the food s cell pores open and the marinade that is added can be absorbed quickly This produces a more intensive taste i...

Page 26: ...rage Do not use any food that is of dubious quality Recommended vacuuming levels Special instructions Food that is stored at room temperature 20 C to 23 C Baked goods 1 2 3 Dried baked items biscuits 1 Tea coffee 1 2 3 Store in a dark place Rice pasta 2 Vacuum in a container Flour semolina 1 Nuts without shell 3 Store in a dark place Dried fruits 3 Crackers chips 1 2 Vacuum in a container Fresh fo...

Page 27: ... appliance and accessory parts to fully dry after they have been cleaned Glass front and glass lid Clean the glass front and the glass lid with glass cleaner and a soft cloth Do not use any abrasive sponges that may scratch or any glass scrapers Stainless steel vacuuming chamber Always remove flecks of limescale grease starch and albumin e g egg white immediately Corrosion can form under these pat...

Page 28: ...nnot be reached As the temperature rises liquids begin to boil At this point the pro cess of creating a vacuum stops Only vacuum seal cold liquids If the vacuum sealing chamber is wet wipe it dry Heat seal the vacuum sealing bag early if large bubbles form Select a lower vacuum sealing level The vacuum sealing pro cess will not start The symbol does not appear even though the lid is closed The app...

Page 29: ...bones may poke holes in the bag Check the bag for damage Use a different bag if it is damaged If the damage is caused by sharp edged parts of the food as far as possible position these in the bag in such a way that they cannot damage the wall of the bag The heat sealed seam is defective The heat sealing time you have selected is unsuitable for the plastic from which the bag is made Select a differ...

Page 30: ......

Page 31: ......

Page 32: ...Gaggenau Hausgeräte GmbH Carl Wery Straße 34 81739 München GERMANY www gaggenau com 9001280558 9001280558 de en 970419 ...

Reviews: