background image


24 

2019/9/18V1.1+V1.0 

enters the cooling stage.


During the operation period, if the heart rate is 45 seconds more than the maximum value, the 

running machine will be suspended automatically whereas if the heart rate does not meet with the goal and wonders between 

the two goals, the display will give prompt to increase or lower the speed.


If the first heart rate goal is reached, the program 

will not skip to next goal. 


In the running period, confirmation shall be made that the breast belt sensor is correctly worn or 

the heart rate sensor on the handle is grasped tightly. Otherwise, the program will not run normally. 


Heart rate control display image 


Corresponding targeted heart beat times 

Take a 40-year old user for instance, the heartbeat goal is 80% of the maximum heart beat times:   

(220—40) ×80%=144


 Interval Heart Rate Control 

The interval heart rate control is similar to the heart rate control program and the differences are: firstly, the heart rate goals 

are 80% of the maximum heart rate.


 Secondly, the maintaining time of each heart rate goal is 3 minutes.


 In the running period, confirmation shall be made that the breast belt sensor is correctly worn or the heart rate sensor on the 

handle is grasped tightly. Otherwise, the program will not run normally. 
Summary of Contents for AR-22.1

Page 1: ...TREADMILL AR 22 1 OWNER S MANUAL ...

Page 2: ...ns 11 3 1 Pre Assembly Check List 11 3 2 Hardware Pack 12 3 3 Assembly steps 13 4 Computer console operation instruction 18 4 1 computer console construction 18 5 Sectional heartbeat ratio training 20 5 1 Sectional heart rate training 20 5 2 Heart rate monitor system 21 6 Exercise Program 23 7 Malfunction elimination 37 8 UNIT SWITCH BETWEEN E C 38 9 Bluetooth module manual and APP iOS installatio...

Page 3: ...mport Gym2000AS TRONDHEIM Østre Rosten 102b 7075 Tiller Telefon 47 73 18 66 00 VIKERSUND Nedre Nedmarken 2 3370 Vikersund Telefon 47 32 78 63 63 Service service gym2000 no E post kontakt gym2000 no Firma org nr GYM2000 AS 987 651 067 ...

Page 4: ...3 2019 9 18V1 1 V1 0 1 Overview Drawing ...

Page 5: ...ce center of seller for examination and repair Do not carry this product by the supply cord or use the cord as a handle Keep the cord away from hot surfaces or ground Never operate the product with the air vents blocked Keep the air vents free of lint hair etc Never drop or insert any objects into any openings Do not use or operate outdoors Do not operate where aerosol spray products are being use...

Page 6: ...could interfere with the user s movement should not be left projecting Users correct ergonomic position on the equipment shown in Figure When you are ready for running please do not stand on the running belt Before starting the machine turn on the power Put your hands on the side handrail and stand on the protection bar at both sides And then press START when the motor is working in low speed move...

Page 7: ...the cable to stop the machine b STOP key Press downwards the STOP key to make the key withdraw from the control box and the running belt will stop Notice Pull back the key to the control box to make the machine back to the standby status Before using this product you should step on the it then turn on the product Do not turn on the treadmill before step on it Running surface Width dimensions 560 1...

Page 8: ...essure wires low pressure wires and underground wires should be transported separately and can t connect with or twist other wires Improper connection of the grounding plug can result in the risk of electric shock Check with a qualified electrician or serviceman if you are in doubt as to whether the products are properly grounded Do not modify the plug provided with the product If it will not fit ...

Page 9: ... is placed on uneven ground The level adjustment method is as follows Turn A counter clockwise to loosen it Adjust B to the proper height Turn A clockwise to tighten it The left side adjustment method is the same with the right side 2 3 Power Switch The Power Switch is on the bottom panel of the treadmill 1 means on 0 means off ...

Page 10: ...elt is running properly First determine that the power supply meets the requirements After the power is plugged in start the treadmill press the QUICK START button and then press the up speed key to increase the speed to 4 0 miles per hour MPH or 6 4 k km h KPH When you need to tighten it rotate both sides by 1 4 turn clockwise When you need to loosen rotate both sides by 1 4 turn counterclockwise...

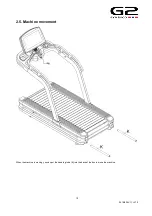
Page 11: ...10 2019 9 18V1 1 V1 0 2 5 Machine movement When the machine is moving you can put the handling tube K into the back of the box to move the machine ...

Page 12: ...belt and the HRC will show in Pulse windows 3 1 Pre Assembly Check List ITEM Description Qty ITEM Description Qty A Treadmill frame 1 G Electronic meter 1 B Treadmill s hand stand pipe left 1 H Water cup 2 C Treadmill s hand stand pipe right 1 I Stand pipe decorative cover left 1 D Handrail pipe left 1 J Stand pipe decorative cover right 1 E Handrail pipe right 1 K Transporting pipe 2 F Water cup ...

Page 13: ...x115mm 1 c Washer φ10xφ25x2 0t 16 l Type T wrench 6mm 1 d Inner hexagon steel screw M8x100 of socket head 4 m Type T wrench 10mm 1 e Spring washer M8 8 n Power cord switch sleeve 1 f Washer Φ8xΦ19x2 0t 4 o Umbrella head crossed screw M4x10 2 g Inner hexagon screw M10x20 of umbrella head stainless steel 8 p Spring washer M4 2 h Inner hexagon steel screw M8x75 of umbrella head 4 q CABLE adapter 1 i ...

Page 14: ...ed to the left and right treadmill s hand stand pipes to tighten the wires on both sides of the platform Pass it through the square hole at the bottom of the left and right treadmill s hand stand pipes and pull it above the pipe Fix the left and right treadmill s hand stand pipes D E by screw A spring b and washer C without fastening Please be careful not to clip the wire when assembling ...

Page 15: ...ater bottle shelf out from the upper holes on the left and right tubes After connecting Cable the Cable middle plastic sleeve shall be inserted into the Cable metal connector Lock with screw g and washer b c but not tightly Confirm that the water cup frame F is locked with all the screws of the left and right treadmill s hand stand pipes and then use the tool to lock all the screws Please be caref...

Page 16: ...pright tubes D E After arranging insert into the upright tubes D E Use screw d spring washer e Bushing r to lock the left and right handrail pipes D E tightly as shown in the figure and fix them on the left and right treadmill s hand stand pipes Please be careful not to clip the wire when assembling ...

Page 17: ... meter Use the screw h and washer e f to lock Electronic meter tightly and fix it on the water cup frame Cover the Electronic meter decorative cover L and lock it tightly with the screw j and pay attention that the cover should not be pressed on the wire Please be careful not to clip the wire when assembling Cable is reserved for TV system which is not needed in this model ...

Page 18: ...orative covers I J and tighten them with screws i Insert the power cord into the power cord socket according to the figure position Cover the power cord switch sleeve n and lock it tightly with screws o and spring washer p Finally put the water cup H into the rack frame ...

Page 19: ... B MESSAGE CENTER Show the operation steps of all the programs and the relative information about all the control and conduction program operation such as calorie distance stride time incline and speed C1 During exercise to increase incline angle During exercise to increase incline angle max is 20 10 for pushing mode STEP 0 1 Under PROGRAM to set LEVEL program during exercise this key is invalid C...

Page 20: ... only GOAL HRC Thrust INTERVAL Thrust INTERVAL CUSTOM is valid F QUICK START Press this key to get fast entrance to the user preset mode no need to choose program setting during program execution process use direction key or digit key to adjust incline and speed pushing power The initial speed is 0 6mph 1km G1 Heartbeat ratio display Show the heartbeat ratio when the user use sensor or breast band...

Page 21: ... to wake up the computer console N Fan start stop key Control the fan start and stop O USB charge This hole is for iOS device or Android device charge and the output current is 5V 1A 5 Sectional heartbeat ratio training According to research keeping a stable heart rate to exercise is the best training method to monitor exercise intensity and realize highest intensity And this treadmill can meet th...

Page 22: ...are two sensors for each handrail and these four sensors all should be gripped during the exercise So you can get the heartbeat signal in the control board and it will show the heart rate change after 20 30 seconds When the speed is higher than 4 5mph 7 2KPH you should use the breast band heart rate belt instead of the hand grip sensor B Breast band heart rate belt The breast band heart rate belt ...

Page 23: ...h is smooth If the sensor section touchs the skin directly the effect will be best but wet cloth can also get the effect If you want to dampen the sensor section you can hold the middle of the belt to drive out the belt to dampen the sensor section When setting heart rate exercise user needs to set the start speed of the treadmill If system detects no chest belt pulse monitor the max speed is 4 5m...

Page 24: ...n automatically Setting Range Distance Preset 5KM Range 1 99 Calories Goal This program serves to lose and control weight When certain quantity of the calories is exhausted within limited time the program will stop operation automatically Setting Range Calories Preset 200 Range 40 600 HRC Hill Heart Rate Control The preset heart rate goal is 80 of the maximum which could be reset according to the ...

Page 25: ...rate sensor on the handle is grasped tightly Otherwise the program will not run normally Heart rate control display image Corresponding targeted heart beat times Take a 40 year old user for instance the heartbeat goal is 80 of the maximum heart beat times 220 40 80 144 Interval Heart Rate Control The interval heart rate control is similar to the heart rate control program and the differences are f...

Page 26: ...t necessary to grasp the heart rate sensor on the handler Set the program to determine the heart rate goal and choose the walk speed and jog speed After three minutes preparation warm up exercise the electronic meter of the running machine increases to the job speed and raises the incline of the running platform to make the heart rate of the user reach 85 HR max After keeping steady for a period o...

Page 27: ...olism navy ENDURANCE PHYSICALTEST Marine Corps Physical Fitness Test US soldiers GERKIN PROTOCOL GERKIN PROTOCOL is applied by the International Fire Protection Association to judge whether the solider are qualified for the fire control tasks and the marks rely on the time to finish the test Except the GERKIN PROTOCOL other tests are all performed after finishing the stipulated miles The program e...

Page 28: ...ct diagram HILL The interval exercise effect analysis diagram is the interval exercise program controlled by the computer which could improve the cardio pulmonary function better than the steady training program The whole program is divided into four stages each stage represents different exercise intensity and the program window displays the operation status The heart rate test shall firstly choo...

Page 29: ...and the time and intensity of the cooling time rely on the execution time speed incline and heart rate of the program Each light column represents an interval and the whole program is composed by 20 intervals The operation period of the program determines the program every 95 minutes The default time setting is 10 minutes with the range from 10 to 95 and the STEP is 5 minutes 10 19 minutes The tot...

Page 30: ...rgeted rate This program is for warming up exercise and will not accept severe exercises Heart beat times goal 220 age 0 8 namely the 80 of the HRmax Notice the computer console only change the incline not the speed CARDIO The best training methods refer to the oxygenation exercises or the training to increase the angiocarpy functions While doing exercises it s necessary to wear the breast belt se...

Page 31: ...e screen The FIT TEST is to test the function of the heart to supply the aerated blood to the muscle tissue by measuring the oxygen capacity in the blood and to test how the muscle tissue effectively absorbs the oxygen from the blood supply The physicians and physiologists commonly believe this is a wonderful means to test the aerobic metabolism capacity TEST SETTING Press the FIT TEST key the scr...

Page 32: ...weight is less than 34kg and more than 180kg 400LBS The age is less than 10 and more than 99 The input value exceeds the maximum potentiality of the human being If the input information proves to be incorrect press CLEAR key to clear and input again press ENTER to confirm The test must be taken under constant condition as the heart rate relies on the factors from many aspects Sleep status suggeste...

Page 33: ...xcellent Superior 13 19 35 0 35 0 38 3 38 4 45 1 45 2 50 9 51 0 55 9 55 9 20 29 33 0 33 0 36 4 36 5 42 4 42 5 46 4 46 5 52 4 52 4 30 39 31 5 31 5 35 4 35 5 40 9 41 0 44 9 45 0 49 4 49 4 40 49 30 2 30 2 33 5 33 6 38 9 39 0 43 7 43 8 48 0 48 0 50 59 26 1 26 1 30 9 31 0 35 7 35 8 40 9 41 0 45 3 45 3 60 20 5 20 5 26 0 26 1 32 2 32 3 36 4 36 5 44 2 44 2 Table Reference The Physical Fitness Specialist C...

Page 34: ...igit key The instruction of the program under the pushing power operation thrust mode Time Goal Set the target time according to the target distance when the target is achieved the program will stop running Setting Range Time Preset 20min Range 10 95 Distance Goal This program serves to test the endurance of the user When the user completes the set miles within limited time and reaches the goal th...

Page 35: ...tbeat maintain within the range to get the training effect AGE setting press or key to adjust age and then press to enter into next program age preset 30 setting range 10 99 step is 1 PULSE setting the program will ask you to input your heartbeat data this data will change according to the age please refer to the appendix chart for details and choose your suitable data from the chart Press or to a...

Page 36: ...9 119 44 167 106 106 67 145 92 92 90 123 89 89 22 188 119 119 45 166 105 105 68 144 91 91 91 122 88 89 23 187 118 118 46 165 104 104 69 143 91 91 92 121 88 88 24 186 118 118 47 164 104 104 70 143 90 90 93 120 88 88 25 185 117 117 48 163 103 103 71 142 90 89 94 119 88 87 26 184 116 116 49 162 103 103 72 141 90 89 95 118 88 87 27 183 116 116 50 162 102 102 73 140 90 88 96 117 88 86 28 182 115 115 51...

Page 37: ...g and fast running pushing power LEVEL according to the LEVEL time when do switch the letters will show JOG Thrust and RUN Thrust reminding letters until reach to the setting Thrust circle times which will show in the big dot screen and then end the PROGRAM Thrust INTERVAL CUSTOM program process press PROGRAM key press digit key to choose the program Set weight preset data 70 set range 34 181KG ST...

Page 38: ... transducer change transducer brake electrical resistance E08 abnormality for the falling of the transducer change transducer E09 overheat of the transducer add lubrication oil to bearing change transducer E10 abnormality for overload of transducer motor change motor transducer E11 abnormality for overload of transducer add lubrication oil to bearing change transducer E12 abnormality for overload ...

Page 39: ...019 9 18V1 1 V1 0 8 UNIT SWITCH BETWEEN E C 1 The standby page is as the following 2 Press STOP ENTER key for 8 seconds to enter into engineer mode 3 Press ENTER key two times to enter into unit switch page ...

Page 40: ...39 2019 9 18V1 1 V1 0 4 Switch unit by SPEED key 5 Press ENTER key four times to back to standby mode ...

Page 41: ...le can be used for RUN FIT which is the relevant APP normally and mainly And other APP such as ZWIFT VIRTUAL RUNNER KINOMAP please check the APP manufacturer operation instruction whether it is supportive and please take the APP download page or official website notice as the formal one For iPhone RUN FIT APP wire connection example 1 APP mode download Connect IPhone to iTunes Store OR Google play...

Page 42: ...gnal at the top of the page STEP 2 2 Enter into iPhone system setting page and then turn on 3G 4G or turn on Wi Fi function after that connect to the valid internet signal STEP 2 3 Place the iPhone into the specific section in front of the computer console STEP 2 4 Click the APP downloaded before to turn on RUN FIT and the page is as the picture below Click GYMCNNECT in the APP to enter into conne...

Page 43: ...er into Bluetooth match page please choose the number in the list and the number has the patter as DK YEAR SERIAL_NO such as DK201800001 Notice if cannot get the result please press Scan manually to search the Bluetooth device nearby again STEP 2 6 After matching the APP in iPhone will show the START key to instruct ...

Page 44: ... more than 2 machines within the range it is possible to connect to other machine Under such condition please stop the match and switch to the right ID to correct 3 Usage of the APP STEP 3 1 According to the instruction in the APP page press the START key in the machine and then the APP will start the simultaneous operation with the machine including the exercise time speed accumulated distance ca...

Page 45: ...pause Or the user also can choose the SAVE key in the APP to save the exercise data and then to end the connection status When the page show the accumulated data of the exercise this time the APP will take it as the end of the exercise and will disconnect with the Bluetooth automatically and will back to the normal computer console operation page ...

Page 46: ... switch the metric and British system automatically if the unit in the APP and Console does not match please adjust in the APP manually The software will release the updated version please pay attention to the APP download page For the preset APP RUN FIT the user has to switch on the mobile internet or Wi Fi internet for the APP use Under the conditions as the following the APP will disconnect or ...

Page 47: ...page and then delete the memory of name of the Bluetooth device STEP 3 Turn off the Bluetooth function in the iPhone setting page STEP 4 Power off the machine and turn on after 10 seconds STEP 5 Re execute the Step 2 1 3 4 If the machine is still abnormal please check whether the ID of the Bluetooth which connect with the iPhone belongs to this machine For it is possible the iPhone connect with ot...

Reviews: