background image

39

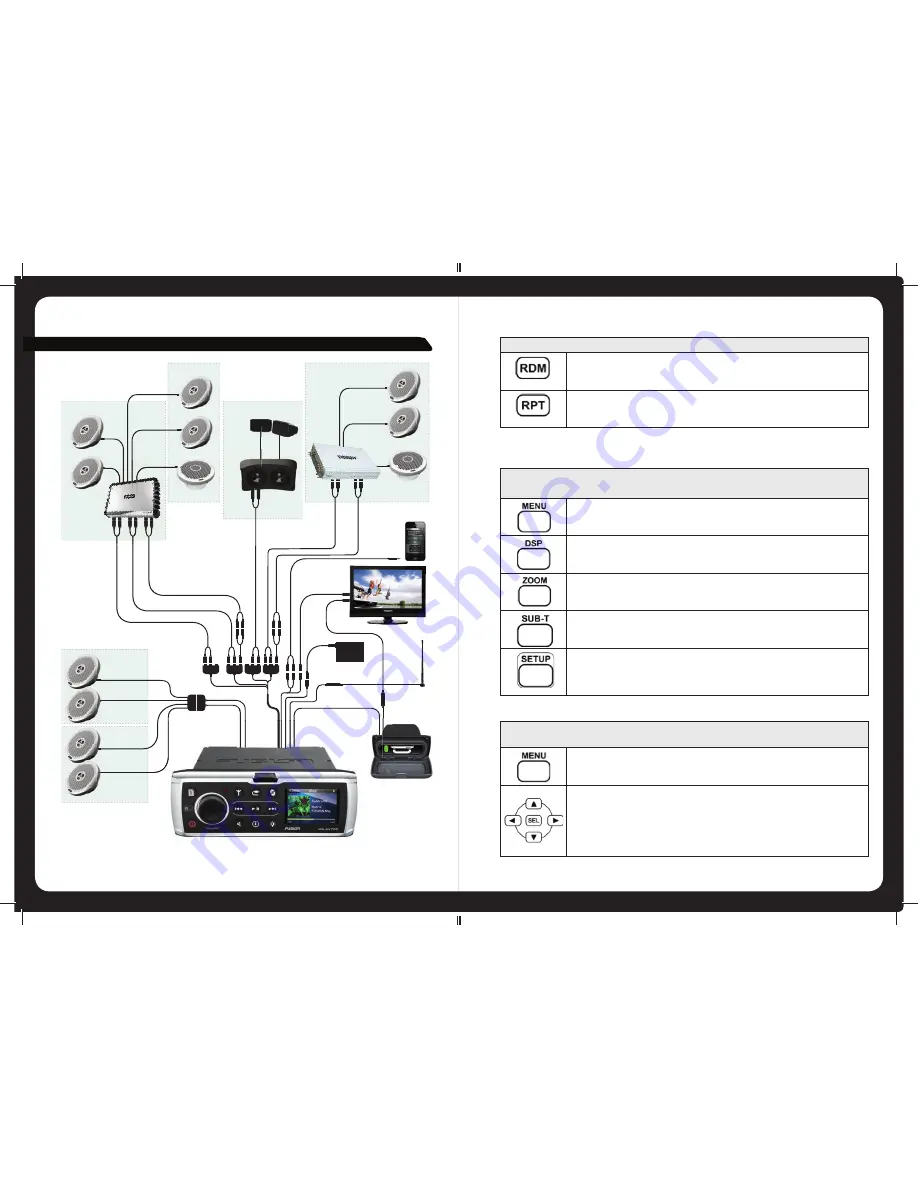
700 SERIES CONNECTION EXAMPLE

ZONE 1

SPEAKER 
CONNECTION

ZONE 1

LINE OUT

ZONE 2

LINE OUT

ZONE 3

LINE OUT

ZONE 4

LINE OUT

ZONE 2

SPEAKER 
CONNECTION

DVD/CD

MS-DKIPUSB Dock 

AM/FM 

ANTENNA

AUX

AUDIO

MS-SW10

MS-SW10

MS-FR702

MS-FR702

MS-FR702

MS-FR702

MS-FR602

MS-FR602

MS-DA51600

MS-AB1060R

MS-FM504

MS-FR602

MS-FR602

MS-BX3020

MS-FR602

MS-FR602

SIRIUS XM 

TUNER MODULE 

SVX100

TV220LED

S DKIPUSB Dock

NE OUT

DVD/CD

MS

MS

LRS

LRS

LRS

LRS

MS-AB1060R

020

0

602

32

When the DVD source is selected, use the following keys to control specifi c 

features.


Open a menu in the TV display.

Display on the TV display which CD track, DVD chapter and title you 
are currently watching or listening to.

Zoom in on the picture for the currently playing DVD.

Cycle through the available subtitle languages found in the playing 
DVD.

Open the DVD setup menu on the TV display.

The following keys work for DVD / iPod / USB sources only.


Random / Shuffl e

Cycle through repeat options

When the DVD source is not selected, use the following keys for navigating the 
700 Series menu.


Open the menu for navigation.

Use the arrow keys to navigate through menu, and press select (SEL) 
to choose the highlighted menu item.

DVD source selected.

DVD source not selected


Summary of Contents for MS-AV700

Page 1: ...71 71 Speci cations and design are subject to change without notice 700 SERIES Manual MARINE ENTERTAINMENT SYSTEM MS IP700 True Marine Entertainment System for iPod MS AV700 True Marine DVD Entertain...

Page 2: ...ng the disc to direct sunlight Ensure the disc is clean If necessary clean the disc with a clean dry soft lint free cloth Ensure the disc is not scratched or damaged Ensure the disc is dry when insert...

Page 3: ...your product any software upgrades or new accessories to help you get the most from your product All FUSION True Marine Products are backed by a 3 Year Limited Consumer Warranty and by registering you...

Page 4: ...aying the Clock 12 Setting and Clearing the Alarm 13 Adjusting Screen Brightness 14 TUNER 15 Listening to the Tuner 15 Tuner Source Screens 15 Tuning Methods 16 Adding and Removing Presets 18 Setting...

Page 5: ...INSTALLING THE 700 SERIES 33 CONNECTIONS 35 700 Sereis Connection Example 39 SETTING UP THE 700 SERIES 40 Zones 40 Preparing for iPod or USB Input 43 Preparing for Auxiliary Input 47 Clock Setting 48...

Page 6: ...ing 19 region setting 56 scan mode turning on 19 setting up 19 tuner source enabling disabling 57 volume control enabling disabling in a zone 44 level adjusting 10 limit setting in a zone 42 wired rem...

Page 7: ...methods 16 turning the unit on and off 8 USB ash drive controlling playback 25 format information 1 listening to your music 24 preparing for input 43 6 ROTARY ENCODER AND MENU KEY Although the contro...

Page 8: ...peat setting changing 23 selecting tracks from playlist 21 settings changing 23 shuf e setting changing 23 source screen 20 subtitles setting changing 24 keys control key names and symbols 5 encoder k...

Page 9: ...Series 30 FAST menu search feature on iPod 23 FUSION Link control system 29 gain value adjusting for auxiliary input 47 infrared IR remote control 31 installing the 700 Series 33 iPod compatibility 1...

Page 10: ...areas called Zones Note Zone 3 and 4 require additional ampli cation If you wish you can customize the settings for each Zone by de ning a volume limit a balance setting a sub woofer level and a pers...

Page 11: ...d over the top of the current input source screen Press the Mute key again to unmute the audio output The volume continues at the previously set level To adjust the volume level 1 Turn the Encoder The...

Page 12: ...lectronics Australia 61 1300 736 012 FUSION Electronics Europe 31 76 572 3632 FUSION Electronics USA 1 623 580 9000 Website www fusionelectronics com SPECIFICATIONS FCC compliance statement This devic...

Page 13: ...Ensure that you have the latest version of operating soft ware installed in your iPod iPhone and the latest iTunes version To do this connect your iPod iPhone to iTunes and it will check and if neces...

Page 14: ...00 Series chrome nish As with all products with a chrome nish exposed to the harsh marine environment a little care will help to preserve the nish and prevent cor rosion FUSION recommends that you cle...

Page 15: ...nable the AM source or disable the AM source 4 If required turn the Encoder to select VHF then press the Encoder to enable the VHF source or disable the VHF source 5 Press any key to exit 14 Brightnes...

Page 16: ...s the audio output from the 700 Series when a call is received on your cellphone Aux Allows the received call to be broadcast through the Auxilary input on the 700 Series Note This feature may not ope...

Page 17: ...der to save the setting and exit 5 Press any key to exit Power save If you are operating the 700 Series on battery power you can turn on the power save option to reduce drain on the battery The LCD sc...

Page 18: ...to a speci c preset a Press the Menu key and then press the Encoder to select Presets b Turn the Encoder to highlight the required preset c Press the Encoder to tune to the highlighted preset For fur...

Page 19: ...ental Channels b Tune to the channel you require This channel will display a padlock icon to the right of the screen 3 Enter your access code 4 Press the Menu key to return to the Sirius Source Screen...

Page 20: ...essing the Play Pause Forward or Rewind key turns scan mode off 52 To disable the Category tuning method press the Encoder to select All channels The Sirius Source Screen is displayed with the Tuning...

Page 21: ...means the channel has been setup to be skipped when using the Forward and Backward keys in the Sirius Source Screen However you can always access a skipped channel via this channel list 20 PLAYING CON...

Page 22: ...a channel from the list of all channels press the Encoder to select All channels To select a channel in a speci c category turn and then press the Encoder to select a category name Pop for example 4...

Page 23: ...r tuner The 12 digit SXID is displayed on the LCD on initialization MS IP700 and MS AV700 will display the SXID on Channel 0 Power on your system and make sure that you are receiving good signal you a...

Page 24: ...er of items Press Menu key The iPod control menu is displayed Turn Encoder to scroll the highlight down to iPod settings Press Encoder to select iPod settings Change settings as described below Menu e...

Page 25: ...s To adjust auxiliary input level by changing the gain Increase gain volume by pressing the Forward key 1dB steps up to 9dB Decrease gain by pressing the Rewind key 1dB steps down to 9dB Auxiliary Rew...

Page 26: ...your ash drive has not been named the default name is disk Press Encoder to select KINGSTON Files and folders on the ash drive are displayed Turn Rotary Encoder to scroll the highlight Press Encoder...

Page 27: ...t connected is displayed on the screen USB socket iPod sleeve 26 Controlling playback You can control playback with the Play Pause Forward and Rewind keys The selected track starts playing automatical...

Page 28: ...connected is displayed on the screen Before inserting iPod To avoid damage and ensure safe operation please read the following information before using your iPod Please ensure iPod dock connector is...

Page 29: ...extreme temperatures Do not remove iPod or use stereo in a distracting manner while operating the vessel Check and obey all marine laws in association with use 28 LISTENING TO AUXILIARY INPUT The 700...

Page 30: ...mote Control has a full featured user interface identical to the main unit To the user operating the entertainment system from the remote control is identical to operating it from the main unit It inc...

Page 31: ...T Add a Wi Fi wireless router to the 700 Series entertainment system and Apple devices like the iPad iPhone and iPod touch can wirelessly control the audio around the boat Apps are available for downl...

Page 32: ...f required you can also Enable or disable Zones 2 3 and 4 Zone 1 is always enabled Enable or disable volume control Zones 3 and 4 only Link Zones 1 and 2 For further details see instructions below Sel...

Page 33: ...ng keys to control speci c features Open a menu in the TV display Display on the TV display which CD track DVD chapter and title you are currently watching or listening to Zoom in on the picture for t...

Page 34: ...ON WITH YOUR BOAT DEALER OR MANUFACTURER BEFOREHAND Fit mounting gasket Insert the unit into the mounting hole Pull down the front face to expose the mounting screw locations Use either the supplied 4...

Page 35: ...GREY BLACK GREEN GREEN BLACK PURPLE PURPLE BLACK RED BLACK BLUE ORANGE BROWN L white R RED SUB ORANGE L white R RED SUB ORANGE L white R RED SUB ORANGE L white R RED SUB ORANGE USB CONNECTION MS AV70...

Page 36: ...to an existing NMEA2000 Bus a MS N2KCONN is required not included To install a new NMEA2000 Bus a MS N2KSTART is required not included CONNECTIONS 36 ETHERNET CONNECTION For connection to a DHCP Ether...

Reviews: