background image

 SK-91F467D-208PFV V1.1 

Appendix 

FMEMCU-UG-910014-10 

- 60 - 

© Fujitsu Microelectronics Europe GmbH 

10.3 Tables  


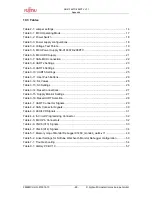
Table 2-1: Jumper settings .................................................................................................... 14


Table 3-1: MCU Operating Mode........................................................................................... 17


Table 3-2: Power Switch ........................................................................................................ 18


Table 3-3: Power supply configurations................................................................................. 18


Table 3-4: Voltage Test Points............................................................................................... 19


Table 3-5: MCU Power Supply SK-91F467D-208PFV .......................................................... 20


Table 3-6: MCU ADC Supply ................................................................................................. 21


Table 3-7: CAN-MCU connection .......................................................................................... 22


Table 3-8: UART2 Settings .................................................................................................... 23


Table 3-9: UART4 Settings .................................................................................................... 24


Table 3-10: UART5 Settings .................................................................................................. 25


Table 3-11: User Push Buttons.............................................................................................. 26


Table 3-12: S4 Values ........................................................................................................... 26


Table 3-13: S3 Settings ......................................................................................................... 26


Table 3-14: Reset Connections ............................................................................................. 27


Table 3-15: Supply Monitor Settings...................................................................................... 27


Table 3-16: Reset UART Selection........................................................................................ 28


Table 4-1: UART Connector Signals...................................................................................... 29


Table 4-2: CAN Connector Signals........................................................................................ 30


Table 4-3: LED/LCD Signals.................................................................................................. 31


Table 4-4: In Circuit Programming Connector ....................................................................... 32


Table 4-5: MCU Pin Connectors ............................................................................................ 32


Table 4-6: VG96 (X13) Signals .............................................................................................. 33


Table 4-7: VG48 (X14) Signals .............................................................................................. 34


Table 5-1: Memory map of Monitor Debugger 91460_mondeb_uart4-v11 ............................ 49


Table 5-2: Linker Settings for Softune Workbench Monitor Debugger configuration ............. 50


Table 7-1: Trouble shooting ................................................................................................... 54


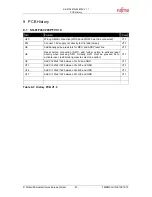
Table 9-1: History PCB V1.0.................................................................................................. 57


Summary of Contents for SK-91F467D-208PFV

Page 1: ...Fujitsu Microelectronics Europe User Guide FMEMCU UG 910014 10 MB91460 SERIES EVALUATION BOARD SK 91F467D 208PFV USER GUIDE ...

Page 2: ...SK 91F467D 208PFV V1 1 Revision History FMEMCU UG 910014 10 2 Fujitsu Microelectronics Europe GmbH Revision History Date Issue 22 11 2005 V1 0 UMa first official version This document contains 62 pages ...

Page 3: ... the date of receipt by the customer 2 Should a Product turn out to be defect Fujitsu Microelectronics Europe GmbH s entire liability and the customer s exclusive remedy shall be at Fujitsu Microelectronics Europe GmbH s sole discretion either return of the purchase price and the license fee or replacement of the Product or parts thereof if the Product is returned to Fujitsu Microelectronics Europ...

Page 4: ...N 10 1 3 7 MCU Pins 10 1 3 8 User Buttons 10 1 3 9 User LEDs and optional LCD 11 1 3 10 Power Supply 11 2 INSTALLATION 12 2 1 Jumper Settings 14 2 2 Jumper Location 15 2 3 Software Installation 16 2 3 1 Installation of Softune Workbench 16 3 JUMPERS AND SWITCHES 17 3 1 MCU Operating Mode S5 17 3 2 Power Supply 18 3 2 1 MCU Power Supply Voltage 20 3 2 2 MCU Analogue Power Supply Voltage 20 3 3 CAN0...

Page 5: ...ED 35 5 1 Introduction to Softune Workbench 35 5 2 Project Start up 37 5 2 1 Create a new project 37 5 2 2 Use Active Configuration MONDEBUG 39 5 2 3 Use Active configuration STANDALONE 41 5 3 Softune Workbench Monitor Debugger 42 5 3 1 General Description 42 5 3 2 Basic Debugger Features 45 5 4 Advanced Softune Workbench Monitor Debugger Features 46 5 5 Memory Configuration for User Applications ...

Page 6: ...SK 91F467D 208PFV V1 1 Contents FMEMCU UG 910014 10 6 Fujitsu Microelectronics Europe GmbH 10 5 Abbreviations 62 ...

Page 7: ...is a multifunctional development board for the FUJITSU 32 bit Flash microcontroller MB91460 series It can be used stand alone for software development and testing or together with a monitor debugger software The board allows the designer immediately to start with the software and system development before his own final target system is available ...

Page 8: ... 4 MByte SRAM o 128 Mbit 16 MByte Flash All microcontroller resources available for evaluation All microcontroller pins routed to pin header In Circuit serial Flash programming Three selectable RS 232 or LIN UART interfaces Three High Speed CAN interfaces 16 User LEDs optional alphanumeric standard LC Display connectable Reset button Reset LED 4 User buttons one 8 bit MCU port can be connected to ...

Page 9: ...sh microcontroller MB91F467D The Starterkit can be used as a stand alone development platform or instead of the Flash MCU MB91F467D with the emulation system MB91V460 adapter board MB2198 300 and 208 pin probe cable board PB 91467D 208PFV This User Guide is describing PCB version V1 1 The PCB version is printed at the TOP side of the Starterkit close to MB91F467D MCU U1 ...

Page 10: ...controller and CAN bus 1 3 6 RS 232 and LIN Three separate RS 232 transceivers and three separate LIN transceivers are available to connect the on chip USARTs to the 9 pin D Sub connectors The RS 232 transceivers generate the adequate RS 232 levels for receive RXD and transmit TXD lines The RTS signal can be shortcut to CTS using jumpers some PC software needs this connection Either the DTR line o...

Page 11: ...stor networks RN2 and RN3 can be removed to free the ports 1 3 10 Power Supply The four on board step down switching regulators allow the user to connect an unregulated DC input voltage between 9 V to 12 V max 2000 mA to the Starterkit The switching regulators provide the voltages of 5 V 3 A 3 3 V 3 A 2 5 V 1 5 A and 1 8 V 1 5 A on the Starterkit These voltages give also the possibility to connect...

Page 12: ... Figure 2 2 AC plug adapter selection Check the selected output DC voltage of the AC DC In Plug adapter at the voltage selection key It should be 9V Change the output voltage only in a powered down condition Figure 2 3 DC voltage selection Select the low voltage adapter suitable to the power connector X5 at the SK 91F467D 208PFV and plug it to the connecting socket in the right orientation connect...

Page 13: ...e SK 91F467D 208PFV the four red power on LEDs D24 5 V D30 3 3 V D34 2 5 V and D40 1 8 V should be light The reset LED D18 should be off Additionally the LED D2 and D4 should be on The Starterkit is delivered with programmed Softune Workbench Monitor Debugger in internal Flash of MB91F467D The monitor debugger is checking also the external SRAM access at CS1 In case of successful access to externa...

Page 14: ...ST Jumper 2 pin Closed B 15 2 3 JP57 UARTX RST Select Jumper 6 pin Open H 6 2 3 JP58 UART4 RTS CTS Jumper 2 pin Closed F 3 2 3 JP60 UART4 RxD RS232 LIN Jumper 3 pin 1 2 H 5 2 3 JP64 UART4 DTR RTS Jumper 3 pin Open H 4 2 3 JP65 UART4 TxD RS232 LIN Jumper 3 pin 1 2 H 5 2 3 JP68 Vcc 5V 3 3V Solder Jumper 3 pad 1 2 B 16 2 3 JP69 UART4 RS232 LIN Jumper 3 pin 1 2 H 4 2 3 JP71 UART4 LIN Enable Jumper 2 p...

Page 15: ...mper Location The following picture shows the silk plot of the Starterkit with marked default jumper settings A B C D E F G H J K L M N 1 1 2 2 3 3 4 4 5 5 6 6 7 7 8 8 9 9 10 10 11 11 12 12 13 13 14 14 15 15 16 16 17 17 18 18 19 19 20 20 21 21 A B C D E F G H J K L M N Figure 2 6 Default Jumper Settings ...

Page 16: ...installation setup ensure that you are logged in with administrator or poweruser permissions otherwise the Softune installation will fail Be aware that Softune does not support multi user support Therefore install and user login must be the same 2 Browse on the Starterkit CD ROM into the directory Software SWBInstall and start the setup exe You can also start the installation using a browser by op...

Page 17: ...h S5 is used to set the operating mode of the MCU Ensure that the mode pin settings correspond to the operation mode of the application For more detailed information please check the Hardware Manual of the microcontroller DIP switch Setting Logical value ON closed 1 high S5 1 MD0 OFF open 0 low ON closed 1 high S5 2 MD1 OFF open 0 low ON closed 1 high S5 3 MD2 OFF open 0 low ON closed Not connecte...

Page 18: ...sible to supply the board from an external connected board There is a triple supply monitor on board which monitors three of the four DC output voltages and generates a system reset in case with wrong levels of the on board voltages 5 V and 3 3 V are always monitored and the third monitored voltage can be selected with the solder jumpers JP42 and JP43 With JP68 it is possible to select the whole b...

Page 19: ...umpers and Switches Fujitsu Microelectronics Europe GmbH 19 FMEMCU UG 910014 10 Figure 3 2 Voltage Test Points Regulator Test point Voltage U9 J21 5V U11 J22 3 3V U14 J23 2 5V U17 J24 1 8V J20 GND Table 3 4 Voltage Test Points ...

Page 20: ...e high current ports Jumper Setting Description 1 2 VDD35 is connected to MCUVcc JP21 2 3 VDD35 is connected to 3 3 V ON closed HVDD5 is connected to MCUVcc JP23 OFF open HVDD5 is not connected to MCUVcc ON closed VDD5R is connected to MCUVcc JP25 OFF open VDD5R is not connected to MCUVcc ON closed MCUVcc is connected to Vcc JP26 OFF open MCUVcc is not connected to Vcc ON closed VDD5 is connected ...

Page 21: ... JP16 OFF open AVRH defined by resistor network 1 ON closed AVss is connected to GND JP18 OFF open AVss is disconnected Default grey 1 By default the resistor network R10 and R13 is not assembled on the board Table 3 6 MCU ADC Supply Note If JP15 or JP18 are open the user has to supply an adequate analogue voltage supply AVcc and AVss to the A D converter If JP16 is open the potential divider comp...

Page 22: ...tion to the microcontroller ON closed CAN0 TxD connected to MCU JP83 OFF open No connection to the microcontroller ON closed CAN1 RxD connected to MCU JP87 OFF open No connection to the microcontroller ON closed CAN1 TxD connected to MCU JP88 OFF open No connection to the microcontroller ON closed CAN2 RxD connected to MCU JP89 OFF open No connection to the microcontroller ON closed CAN2 TxD conne...

Page 23: ... whether UART2 will be LIN master or LIN slave Jumper Setting Description 1 2 MCU SIN2 connected to RS 232 transceiver JP37 2 3 MCU SIN2 connected to LIN transceiver 1 2 MCU SOT2 connected to RS 232 transceiver JP44 2 3 MCU SOT2 connected to LIN transceiver 1 2 X1 pin2 is connected to RS 232 transceiver JP46 2 3 X1 pin2 is connected to LIN transceiver ON closed RTS and CTS is shortcut at connector...

Page 24: ...RT4 will be LIN master or LIN slave Jumper Setting Description 1 2 MCU SIN4 connected to RS 232 transceiver JP60 2 3 MCU SIN4 connected to LIN transceiver 1 2 MCU SOT4 connected to RS 232 transceiver JP65 2 3 MCU SOT4 connected to LIN transceiver 1 2 X4 pin2 is connected to RS 232 transceiver JP69 2 3 X4 pin2 is connected to LIN transceiver ON closed RTS and CTS is shortcut at connector X4 JP58 OF...

Page 25: ...ether UART5 will be LIN master or LIN slave Jumper Setting Description 1 2 MCU SIN4 connected to RS 232 transceiver JP79 2 3 MCU SIN4 connected to LIN transceiver 1 2 MCU SOT4 connected to RS 232 transceiver JP81 2 3 MCU SOT4 connected to LIN transceiver 1 2 X4 pin2 is connected to RS 232 transceiver JP84 2 3 X4 pin2 is connected to LIN transceiver ON closed RTS and CTS is shortcut at connector X4...

Page 26: ...en No connection to the microcontroller ON closed Button ICU0 TIN0 is connected to the microcontroller JP95 SW5 OFF open No connection to the microcontroller Default grey Table 3 11 User Push Buttons 3 6 User DIP Switch 8 Bit S4 There is an 8 bit user DIP switch on board which can be connected to one MCU port P26 in order to set high or lowlevel S3 also an 8 bit DIP switch dis connects the eight c...

Page 27: ...U 1 2 Reset is generated immediately when SW1 is pressed JP96 2 3 Reset is generated after SW1 is pressed 2s Default grey Table 3 14 Reset Connections The triple supply monitor on board has the possibility to watch 5V 3 3V and the third voltage is user configurable 2 5V or 1 8V If any voltage fails a system reset will be done JP42 Monitoring of 1 8V supply voltage JP43 Monitoring of 2 5V supply vo...

Page 28: ...via UART4 JP57 5 6 Reset will be done via UART5 1 2 No polarity inversion for the DTR RTS signal JP29 2 3 Polarity inversion for the DTR RTS signal Table 3 16 Reset UART Selection By default the UART reset is disabled Note During normal operation the reset LED should be off If the reset LED is steadily on check the power supply voltages and the settings for the reset generation by UART ...

Page 29: ... as well as the LIN signals are shared at the connectors and have to be selected by jumpers see chapter 3 4 Figure 4 2 UART Connector Pin Number Pin Signal Description 1 VBat Power from LIN bus TXD RS 232 transmit output 2 LIN Bi directional LIN interface 3 RXD RS 232 receive input 4 DTR Connected to DSR pin 6 5 GND Ground normally used for RS232 connection 6 DSR Connected to DTR pin 4 7 RTS Can b...

Page 30: ...nnectors are used for the CAN interfaces CAN0 CAN1 and CAN2 Figure 4 3 CAN Connector Pin Number Pin Signal Description 1 NC Not used 2 CANL LOW level CAN voltage input output 3 GND Ground 4 NC Not used 5 NC Not used 6 NC Not used 7 CANH HIGH level CAN voltage input output 8 NC Not used 9 NC Not used Shield GND Ground Table 4 2 CAN Connector Signals ...

Page 31: ... at port P25 and RN2 D9 D16 at port P16 It is also possible to connect a standard LCD module with backlight to connector J6 With the potentiometer RP1 the contrast of the LCD can be adjusted Pin 14 13 12 11 10 9 8 7 6 5 4 3 2 1 16 15 LCD DB7 DB6 DB5 DB4 E R W RS VO Vcc GND LED LED LED D8 D7 D6 D5 D4 D3 D2 D1 Port P25_7 P25_6 P25_5 P25_4 P25_3 P25_2 P25_1 P25_0 MCU 187 186 185 184 181 180 179 178 T...

Page 32: ...n 1 NC Not used 2 NC Not used 3 MD0 MCU mode pin 0 4 MD2 MCU mode pin 2 5 INITX MCU reset signal 6 SIN4 UART4 receive data 7 SOT4 UART4 transmit data 8 SCK4 UART4 clock 9 VCC Board supply voltage 10 GND Ground Table 4 4 In Circuit Programming Connector 4 6 MCU Pin Connectors J1 J4 All MCU pins are directly connected to the four pin header around the MCU The last two pins of the pin header J1 J2 J3...

Page 33: ...1 C13 D26 12 A14 D27 13 B14 D28 14 C14 D29 15 A15 D30 16 B15 D31 17 C15 GND A16 GND B16 GND C16 GND A17 A0 18 B17 A1 19 C17 A2 20 A18 A3 21 B18 A4 22 C18 A5 23 A19 A6 24 B19 A7 25 C19 A8 28 A20 A9 29 B20 A10 30 C20 A11 31 A21 A12 32 B21 A13 33 C21 A14 34 A22 A15 35 B22 A16 36 C22 A17 37 A23 A18 38 B23 A19 39 C23 A20 40 A24 A21 41 B24 A22 42 C24 A23 43 A25 A24 44 B25 A25 45 C25 NC A26 NC B26 NC C26...

Page 34: ...A10 DREQ0 189 B10 NC C10 DACKX0 190 A11 DEOP0 191 B11 NC C11 NC A12 INT12 97 B12 NC C12 SDA0 99 A13 INT13 98 B13 NC C13 SCL0 100 A14 SIN5 109 B14 Vin C14 SOT5 110 A15 GND B15 Vin C15 SCK5 111 A16 INITX 73 B16 Vin C16 GND Table 4 7 VG48 X14 Signals 4 7 3 Distance between VG Connectors To connect own applications to the Starterkit the following figure shows the distance between the VG DIN 41612 conn...

Page 35: ...space to load the first example MB91460_io_91467d wsp All examples can be found in the folder software examples on the Starterkit CD ROM It is recommended to copy this folder to the local hard drive In the project tree on the left side you can open the source folder which contains the source files registered to this project A double click on one of the files will invoke the built in editor which s...

Page 36: ...is with a simple syntax error e g delete a semicolon from the end of a C line and click on MAKE again You will now see a message like this Now Making Configuration Starterkit91302_Test prj Debug main c C SK 91F467 208PFV 91460_io_91467d Src main c 81 E4065B expected a C SK 91F467 208PFV 91460_io_91467d Src main c 104 W1012B warning parsing restarts here after previous syntax error 1 error detected...

Page 37: ...the Template project 2 Copy the folder Template and rename the folder to e g my_application 3 Enter the folder my_application Rename template prj into my_application prj Rename template wsp into my_application wsp 4 Edit my_application prj Rename template my_application 5 Edit my_application wsp Rename template my_application In any case the settings done in the template must be checked and have t...

Page 38: ...PFV V1 1 Getting Started FMEMCU UG 910014 10 38 Fujitsu Microelectronics Europe GmbH 6 Start Softune Workbench and open your project Figure 5 2 Open Softune Workbench workspace wsp Rename Template into my_application ...

Page 39: ...ifications If the peripheral clock speed is modified it can happen that the communication between Softune Workbench and Softune Workbench Monitor Debugger is lost In the module start91460 asm some basic MCU settings are done and some initial data copy transfers are performed for specific data sections e g INIT Check if the macro SWBMonDeb is enabled default in the Assember options Project Setup Pr...

Page 40: ...heck linker mapping list in the mp1 file by right click on my_application abs Open List File mp1 Figure 5 5 Softune Workbench Linker Mapping Note Always check the memory map of the linker settings and ensure that this memory map is suitable for the application and target system in use Additionally the mp1 file should be checked to ensure correct settings ...

Page 41: ...figuration will not work with the Softune Workbench Monitor Debugger In this configuration the code is linked to work in internal Flash memory only 13 Use Make or Build to compile and link the project for internal Flash memory The generated output files can be found in the sub folder STANDALONE of the project folder The mhx file Motorola S Record is located in the ABS sub folder 14 Program the gen...

Page 42: ...lator debugger The in circuit emulator ICE is a system which allows a connection to any target system using a probe cable The appropriate system for the MB91F467D series is the MB2198 01 system More information about this system can be found on Fujitsus website Which debugger is used for the actual project can be configured in the project tree as shown below or in the Project Setup Project Debug m...

Page 43: ...sition all OFF Figure 5 7 MB91F467D and mode pin DIP switch 2 Correct start up of the Softune Workbench Monitor Debugger Figure 5 8 Reset button and user LED In case of any other status indication push the reset button or check chapter 6 6 1 for detailed information Start the debugger by double clicking the Mondeb_57K6_com1 sup entry in the project debug tree or by using Debug Start Debug from the...

Page 44: ...5 9 SWB Debugging window Breakpoint indicators and the assembler code in mixed view The current program position will be indicated by a yellow line Use right click in the source window to configure the view add remove control characters View Mixed source code Breakpoint Note You can choose mixed view from the context menu right click to display source and assembly code at the same time The command...

Page 45: ...ous CALL RETURN execution STEP OUT Executes the program continuously to the parent function until RETURN Interrupts are enabled Note that debug information is required for this function EXECUTE UNTIL CURSOR Automatically sets a breakpoint at the actual cursor position and executes continuously until this breakpoint which will be deleted afterwards Each valid code line in a debugger window automati...

Page 46: ...reaching this line A list of all breakpoints can be found under the Debug Breakpoint menu 255 Software Breakpoints using TRAP replacement are possible REGISTER WINDOW Displays the CPU register window Updated registers appear in red Setup in context menu defines which Registers should be displayed WATCH WINDOW Displays the current variables to watch Double click on any variable in your code then sp...

Page 47: ...in your code when the debugger is on hold DEBUG LOAD TARGET FILE Starts a new download of the current load module ABS file Usually this function will be executed automatically after starting the debugger defined in debug settings see Project Setup Debug However this function can be useful to re initialize the debugger for the current debug session VIEW SYMBOL This function displays all global symb...

Page 48: ...e files are simple text files with the extension PRC and can be created by the Softune Workbench editor or any other text editor To execute a procedure file use the command window menu or the file open menu during debugging Note Procedure files can be very helpful to configure the debug environment automatically perform automated tests e g when a new C module has to be tested or to enhance basic e...

Page 49: ...d must not be used by the application Memory Map of Softune Workbench Monitor Debugger 91460_mondeb_uart4 v11 Memory Type Used for Area s Sections Internal CPU Data RAM Stack Data 0x28000 0x28FFF STACK DATA Debug Kernel 0x000F 0000 0x000F FFFF CODE CONST Internal Flash Memory of MB91F467D series Vector Table 0x0F FC00 0x0F FFFF INTVECT Note Be aware that the memory map may depend on the debugger v...

Page 50: ...ernal RAM Use the provided templates to make sure the sections are located correctly Always check the mp1 file use right mouse click on top abs file in the project window of Softune Workbench and select open list file to see the used sections and address areas The following chip select areas are used by the Softune Workbench Monitor Debugger and must not be used or overlap with other chip select a...

Page 51: ...ing of the Starterkit CD ROM and execute the FME_FR_Flashprogrammer_v3_7 exe file The default installation folder is C Softune6 Utility b Start the flash programming tool by double click flash exe within the installed folder C Softune6 Utility FME_FlashProgrammer_v3_7 flashprg exe 2 Open the flash programming tool by double click the flashprg exe file 3 Select CPU type COM Port baud rate Hex File ...

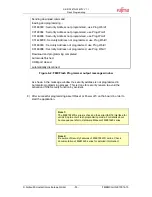
Page 52: ...lank check Flash erase if necessary and programming the application Following is displayed in the message window in case of successful programming Sending start characters Connection OK Filesize 8192 0x2000 bincommand write writing 8192 bytes received checksum 4426 0x114A calculated checksum 4426 0x114A OK checksums match write finished Sending Baudrate Information received checksum 114 0x0072 cal...

Page 53: ...Automode finished COM port closed automatically disconnect Figure 6 2 FME Flash Programmer output message window As shown in the message window the security address is not programmed in Automatic programming process This is done for security reason to avoid the activation of the Security function by accident 8 After successful programming assert Reset or Power off on the board in order to start th...

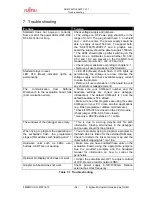
Page 54: ...munication errors Make sure your COM port number and the baudrate settings are correct see debugger introduction The default COM port is 1 and the default baudrate is 57 6 kBaud Make sure no other programs are using the same COM port on your PC Close all other applications e g Flash programmer utilities terminals etc Check if RTS CTS is closed on the CPU module check jumper JP58 60 65 are closed U...

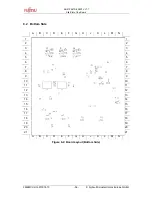
Page 55: ...E F G H J K L M N 1 1 2 2 3 3 4 4 5 5 6 6 7 7 8 8 9 9 10 10 11 11 12 12 13 13 14 14 15 15 16 16 17 17 18 18 19 19 20 20 21 21 A B C D E F G H J K L M N Figure 8 1 Board Layout Top Side Power Power Switch VG48 female X14 VG96 female X13 C1 B1 A1 C16 B16 A16 C32 B32 A32 C1 B1 A1 RST INT0 INT1 INT2 ICU0 CAN0 X9 CAN1 X10 X11 CAN2 X1 UART2 X4 UART4 X8 UART5 ...

Page 56: ...0014 10 56 Fujitsu Microelectronics Europe GmbH 8 2 Bottom Side A B C D E F G H J K L M N 1 1 2 2 3 3 4 4 5 5 6 6 7 7 8 8 9 9 10 10 11 11 12 12 13 13 14 14 15 15 16 16 17 17 18 18 19 19 20 20 21 21 A B C D E F G H J K L M N Figure 8 2 Board Layout Bottom Side ...

Page 57: ...V1 1 U6 Additionally pull up resistors for MCU and ASSP reset line V1 1 U6 Reset button connection SW1 add further option to activate reset directly when pressing SW1 Actually SW1 must be pressed 2s to activate reset add solder jumper to select one option V1 1 U9 Add C 220uF 16F between Vcc5V and GND V1 1 U11 Add C 220uF 16F between Vcc3V3 and GND V1 1 U14 Add C 100uF 16F between Vcc2V5 and GND V1...

Page 58: ...t MB2198 10 DSU cable MB2198 300 Adapter board for MB91V460 emulation chip BGA 660P MB91V460 Emulation chip of MB91460 Series PB 91467D 208PFV Probe cable for MB91F467D target system Recommended for SK 91F467D 208PFV PB 91467D NLS 208PFV Probe cable for MB91F467D target system Recommended for SK 91F467 FLEXRAY NQPACK208SD Socket for package FPT 208P M01 and FPT 208P M04 Tokyo Eletech Corp www tetc...

Page 59: ...t Tools Hard and Software http www fme gsdc de gsdc htm Automotive products MCU Graphic display controller MPEG en decoder gyro sensors http www fujitsu com emea services industries automotive Linear Products Power Management A D and D A Converters http www fujitsu com emea services microelectronics linears Media Products SAW filters acoustic resonators and VCOs http www fujitsu com emea services ...

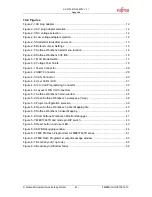
Page 60: ... Settings 25 Table 3 11 User Push Buttons 26 Table 3 12 S4 Values 26 Table 3 13 S3 Settings 26 Table 3 14 Reset Connections 27 Table 3 15 Supply Monitor Settings 27 Table 3 16 Reset UART Selection 28 Table 4 1 UART Connector Signals 29 Table 4 2 CAN Connector Signals 30 Table 4 3 LED LCD Signals 31 Table 4 4 In Circuit Programming Connector 32 Table 4 5 MCU Pin Connectors 32 Table 4 6 VG96 X13 Sig...

Page 61: ...gure 4 3 CAN Connector 30 Figure 4 4 User LEDs LCD 31 Figure 4 5 In Circuit Programming Connector 32 Figure 4 6 Layout of DIN VG Connectors 34 Figure 5 1 Softune Workbench main window 35 Figure 5 2 Open Softune Workbench workspace wsp 38 Figure 5 3 Project configuration selection 39 Figure 5 4 Open Softune Workbench Linker Mapping file 40 Figure 5 5 Softune Workbench Linker Mapping 40 Figure 5 6 S...

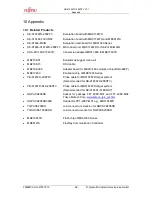
Page 62: ... Standard Product CAN Controller Area Network CS Chip Select FME Fujitsu Microelectronics Europe GmbH LB Lower Byte LIN Local Interconnect Network MCU Microcontroller Unit PCB Printed Circuit Board SRAM Static Random Access Memory UART Universal Asynchronous Receiver Transmitter UB Upper Byte UG User Guide USART Universal Synchronous Asynchronous Receiver Transmitter ...

Reviews: