SK-91F467D-208PFV V1.1
Trouble shooting
FMEMCU-UG-910014-10
- 54 -
© Fujitsu Microelectronics Europe GmbH
7 Trouble shooting
Problem
Solution
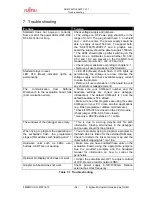
Starterkit does not power-on correctly.
Some or all of the power LEDs (D24, D30,
D34, D40) do not lit up.
Check voltage supply and jumpers :
∗
The voltage on DC-Power plug should be in the
range of 9-12V. The plug should have ‘+’ on shield
and ‘–‘ on the center. The power supply should be
able to supply at least 500 mA. To support both,
the “SK-91F467D-208PFV” and a graphic sub-
board the supply should be able to supply 1500mA.
* The LEDs should light up after switching on the
board. Use a multimeter to see whether 5V,3.3V,
2.5V and 1.8V are present on the Vcc/GND test
measurement points J21, J22, J23 and J24.
∗
Check jumper positions according to chapter 2.1
∗
Remove all user extensions of the Starterkit
Starterkit stays in reset.
LED D18 (Reset indicator) ligths up
permanently.
∗
LED D18 (Reset) should flash. If D18 lights up
permanently, the voltage is too low. Increase the
voltage supply and check available supply current
to solve the problem.
∗
Remove all user extensions on the board to avoid
any shortcuts or leakage current!
The communication from Softune
Workbench to the evaluation board fails
(Communication errors).
∗
Make sure your COM-port number and the
baudrate settings are correct (see debugger
introduction). The default COM-port is 1 and the
default baudrate is 57.6 kBaud.
∗
Make sure no other programs are using the same
COM-port on your PC. Close all other applications
(e.g. Flash programmer utilities, terminals etc.)
* Check if RTS/CTS is closed on the CPU module
(check jumper JP58, 60, 65 are closed).
* Use only a RS232 extension 1:1 cable.
The windows of the debugger are empty. * This is due to a wrong (maybe old) file path
information. Closing all windows in the debugger
and re-open should fix the problem.
When trying to program the application to
the embedded flash, the programmer
stops at first address with “loading error” !
* You are probably trying to program a program to
the flash which is linked for the external RAM area.
Check for details the linker memory map and the
linker output mapping file *.mp1 file.
Hardware units such as LEDs, user
buttons, UART are not working.
∗
Make sure you have enabled these units on the
evaluation board using the appropriate jumpers.
See the provided examples and the hardware
manual for information on how to control the
peripherals.
Optional LC-Display at J6 does not work
∗
Adjust the potentiometer RP1 to adjust contrast
of LCD. Remove resistor network RN3.
Graphic sub-board does not work
Check power supply 9-12V/1500mA. Reduce
external bus clock frequency.
Table 7-1: Trouble shooting

