


172
Upgrade and Maintenance Manual
RX1330
M3
Hard disk drive (HDD) / solid state drive (SSD)
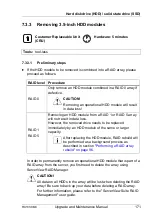
7.3.3.2
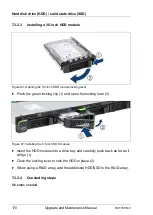
Removing a 3.5-inch HDD module
Ê
Pinch the green locking clips and open the locking lever (see figure
).
Ê
Pull the HDD module out a few centimeters.
Ê
Wait about 30 seconds to allow the HDD to spin down.
I
This period is necessary for the RAID controller to recognize that an
HDD module has been removed and for the HDD to come to a stop.
Ê
Pull the HDD module completely out of its bay.
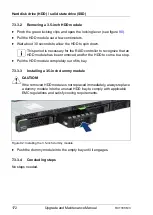
7.3.3.3
Installing a 3.5-inch dummy module
V
CAUTION!
If the removed HDD module is not replaced immediately, always replace
a dummy module into the unused HDD bay to comply with applicable
EMC regulations and satisfy cooling requirements.
Figure 92: Installing the 3.5-inch dummy module
Ê
Push the dummy module into the empty bay until it engages.
7.3.3.4
Concluding steps
No steps needed.
Summary of Contents for PRIMERGY RX1330 M3
Page 20: ...Upgrade and Maintenance Manual RX1330 M3 Contents ...
Page 48: ...48 Upgrade and Maintenance Manual RX1330 M3 Important information ...
Page 70: ...70 Upgrade and Maintenance Manual RX1330 M3 Basic hardware procedures ...
Page 132: ...132 Upgrade and Maintenance Manual RX1330 M3 Power supply unit PSU ...
Page 178: ...178 Upgrade and Maintenance Manual RX1330 M3 Hard disk drive HDD solid state drive SSD ...
Page 184: ...184 Upgrade and Maintenance Manual RX1330 M3 Fans ...
Page 222: ...222 Upgrade and Maintenance Manual RX1330 M3 Expansion cards and backup units ...
Page 244: ...244 Upgrade and Maintenance Manual RX1330 M3 Processor CPU ...
Page 310: ...310 Upgrade and Maintenance Manual RX1330 M3 System board and components ...