background image

6 Removing the side cover

11

E

3

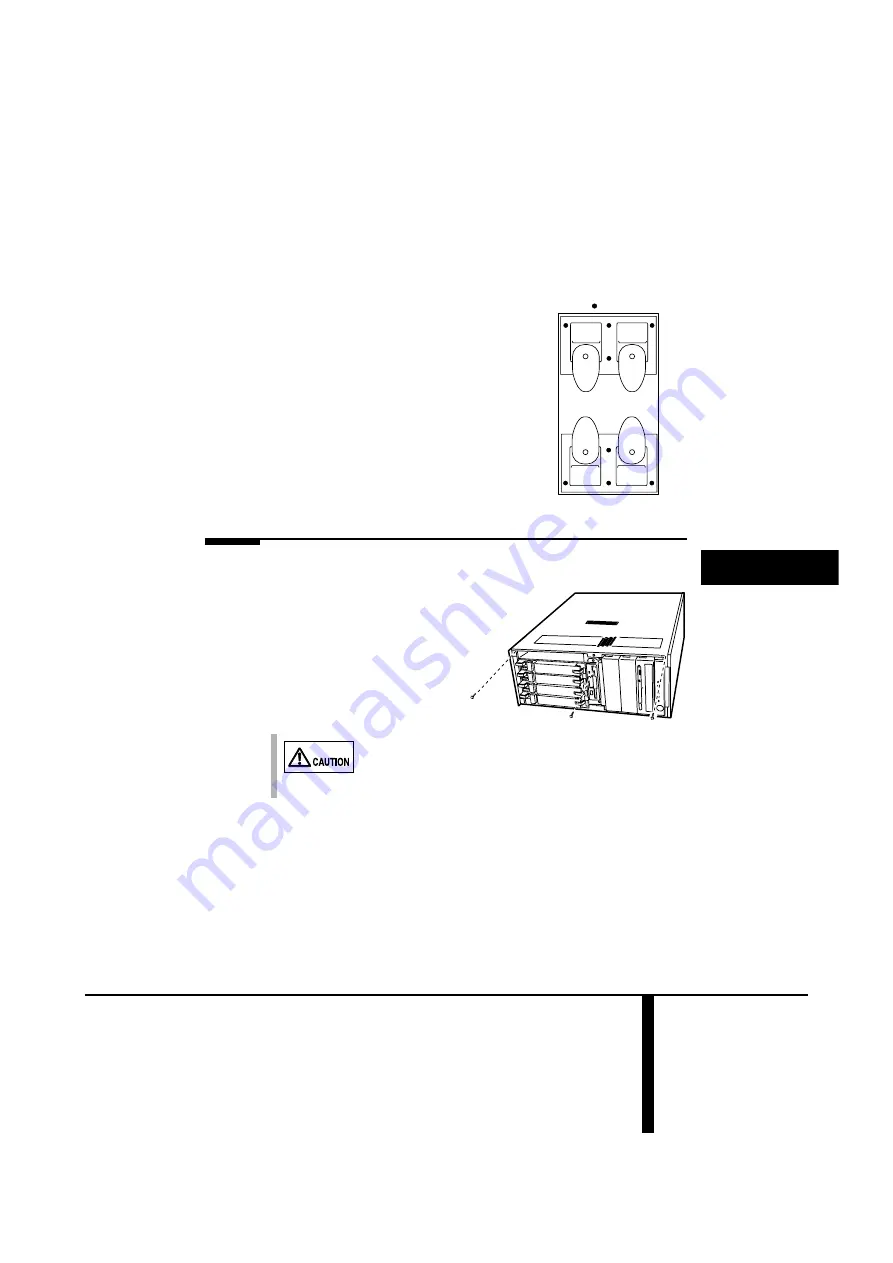
Detach the stabilizer legs from the bottom of the server.

Remove the retaining M3 screws (4 per plate) to detach
the stabilizer legs from the server.

6

Removing the side cover

1

Remove the 3 retaining screws (M3) fixing the side cover.

Screw holes

[Bottom of the server]

Do not lose these screws since they will be used later to reat-
tach this cover.

Summary of Contents for PRIMERGY PG-R1CK2

Page 1: ...このマニュアルは再生紙を使用しています PRIMERGY P3FY 2360 01 E J マニュアル 製品名称 PRIMERGY ES320 ラックマウント変換機構 PG R1CK2 PRIMERGY ES320 Rack Conversion Kit PG R1CK2 J E ...

Page 2: ...PRIMERGY ES320 ラックマウント変換機構 PG R1CK2 をお買い上げ いただき 誠にありがとうございます ラックマウント変換機構は デスクサイドタイプのサーバをラックに搭載するため に ラックマウントタイプに変換するためのキットです 本書はラックマウント変換機構の取り扱いの基本的なことがらについて説明してい ます 本書をご覧になり ラックマウント変換機構を正しくお使いいただきますよう お 願い致します 2002 年 2 月 ...

Page 3: ...サーバを搭載することができませんので ご注意ください スタンダードラック 型名 PG R3RC1 PG R3RC2 PG R4RC1 PG R4RC2 スリムラック 型名 GP5 R1RC4 GP5 R1RC5 GP5 R1RC6 GP5 R1RC7 GP5 R2RC1 GP5 R2RC2 GP5 R2RC3 GP5 R2RC4 会社名および製品名は 各社の商標または登録商標です All Rights Reserved Copyright 富士通株式会社 2002 スタンダードラック スリムラック ...

Page 4: ...ために 上記の絵表示と同時に 次の記号を使用しています 警告 この表示を無視して 誤った取り扱いをすると 人が死亡する可能性 または重傷を負う可能性があることを示しています 注意 この表示を無視して 誤った取り扱いをすると 人が傷害を負う可能 性があること および物的損害のみが発生する可能性があることを示 しています で示した記号は 警告 注意を促す内容であることを告げるも のです 記号の中やその脇には 具体的な警告内容 左図の場合は感 電注意 が示されています で示した記号は してはいけない行為 禁止行為 であること を告げるものです 記号の中やその脇には 具体的な禁止内容 左図 の場合は分解禁止 が示されています で示した記号は 必ず従っていただく内容であることを告げる ものです 記号の中やその脇には 具体的な指示内容 左図の場合は 電源プラグをコンセントから抜いてください が示されて...

Page 5: ...感電したり機器が故障するおそれがあります 注意 指 示 サーバ本体をラックマウントタイプに変換するときは 必 ず担当営業員または担当保守員に連絡してください 禁 止 サーバ本体を直射日光の当たる場所や 暖房器具の近くな ど 高温になる場所には設置しないでください また 10 未満の低温になる場所には 設置しないでください 故 障の原因となります サーバ本体を塩害地域では使用しないでください 故障の 原因となります ラックの開口部 通風孔など をふさがないでください 通風孔をふさぐと内部に熱がこもり 火災の原因となりま す 電源ケーブルおよび各種ケーブル類に足がひっかかる場所 には設置しないでください 故障の原因となります サーバ本体をテレビやスピーカの近くなど 強い磁界が発 生する場所には設置しないでください 故障の原因となります ...

Page 6: ...v J 注意 禁 止 空気の吸排気口である装置前面部および背面部をふさがな いでください これらをふさぐと内部に熱がこもり 火災の原因となりま す サーバ本体を移動する場合は 必ず電源を切断し ケーブ ル類 マウス キーボード AC ケーブルを外してくださ い オプションの搭載によって 最大 35Kg 以上の重量と なりますので十分注意してください ...

Page 7: ...vi ...

Page 8: ...以下の表記 記号を使用しています ラックマウント変換機構または本製品 PRIMERGY ES320 ラックマウント変換機構のことです サーバ本体または本サーバ PRIMERGY ES320 のことです また サーバ本体の形態を区別して 以下の名称を用いて説明しています デスクサイドタイプ ラックマウントタイプ ポイント ポイント ポイント ポイント ハードウェアやソフトウェアを正しく動作させるために必要なことが書いて あります 本書内の参照ページを示します ...

Page 9: ...viii ...

Page 10: ...作業前の準備 5 2 フロントカバーの取り外し 5 3 内蔵ハードディスクの取り外し 7 4 トップカバーの取り外し 9 5 転倒防止足の取り外し 11 6 サイドカバーの取り外し 12 7 5 インチドライブとオペレータパネルの入れ替え 13 8 サイドカバーの取り付け 14 9 ラックへの搭載 15 10 内蔵ハードディスクの取り付け 20 11 ラックフロントカバーの取り付け 21 12 電源を入れる前の確認事項 22 付録 23 使用環境シート 23 ...

Page 11: ...x ...

Page 12: ...1 J 本製品の梱包物 ここでは 本製品に同梱されている部品を示します 作業を行う前に 以下のリストに従って部品がすべて揃っているかどうかを確認 し 万一足りない部品があった場合は担当営業員に連絡してください 部品 名称 数量 確認 ラックフロントカバー 1 レールブラケット 左右 各 1 スライドレール 左右 各 1 フロントカバーブラケット 左右 各 1 左 右 左 右 左 右 ...

Page 13: ...2 を搭載していない場 合には 使用しません ハンドル 1 M3 ネジ 6 M4 ネジ 22 M6 ネジ 12 スクリューホルダー 8 内蔵 DAT オートチェン ジャ GP5 DTA101 GP5 DTA102 用電源ケーブル 1 警告ラベル 1 部品 名称 数量 確認 注意 CAUTION 手指を挟むとけがをするおそれがあります ユニットの出し入れ時には 注意して下さい Mechanical hazard Please pull out or push in unit carefully ...

Page 14: ...員に連絡し 変換作業は必ず担当保 守員に行わせてください サーバのラックマウントタイプへの変換作業は 安定した 場所で行ってください オプションの搭載によって 最大 35kg 以上の重量となりますので十分注意してください サーバのラックマウントタイプへの変換作業は サーバ本 体を横にして作業をするのに十分な広さの場所で行ってく ださい サーバをラックマウントタイプに変換する前に必ずシステ ムを起動し システムの動作状況を確認してください 電源を切った直後は サーバの内部の装置が熱くなってい ます 内蔵オプションの取り付けや取り外しを行う場合は 電源を切ったあと 10 分ほど待ってから 作業を始めてくだ さい 内蔵オプションは 基板や半田付けした部分がむきだしに なっています これらの部分は 人体に発生する静電気に よって損傷を受ける場合があります 取り扱う前に 添付 のリストストラップを必...

Page 15: ... トップカバーを取り外します 5 転倒防止足を取り外します 6 サイドカバーを取り外します 7 5 インチドライブとオペレータパネルを入れ替えます 8 サイドカバーを取り付けます 9 ラックマウント変換機構をサーバ本体に取り付け ラックへ搭載しま す 10 手順 3 で取り外した内蔵ハードディスクを再び取り付けます 11 ラックフロントカバーを取り付けます 12 電源を入れる前の確認を行います 注意 必ず内蔵ハードディスクを取り外してください 作業中に内蔵 ハードディスクに衝撃が加わると 保存されているデータが損 傷することがあります ...

Page 16: ...入します 2 サーバのシステムが動作している場合は システムを終了させます 3 サーバ本体の電源を切り 電源ケーブルをサーバ本体から取り外しま す 4 周辺機器が接続されている場合は 周辺機器の電源を切り サーバ本 体から取り外します 2 フロントカバーの取り外し 1 フロントドアを開け フロントカバーとサーバ本体を固定しているつ まみネジ M3 をゆるめます 注意 各カバーの取り外し 取り付けを行うときは 必ず添付のリス トストラップを着用してください リストストラップは 作業が終了するまで外さないでください ...

Page 17: ...6 操作方法 2 フロントカバーを少し押し下げ 手前に引いて取り外します 3 リストストラップを着用します リストストラップは 本サーバに 添付されています リストスト ラップは サーバ本体に接着する 面 図中 A と 手首に巻き付け る面 図中 B があります A 側のシールをはがして 図に示 すようにサーバ本体前面に接着し ます B 側は手首に巻き付けてく ださい A B リストストラップ ...

Page 18: ...ードディスクの搭載位置についての注意 サーバをデスクサイドタイプからラックマウントタイプに変換すると ベイの向き が変わります 内蔵ハードディスクは 取り外す前にデスクサイドタイプ時のベイ番号と SCSI ID を記録しておき ラックマウントタイプに変換後は必ず取り外し前と同じ位置に搭 載してください 注意 指 示 サーバ本体を移動する前に 必ず内蔵ハードディスクを取り外 してください 内蔵ハードディスクに衝撃が加わると 保存さ れているデータが損傷することがあります ベイ4 ID 3 ベイ3 ID 2 ベイ2 ID 1 ベイ1 ID 0 ベイ5 ID 4 デスクサイドタイプ時の正面 ベイ4 ID 3 ベイ3 ID 2 ベイ2 ID 1 ベイ1 ID 0 ベイ5 ID 4 ラックマウントタイプ時の正面 ...

Page 19: ...1 3 5 インチストレージベイ保護カバーを取り外します 3 5 インチストレージベイ保護カ バーの上部 2 箇所のつまみネジを ゆるめ 手前に開けます 3 5 インチストレージベイ保護カ バーを少し持ち上げて 取り外し ます 2 内蔵ハードディスクを取り外します 内蔵ハードディスクのプラスチッ クレバーを上側に開け 手前に引 きます そのとき 内蔵ハード ディスクに手を添え 両手で持っ て引き出してください 内蔵ハードディスク ...

Page 20: ...取り外し 1 オペレータパネルを 2 3cm 前方にスライドさせます オペレータパネルの両側のツメを内側 に押しながら ゆっくりと手前に引き 出します 2 サーバ本体のフロント側 2 箇所の M3 ネジを取り外します 注意 オペレータパネルを引き出すときには ケーブルがはずれない ようにゆっくりと引き出してください ポイント ポイント ポイント ポイント トップカバーで取り外す M3 ネジは 本製品に添付の M3 ネジと は形状が異なります ツメ 正面 ...

Page 21: ...10 操作方法 3 トップカバーを前方にスライドさせ サーバ本体から取り外します 4 オペレータパネルを カチッと音がするまで押し込んで元の位置に戻 します ...

Page 22: ...5 転倒防止足の取り外し 11 J 5 転倒防止足の取り外し 1 サーバ底面の 4 本の転倒防止足を内側にたたみます 2 サーバ本体を図のように横にします 3 サーバ本体底面の転倒防止足を取り外します 転倒防止足は前後 2 枚のプレートに取り付けられてい ます 各プレートの M3 ネジを 4 箇所ずつ外し サーバ本体 からプレートごと取り外します 転倒防止足 ネジ位置 サーバ本体底面 ...

Page 23: ...12 操作方法 6 サイドカバーの取り外し 1 サーバ本体のフロント側 3 箇所の M3 ネジを取り外します 2 サイドカバーのくぼみに手を添えながら サイドカバーをゆっくりと サーバ前面にスライドさせ サーバ本体から取り外します 注意 取り外したネジは サイドカバーの取り付け時に使用しますの で なくさないように注意してください ...

Page 24: ...するときは 5 インチストレージベイに搭載されてい るユニットとオペレータパネルを 向きを変えて入れ替えます 1 5 インチドライブから内部ケーブルおよび電源ケーブルを取り外しま す 2 オペレータパネルから信号ケーブルおよび電源ケーブルを取り外しま す 3 5 インチドライブ 5 インチブランクユニット およびオペレータパ ネルを 5 インチストレージベイから取り外します 上下のツメを内側に押しながら ゆっくりと手前に引き出します ポイント ポイント ポイント ポイント システム構成により 5 インチブランクユニットは搭載されて いない場合があります 5インチストレージベイ オペレータパネル 変換前 変換後 ツメ 正面 ...

Page 25: ...ータパネルにケーブルを取り付けます 8 サイドカバーの取り付け サイドカバーは 6 サイドカバーの取り外し 12 ページ と逆の手順で取り付 けてください 注意 各ドライブや 5 インチブランクユニットを取り付けるときは ケーブル類をサーバ本体の部品にはさみ込まないように注意し てください ポイント ポイント ポイント ポイント システム構成により 5 インチブランクユニットは搭載されて いない場合があります 注意 オペレータパネルの直下のCD ROMドライブに電源ケーブルを 接続するときは フロッピィディスクドライブの電源ケーブル の途中に取り付けられているコネクタを使用してください 注意 サイドカバーを取り付けるまで リストストラップは外さ ないでください サイドカバーを取り付けるときに サーバ本体内部に不要 な部品や工具を置き忘れたままにしないようにご注意くだ さい ...

Page 26: ...載 ここでは ラックマウント変換機構のサーバ本体への取り付けからラックへの搭載 までの手順を説明します 1 ハンドルを取り付けます サーバ本体前面の中央に 本製 品に添付の M3 ネジ 2 本でハン ドルを固定します 2 フロントカバーブラケットを サーバ本体の両側に取り付けます 左右のブラケットは 各 3 箇所ずつ 本製品に添付の M4 ネジで固定しま す 左面には ない 右側 左側 ハンドルの左右の向き ネジ位置 フロントカバー ブラケット ...

Page 27: ...押しながらスライドレールから引き出し て取り外します インナーレールは 左右異なります 右側のインナーレールにはマニュアル ロック機構があり 左側のインナーレールにはオートロック機構があります 5 サーバ本体にインナーレールを取り付けます それぞれサーバ本体の刻印 A の箇所に 本製品に添付の M4 ネ ジ 4 本で固定します 6 左右のレールブラケットの各 4 本の M4 ネジをゆるめます インナーレール スライドレール 左側 オートロック 右側 マニュアルロック ロック A A A A ...

Page 28: ...9 ラックへの搭載 17 J 7 レールブラケットを伸ばして 左右ともにラックの幅に合わせます 8 サーバ本体を取り付ける位置を決めます 任意の ラック支柱の穴の間隔が狭い位置 にサーバ底面を合わせます ラック左側 ラック支柱 前面 背面 ラック支柱 サーバ本体底面の位置 ...

Page 29: ...置から決まります ネジは 前面では 5 個目と 6 個目に 背面では 4 個目と 6 個目に M6 ネジで スクリューホルダーとともに固定します M6 ネジ スクリューホルダーは本 製品に添付 ラックナットは ラックに添付されているものを前面の 9 個目に取り付けま す ラックナットは ラックレールの内側からツメを引っ掛けて取り付けま す スクリュー ホルダー M6ネジ サーバ本体底面の位置 前面 背面 ラック支柱 レールブラケット 前面 背面 4U 本体装置サイズ 5個目 ネジ 6個目 ネジ 9個目 ラックナット 4U 本体装置サイズ 6個目 ネジ 4個目 ネジ ...

Page 30: ...固 定します 12 ラックに取り付けたスライドレールを カチッと音がするまで伸ばし ます 13 サーバ本体をラックに取り付けます スライドレールの溝とサーバ本体 に取り付けたインナーレールの溝 を合わせ サーバ本体を後方にス ライドさせます このとき 右側 のインナーレールのロックを押し ながらスライドさせてください 14 本製品に添付の警告ラベルを サイドカバーに貼り付けます サイドカバーのフロント側の右端 に貼り付けます 注意 CAUTION 手指を挟むとけがをするおそれがあります ユニットの出し入れ時には 注意して下さい Mechanical hazard Please pull out or push in unit carefully ...

Page 31: ...1 3 5 インチストレージベイに 取り外しておいた内蔵ハードディスクを 取り付けます 内蔵ハードディスクのプラス チックレバーを開いた状態で 搭載する 3 5 インチストレージ ベイに内蔵ハードディスクを図 中の矢印の方向に押し込みま す 2 プラスチックレバーを カチッと音がするまで左側に閉じます 注意 内蔵ハードディスクは 取り外したときに記録した位置と必ず 同じ位置に内蔵ハードディスクを取り付けてください 内 蔵ハードディスクの搭載位置についての注意 7 ページ 参 照 取り付け位置が違うと正しく動作しないおそれがあります 内蔵ハードディスク プラスチックレバー ...

Page 32: ...保護カバー前面のシールドガスケットをはが します 4 3 5 インチストレージベイ保護カバーを取り付けます 3 5 インチストレージベイ保護カバーを 3 5 インチストレージベイの前面 2 箇所 の取り付け穴に引っかけるようにして取り付け 保護カバーの 2 箇所のつまみ ネジをしめます 11 ラックフロントカバーの取り付け 1 ラックフロントカバーを取り付けます 両側のフロントカバーブラケット に 本製品に添付の M3 ネジ 4 本 で固定します シールドガスケット 保護カバー ...

Page 33: ... 5 インチストレージベイの奥まで完全に差し込まれていますか すべての内蔵ハードディスクが取り付けられていますか 確認事項 確認 指示どおりに接続されていますか 各ドライブのコネクタに完全に差し込まれていますか すべてのケーブルが取り付けられていますか 取り外すように指示してあるケーブルは取り外しましたか 1 変換作業前の準備 でサーバ本体から取り外した電源ケーブルは接 続しましたか 確認事項 確認 拡張カードがスロットの奥まで完全に差し込まれていますか 変換作業時の衝撃でカードの差し込みがゆるむ場合があります 確認事項 確認 1 変換作業前の準備 で取り外した周辺機器は 元どおりに正しく接 続しましたか ...

Page 34: ...ーバ本体の仕様 ラック型名およびラックマウント変換機構型名を記 録します この使用環境シートは担当営業員または担当保守員への連絡時に必要となりますの で なくさないようにご注意ください サーバ ラック型名 PRIMERGY ES320 モデル名 型名 シリアル番号 Product Key ラックマウント変換機構型名 GP PG PG R1CK2 サーバ本体の左右どちらかの側面にProduct Keyラベルが貼付されて いる場合にのみ記載してください ...

Page 35: ...24 付録 ...

Page 36: ...t the PRIMERGY ES320 Rack Conversion Kit Please review the information outlined in this manual when using the PRIMERGY ES320 Rack Conversion Kit February 2002 Rack Types This kit only supports the following 2 rack types Do not attempt to install this kit to any other rack type Standard type rack PG R3RC1 PG R3RC2 PG R4RC1 PG R4RC2 Slim type rack GP5 R1RC4 GP5 R1RC5 GP5 R1RC6 GP5 R1RC7 GP5 R2RC1 GP...

Page 37: ...ii All Rights Reserved Copyright FUJITSU LIMITED 2002 ...

Page 38: ...ructions under this symbol when using the server could be hazardous as well as lethal Ignoring the instructions under this symbol when using the server may lead to injuries as well as damage the server or hard ware options The triangle mark emphasizes the urgency of the WARN ING and CAUTION contents Inside the triangle and above it are details concerning its symbol e g Electrical Shock The circle ...

Page 39: ...trip hazards This could damage the server and cause injury Do not use the server in a salty environment Do not obstruct the ventilation slots in the equipment This could cause overheating and shorten the life of the equip ment Do not string the connecting cables in a way that they become trip hazards This could both damage the server and even be injurious Do not place the server in areas where str...

Page 40: ...sion Kit this product Refers to PRIMERGY ES320 Rack Conversion Kit the server this server Refers to PRIMERGY ES320 This server is available with two different mounting schemes Deskside model Rackmount model point Necessary information for operating the hardware and software are provided in this sec tion Indicates references found in this manual ...

Page 41: ...vi ...

Page 42: ...4 Removing the top cover 8 5 Detaching the stabilizer legs 10 6 Removing the side cover 11 7 Repositioning the devices 12 8 Attaching the side cover 14 9 Converting to a rackmount model 14 10 Reinstalling the hard disk units 21 11 Fastening the server to the rack 22 12 Before turning on the server 23 Appendix 25 A 1 Product information sheet 25 ...

Page 43: ...viii ...

Page 44: ...g items are included in the rack conversion kit package If any items are missing inform your Fujitsu sales representative Item Name Qty Check Rack front cover 1 Rail bracket 1 pair Slide rail 1 pair Front cover bracket 1 pair Left Right Left Right Left Right ...

Page 45: ...loader is installed in the server Handle 1 M3 screw 6 M4 screw 22 M6 screw 12 Washer 8 DAT autoloader 1 Warning label 1 Item Name Qty Check 注意 CAUTION 手指を挟むとけがをするおそれがあります ユニットの出し入れ時には 注意して下さい Mechanical hazard Please pull out or push in unit carefully ...

Page 46: ...a sta ble level surface when perform the conversion work as the combined weight can be in excess of 35kg Also work in an open space as the rackmount must be laid horizontally to perform the conversion Make sure that the system is operating properly before per forming the conversion Devices inside the server remain hot after shutdown Wait for approximately 10 min after shutdown before installing or...

Page 47: ... side cover 7 Reorient the devices 8 Reattach the side cover 9 Attach the rack conversion components to the server and install it in the rack 10 Reinstall the hard disk units 11 Fasten the server to the rack 12 Confirm several items as instructed in 12 Before turning on the server before turning on the server Before moving the server remove all hard disk units Striking or hitting a hard disk unit ...

Page 48: ...nd any attached peripherals 4 Disconnect all peripherals and unplug all device power cords 2 Removing the front cover 1 Open the front door then loosen the 2 front cover retaining screws M3 2 Slightly depress the front cover pull it forward to remove Wear a wrist grounding strap before removing and attaching covers Keep the strap on until you complete removing and attaching covers ...

Page 49: ... A and affix it to the server 3 Removing hard disk units After removing the front cover remove the hard disk units from the 3 5 inch storage bays These hard disks must be re installed after the rack conversion is complete This section describes how to remove the hard disk units from their bays A B Wrist grounding strap Before moving the server remove all hard disk units Striking or hitting a hard ...

Page 50: ...e and after conversion Make sure to write down the bay and SCSI ID for each hard disk so they can be properly reoriented 1 Remove the hard disk unit bay cover Unscrew the two screws on the top of the cover and open it to the front Note Slightly lift the cover while open ing Bay 4 ID 3 Bay 3 ID 2 Bay 2 ID 1 Bay 1 ID 0 Bay 5 ID 4 Front of a deskside model Bay 4 ID 3 Bay 3 ID 2 Bay 2 ID 1 Bay 1 ID 0 ...

Page 51: ...r of a hard disk unit and pull out to remove Make sure to remove all installed hard disks 4 Removing the top cover 1 Partially slide the operator panel towards the front Holding the latches pinched pull the device out about 2 or 3cm from its bay Hard disk unit Latches Front ...

Page 52: ...r Be sure not to lose the screws that you removed 3 Gently slide the top cover towards the front and remove it from the server 4 Push the operator panel back into the devices until it clicks into place POINT The shape of these M3 screws is different from that of the M3 screws provided ...

Page 53: ...10 Conversion procedure 5 Detaching the stabilizer legs 1 Turn the stabilizer legs inward at the bottom of the server 2 Lay the server on its side see diagram Stabilizer legs ...

Page 54: ...ver Remove the retaining M3 screws 4 per plate to detach the stabilizer legs from the server 6 Removing the side cover 1 Remove the 3 retaining screws M3 fixing the side cover Screw holes Bottom of the server Do not lose these screws since they will be used later to reat tach this cover ...

Page 55: ...e server to a rackmount model you must reorient the following 5 inch bay stor age bay components all 5 inch internal devices all blank units Operator panel See the following diagram to identify their new orientation 1 Disconnect all internal cables and power cables from the operator panel and any other 5 inch internal devices 5 inch storage bays Operator panel Before After ...

Page 56: ...while pulling out the device out of its bay see diagram 3 Orient the operator panel all 5 inch internal devices and or blank units and insert until they click into their 5 inch bays POINT Depending on the number of devices installed there may not be any blank units When installing these components be careful not to pinch the cables between the other components POINT Depending on the number of devi...

Page 57: ...owing steps to attach the rack conversion kit to the server 1 Attach the handle Fasten the handle at the front of the server by the 2 screws M3 pro vided Use the floppy disk power cable for both the floppy disk drive and the CD ROM device The connector for the CD ROM is located midpoint along the power cable Do not remove the wrist grounding strap until the side cover installation is complete Befo...

Page 58: ... M4 provided 3 Open both the front and rear doors of the rack cabinet 4 Separate the inner rail from the slide rail Holding the lock pressed see diagram slowly pull the inner rail outward to remove The right and left rails can be distinguished by the shape of their locks see diagram Screw holes Front cover brackets Inner rail Slide rail Left Auto lock Right Manual lock Lock ...

Page 59: ...ock are different Make sure to attach each rail to it s proper side of the server with screws M4 in the 4 locations A indicated in the figure Note The slide rail is attached to the rack cabinet in step 10 after the rail brackets Step 6 to 9 describe how to attach the rail brackets to the rack cabi net 6 Loosen the 4 screws M4 on the rail brackets 4 per bracket A A A A ...

Page 60: ...ail bracket to align with the rack width 8 Placing the server in the rack You can position the server at various heights in the rack by aligning the base of the server to match to any narrow space between the rack holes Left side of rack Frame Front Rear Rack support Narrow space Server baseline ...

Page 61: ...vided in the 5th and 6th holes up at the front and the 4th and 6th holes at the rear The rack nuts provided with the rack should be installed in the 9th hole position from the bottom at the front see diagram Screw holder M6 screw Server bottom reference lebel Front Rear Frame Rail bracket Front Rear 4U s erver height 5th and 6th slot hole for the rail assembly 9th slot hole for rack nuts 4U server...

Page 62: ... the slide rail in the 4 loca tions indicated in the figure 2 assem blies in total It may be necessary to slightly shift the bracket and rail when tightening the screws 12 Pull the slide rails to the front until they click into place 13 Mount the server on the rack assembly Holding the lock on the slide rail pressed properly seat the server into the rail grooves of the rail assembly and push the s...

Page 63: ...he top cover Affix the provided warning label in the right corner of the top cover near the front 15 Fasten the server to the rack by 4 M6 screws 注意 CAUTION 手指を挟むとけがをするおそれがあります ユニットの出し入れ時には 注意して下さい Mechanical hazard Please pull out or push in unit carefully ...

Page 64: ...ic lever close of each hard disk to secure them into place 3 Remove the gasket put on the hard disk unit bay cover 4 Close the hard disk unit cover Attach the hard disk unit bay cover by inserting the two hinges of the cover into their respective slots located at the front lower left and right corners Be sure to reinstall the hard disk units back to their correct bays from which they were removed ...

Page 65: ...22 Conversion procedure 11 Fastening the server to the rack 1 Attach the rack front cover Fasten the rack front cover to the front cover brackets on both sides by the 4 screws M3 provided ...

Page 66: ...talled Item Check Are all cable connections correct Is each cable properly seated Are all cables connected Did you disconnect the cables as instructed Did you reconnect the server s power cable from 1 Pre work preparations Item Check Are all expansion cards properly seated in their PCI slots Some expansion cards may have become loosen while performing the conversion Item Check Did you reconnect th...

Page 67: ...24 Conversion procedure ...

Page 68: ...s sheet because of the necessary to contact to your maintenance engi neer Server Rack Model PRIMERGY ES320 Name Product ID Serial number Product Key Product ID of your Rack Conversion Kit Type GP PG PG R1CK2 Record the product key if there is a product key label affixed on either side of the server ...

Page 69: ...26 ...

Page 70: ...lity for damages to third party copyrights or other rights arising from the use of any information in this manual No part of this manual may be reproduced in any form without the prior written per mission of Fujitsu PRIMERGY ES320 ラックマウント変換機構 PG R1CK2 取扱説明書 Rack Conversion Kit PG R1CK2 USER GUIDE P3FY 2360 01 00 発行日 2002 年 2 月 発行責任 富士通株式会社 Issued on February 2002 Issued by FUJITSU LIMITED ...

Page 71: ...このマニュアルは再生紙を使用しています PRIMERGY P3FY 2150 01 E J マニュア 製品名称 PRIMERGY F200 ラックマウント変換機構 PG R1CK6 PRIMERGY F200 Rack Conversion Kit PG R1CK6 J E ...

Reviews: