background image

1

Getting to Know Your LifeBook

Names of the Parts 
aNd their fuNctioNs

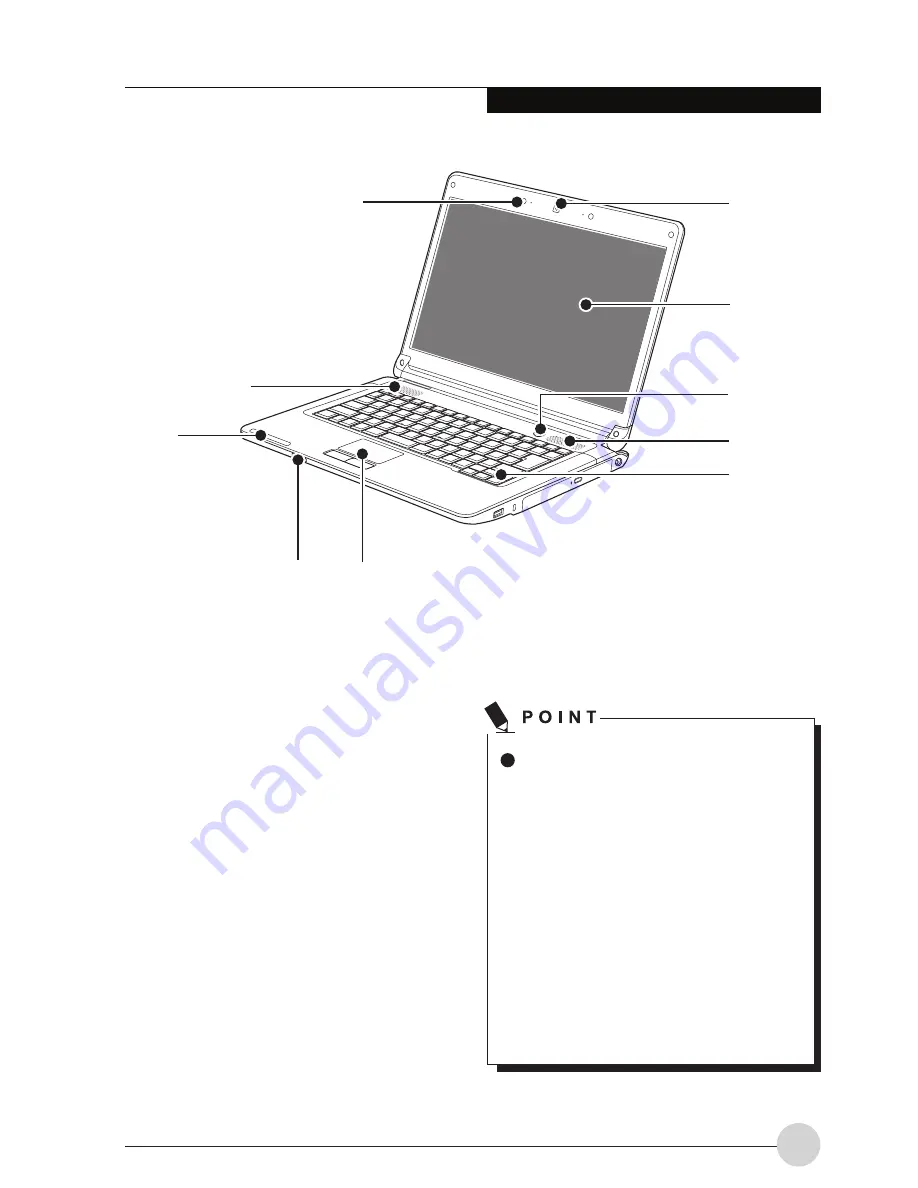
front features of the 
notebook

1.  1.3 mega Pixels camera


The location of the built-in camera.

2.  Lcd Panel


The display screen of the notebook.

(This picture is for illustration purpose only and may look different from the actual unit)

  The  phenomena  described  below  are 

characteristics of LCD panels and do not 
indicate that LCD panels are defective.

•  The TFT color LCD screen of your 

notebook,  composes  of  more  than 
2,350,000 picture elements (number 
of dots when the screen resolution 
is  set  at  1366  by  768  pixels).  It 
was manufactured using advanced 

technologies. For technical reasons, 

LCD screen may have pixels that do 
not light and pixels that are always 
lit.

•  LCD  panels  may  display  slight 

varying colors and uneven density.

6

7

5

4

9

4

2

3

1

8

Summary of Contents for LifeBook LH520

Page 1: ...RMITY according to FCC Part 15 Copyright Fujitsu Limited has made every effort to ensure the accuracy and completeness of this document However as ongoing development efforts are continually improving the capabilities of our products we cannot guarantee the accuracy of the contents of this document We disclaim liability for errors omissions or future changes LifeBook is a trademark of Fujitsu Limi...

Page 2: ... qualified technician to restore the product to normal condition e If the product has been dropped or the cabinet has been damaged f If the product exhibits a distinct change in performance indicating a need for service IMPORTANT SAFETY INSTRUCTIONS 1 Read these instructions carefully Save these instructions for future reference 2 Follow all warnings and instructions marked on the product 3 Unplug...

Page 3: ...or dispose of in fire Replace only with the same or equivalent type recommended by the manufacturer Dispose of the used battery according to the manufacturer s instructions 14 Use only the proper type of power supply cord set provided in your accessories box for this unit It should be a detachable type UL listed CSA certified BS1363 ASTA SS145 certified rated 10A 250V minimum VDE approved or its e...

Page 4: ...his equipment among other information If requested the user must provide their telephone company with the following information 1 The telephone number to which the notebook is connected 2 The Ringer Equivalence Number REN for this equipment 3 That the equipment requires a standard modular jack type USOC RJ 11C which is FCC Part 68 compliant 4 The FCC Registration Number This equipment is designed ...

Page 5: ...e rooms must contain hearing aid compatible telephones or jacks for plug in hearing aid compatible telephones which will be provided to hearing impaired customers on request For model with modem only DOC INDUSTRY CANADA NOTICES Notice to Users of Radios and Television This Class B digital apparatus meets all requirements of the Canadian Interference Causing Equipment Regulations Notice to Users of...

Page 6: ...or equivalent type recommended by the manufacturer Dispose of used batteries according to the manufacturer s instruction Proper Disposal of Battery Under federal state or local law it may be illegal to dispose of batteries by putting them in the rubbish bins or trash cans Please take care of our environment and dispose of batteries properly Check with your local government authority for details re...

Page 7: ...Y This product is designed and manufactured for general use including general office use personal use household use and ordinary industrial use This product is not designed for or intended for use under dangerous fatal conditions unless extreme safety precautions are implemented Do not use this product without implementing high level safety precautions Failure to follow this warning may result in ...

Page 8: ...features of your notebook Names of the Parts and their Functions 1 Front features of the notebook 1 Exterior features Side view 3 STATUS INDICATOR LED 5 Power Indicator 5 Battery Charging Indicator 5 Battery Level Indicators 5 Disk Drive Access Indicator 5 Running the Notebook on its Battery 6 Recharging the battery 6 Running the notebook on its battery 7 Checking the power level of the battery 7 ...

Page 9: ...e phenomena described below are characteristics of LCD panels and do not indicate that LCD panels are defective The TFT color LCD screen of your notebook composes of more than 2 350 000 picture elements number of dots when the screen resolution is set at 1366 by 768 pixels It was manufactured using advanced technologies For technical reasons LCD screen may have pixels that do not light and pixels ...

Page 10: ...nto the keyboard power off your notebook immediately and turn the notebook upside down to drain off the liquid 6 Touch Pad It allows you to control the display cursor mouse pointer 7 SDHC SD MS MS PRO Card Slot The SDHC SD MS MS PRO Card slot allows you to install a flash memory card for data storage This architecture allows you to transfer data from a variety of different digital devices such as ...

Page 11: ... can be changed up to 4 times after which it will be locked so that the DVD optical drive can only play DVD titles of the final region code set 4 DC IN Jack You plug in the supplied AC adapter into this port to power your notebook and charge the battery Exterior features Side view Right view of the notebook 1 USB 2 0 Ports The USB 2 0 port allows you to connect Universal Serial Bus devices USB 2 0...

Page 12: ...is running doing so could cause your system to overheat 4 USB 2 0 Ports The USB 2 0 port allows you to connect Universal Serial Bus devices USB 2 0 devices transfer data at up to 480Mbps and is backward compatible with USB 1 1 devices which transfer data at up to 12Mbps 5 HDA In It allows jack sensing of the following audio input devices Microphone It allows you to connect a Ø3 5mm mono or stereo ...

Page 13: ...icator This indicator turns on when internal battery is being charged 4 Disk Drive Access Indicator This indicator turns on when an internal hard disk drive or built in optical disk drive is being accessed 5 Num Lock Indicator This indicator lights up when the keyboard is locked in Num Lock mode You can use the keyboard as a ten digit keyboard when the Num Lock mode is turned on You can toggle the...

Page 14: ...tery Level LED indicator turns off When the battery is 90 or more charged it cannot be recharged even if the AC adapter is connected The battery can be recharged when its power level i e remaining battery life is 89 or less When a notebook is turned off the Battery Level LED indicator goes off immediately if the battery is completely charged The chargeability of the battery degrades when it is use...

Page 15: ...ses after it has been used over a long period of time If the battery runs down very fast replace it with a new battery Checking the power level of the battery Checking the power level of the battery When the power is turned off the status display LEDs are all OFF except for during battery charging 1 Built in Battery Pack Charging Lamp This lamp indicates charging status of built in battery when AC...

Page 16: ...fore accessing data on the hard disk If a battery is weak and there is no system activity the notebook may go into standby i e suspend mode However if there is system activity the notebook will go into standby mode only after the system activity has completed its processing The notebook will go into standby mode when the indicator reaches 3 This is the default setting of the notebook NOTE 1 Batter...

Page 17: ...the Power indicator If the indicator is visible and not flashing your notebook is fully operational If the indicator is visible and flashing your notebook is in Suspend mode If the indicator is not visible the power is off or your notebook is in Hibernation mode See Hibernation Feature Only applicable for some models SUSPEND MODE Suspend or Standby mode in Windows saves the contents of your LifeBo...

Page 18: ...bernation feature follow these steps 1 From the Start menu select Control Panel 2 Select System and Security and then select Power Options 3 Select Choose what the power button does or Choose what closing the lid does then make your selections Do Nothing Sleep Hibernate or Shut Down Windows Vista The default settings are not enabled To enable or disable the Hibernation feature follow these steps 1...

Page 19: ... is a risk of data loss To ensure that your notebook shuts down without error use the Windows shut down procedure Be sure to close all files exit all applications and shut down your operating system prior to turning off the power If files are open when you turn the power off you will lose any changes that have not been saved and may cause disk errors Using the correct procedure to shut down from W...

Page 20: ...g the AC Adapter 1 Plug the DC output cable into the DC power jack on your notebook 2 Plug the AC adapter into an AC electrical outlet The Li ion battery is not charged at the point of purchase Remember to connect an AC adapter to your notebook to charge it when you use it for the first time DC Power Jack AC Cable AC Adapter DC Output Cable ...

Page 21: ...off When you power on your notebook it will perform a Power On SelfTest POST to check the internal parts and configuration for normal functionality If an error is found your notebook will emit an audio warning and or show an error message After satisfactory completion of the Power On Self Test POST your notebook will load your operating system Power Off Before turning off the power check that the ...

Page 22: ...k and disconnect the AC adapter from it To avoid shock hazards and damage to your notebook be careful not to touch internal components of the notebook including the battery connector After removing the internal battery pack please take necessary precautions to prevent it from being shorted For example you can seal the connector ends with insulating tape After removing the battery pack do not mix i...

Page 23: ...s thus eliminating them as possible causes of failure 5 Turn on your notebook Make sure it has been off at least 10 seconds before you turn it back on 6 Go through the boot sequence 7 If the problem has not been resolved refer to the Troubleshooting Table that follows for more detailed troubleshooting information 8 If you have tried the solutions suggested in the Troubleshooting Table without succ...

Page 24: ...system documentation for help The speakers have been muted using the Volume icon in the system tray Click on the Volume icon in the tool tray on the bottom right of the screen It looks like a speaker If the Mute box is checked click on it to uncheck it DVD CD RW CD ROM Drive Problems LifeBook notebook fails to recognize DVD CD RW CD ROM s Protective sheet is still in the DVD CD RW CD ROM drive tra...

Page 25: ...n is disabled Start the DVD CD RW CD ROM from the desktop or application software or re enable the Windows DVD CD RW CD ROM auto insertion function DVD CD RW CD ROM is dirty or defective Wipe DVD CD RW CD ROM with a non abrasive CD cleaning cloth and reinsert If it still does not work replace a new DVD CD RW CD ROM in the drive The DVD CD RW CD ROM Access indicator on the Status Indicator Panel bl...

Page 26: ...l Primary Master or optional second hard drive Primary Slave Revise BIOS settings to set both Primary Master and Primary Slave correctly The wrong drive designator was used by an application when a bootable CD ROM was used to start the notebook Verify drive designator used by application is in use by the operating system When the operating system is booted from a CD drive designations are automati...

Page 27: ...onnected an external keyboard or a mouse and it seems to be locking up the system Your operating system software is not setup with the correct software driver for that device Check your device and operating system documentation and activate the proper driver Your system has crashed Try to restart your notebook Memory Problems Your Power On screen or Main menu of the BIOS setup utility information ...

Page 28: ...any other installed hardware or software to make sure there are no duplications Power Failures You turn on your LifeBook note book and nothing seems to happen The installed primary battery is completely discharged there is no optional second battery installed or there is no Power adapter AC adapter installed Check the Status Indicator Panel to determine the presence and condition of the batteries ...

Page 29: ...tton on the keyboard or move the mouse to restore operation If that fails push the Power Suspend Resume button Check your power management settings or close your applications and go to the Power Options menu to adjust the timeout values to better suit your needs You are operating on battery power only and have ignored a low battery alarm until the batteries are all power drained empty and your mac...

Page 30: ...e to frequent hard drive access or DVD CD ROM access use of a modem card or a LAN PC card Use both the primary battery and an optional second battery and or use a power adapter for this application when at all possible The power savings features may be disabled Check the power management and or setup utility settings in the Power Savings menu and adjust according to your operating needs The bright...

Page 31: ...up utility are not compatible with your configuration Set the operating source by pressing the ESC key while the Fujitsu logo is on screen or use the F2 key and enter the setup utility and adjust the source settings from the Boot menu You have a secured system requiring a password to load your operating system Make sure you have the right password Enter the setup utility and verify the Security se...

Page 32: ...old up battery has failed Contact your support representative for repairs This is not a user serviceable part but has a normal life of 3 to 5 years Your system display won t turn on when the system is turned on or when the system has resumed The system may be password protected Check the status indicator panel to verify that the Security icon is blinking If it is blinking enter your password Video...

Page 33: ...Stanby mode Auto Suspend or Video Timeout The LifeBook notebook turned on with a series of beeps and your built in display is blank Power On Self Test POST has detected a failure which does not allow the display to operate Contact your support representative The display goes blank by itself after you have been using it The notebook has gone into Video Timeout Standby mode Suspend mode or Save to D...

Page 34: ... not display any information Your BIOS setup is not set to enable your external monitor Try toggling the video destination by pressing Fn and F10 together or check your BIOS setup and enable your external monitor See the Video Features submenu located within the Advanced Menu of the BIOS Your external monitor is not properly installed Reinstall your device Your operating system software is not set...

Reviews: