


43
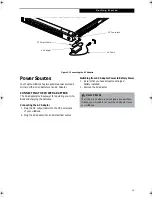
U s e r I n s t a l l a b l e F e a t u r e s
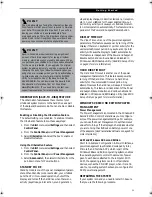
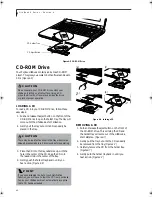
Figure 4-7 Removing a CD.
AUTO INSERT NOTIFICATION FUNCTION
(only in models with Windows 98 Second Edition)
The Auto Insert Notification function allows your
LifeBook to automatically start a CD as soon as it is
inserted in the CD-ROM drive and the tray is closed.
Your LifeBook will begin playing an audio CD or will
start an application if the CD includes an auto run file.
Disabling Auto Insert Notification Function
To disable the Auto Insert Notification function, follow
these easy steps:
1. Save all data and close all open applications.
2. From the
Start
menu, select
Settings
, and then select
Control Panel
.
3. Double-click the
System
icon. This will open the
System Properties dialog box.
4. Select the
Device Manager
tab to display the device
lists for your LifeBook.
5. Click on the
+
to the left of the CD-ROM drive
icon. The treeview will expand to show the CD-
ROM drive manufacturer’s name and model
number.
6. Double-click on the
CD-ROM drive manufacturer’s
name
and
model number
. This will open the
CD-ROM drive manufacturer’s name and model
number dialog box.
7. Select the
Settings
tab and then remove the check
mark in the
Auto Insert Notification
box to turn it
off.
8. Click
OK
.
9. Click
Close
in the System Properties dialog box,
then click
Yes
in the System Settings Change pop-up
window when it asks you to restart your machine
and activate this change.
The Auto Insert Notification function can be re-activated
by repeating this process and placing a check mark in the
Auto Insert Notification
box to turn it back on.
(a)
(b)
(c)
(d)
A_Series.book Page 43 Monday, June 26, 2000 2:28 PM
Summary of Contents for LifeBook A-4170
Page 8: ...L i f e B o o k A S e r i e s ...
Page 9: ...1 1 Preface ...
Page 10: ...2 L i f e B o o k A S e r i e s S e c t i o n 1 ...
Page 12: ...4 L i f e B o o k A S e r i e s S e c t i o n 1 ...
Page 13: ...5 2 Getting to Know Your LifeBook ...
Page 14: ...6 L i f e B o o k A S e r i e s S e c t i o n 2 ...
Page 34: ...26 L i f e B o o k A S e r i e s S e c t i o n 2 ...
Page 35: ...27 3 Getting Started ...
Page 36: ...28 L i f e B o o k A S e r i e s S e c t i o n 3 ...
Page 45: ...37 4 User Installable Features ...
Page 46: ...38 L i f e B o o k A S e r i e s S e c t i o n 4 ...
Page 59: ...51 5 Troubleshooting ...
Page 60: ...52 L i f e B o o k A S e r i e s S e c t i o n 5 ...
Page 74: ...66 L i f e B o o k A S e r i e s S e c t i o n 5 ...
Page 75: ...67 6 Care and Maintenance ...
Page 76: ...68 L i f e B o o k A S e r i e s S e c t i o n 6 ...
Page 80: ...72 L i f e B o o k A S e r i e s S e c t i o n 6 ...
Page 81: ...73 7 Specifications ...
Page 82: ...74 L i f e B o o k A S e r i e s S e c t i o n 7 ...
Page 85: ...77 8 Glossary ...
Page 86: ...78 L i f e B o o k A S e r i e s S e c t i o n 8 ...


