background image

3.10 Correcting Skewed Documents

fi-6130 / fi-6230 Image Scanner Operator's Guide


TROUBLESHOOTING


CONTENTS MAP


TOP


 3.10 Correcting Skewed Documents


The skew of documents can be detected and corrected automatically by enabling the Automatic Deskew function. 

Change the setting in the setup dialog box of the scanner driver.

The following shows the procedure to change settings in the setup dialog box of the FUJITSU TWAIN 32 Scanner Driver.


1.  Place the document on the ADF paper chute.

For details on how to place documents, see Section "

2.2 Loading Documents on the ADF for Scanning.

"


2.  Launch ScandAll PRO.


From the [Start] menu, select [All Programs] 

 [Fujitsu ScandAll PRO] 

 [Fujitsu ScandAll PRO] in the order 

presented. Then, ScandAll PRO starts up.


3.  From ScandAll PRO, display the setup dialog box of FUJITSU TWAIN 32.

For information about how to display the scanner driver's setup dialog box, see Section "

2.6 How to Use ScandAll PRO.

"


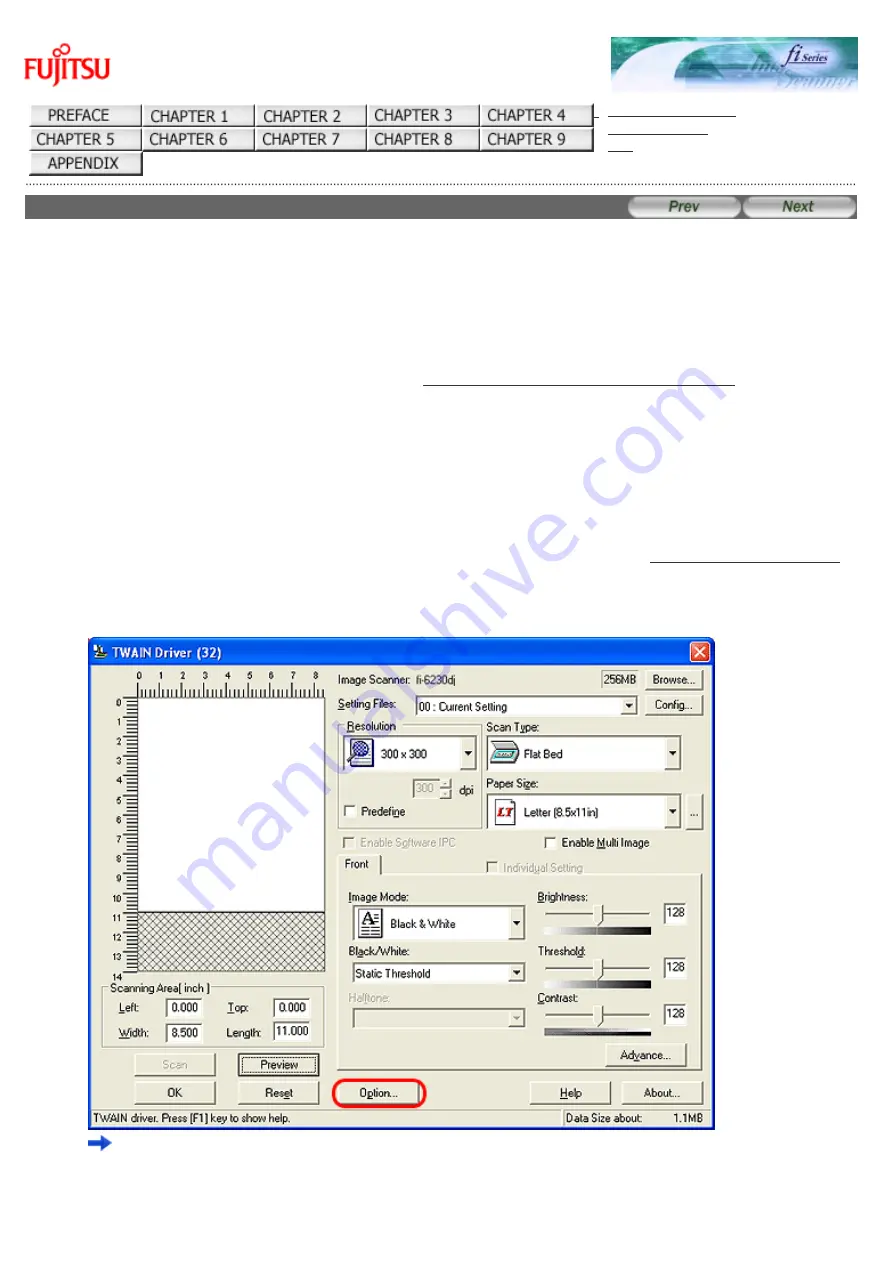
4.  In the [TWAIN Driver] dialog box, click the [Option] button.


 The [Option] dialog box appears.


file:////10.232.227.50/Manual/fi-6130_6230_Lynx3L/OG/R02/02_081030/contents/EN/03/c03_10_01.htm (1/3) [2008/10/30 15:14:25]

Summary of Contents for FI-6130

Page 1: ...anner Operator s Guide TROUBLESHOOTING CONTENTS MAP fi 6130 fi 6230 Image Scanner Operator s Guide P3PC 2162 02ENZ2 All Rights Reserved Copyright 2007 2008 PFU LIMITED file 10 232 227 50 Manual fi 6130_6230_Lynx3L OG R02 02_081030 contents EN index htm 2008 10 30 15 13 02 ...

Page 2: ...n 3 13 Splitting a Page in Two Pages 3 14 Removing Punch Holes from Images 3 15 Scanning by Pressing the Scan Button on the Scanner 3 16 Splitting Documents by Patch Code 3 17 Scanning Using Barcodes 3 18 Not Detecting Multifeed for Fixed Format Chapter 6 TROUBLESHOOTING 6 1 Removing Jammed Documents 6 2 Error Indications on the Operator Panel 6 3 Remedying Typical Troubles 6 4 Items to Check Befo...

Page 3: ...Chapter 5 REPLACING CONSUMABLES 5 1 Consumables and Replacement Cycles 5 2 How to Check and Reset the Comsumables Counters 5 3 Replacing the Brake Roller 5 4 Replacing the Pick Roller All Rights Reserved Copyright 2007 2008 PFU LIMITED file 10 232 227 50 Manual fi 6130_6230_Lynx R02 02_081030 contents EN cReg contentsmap htm 2 2 2008 10 30 15 13 06 ...

Page 4: ...d this manual to ensure correct use CONTENTS Copying of the contents of this manual in whole or in part and copying of the scanner application is prohibited under the copyright law The contents of this manual are subject to change without notice PFU LIMITED is not liable whatsoever for any damages resulting from use of this scanner and procedures described in this manual profit due to defects and ...

Page 5: ...rty responsible for compliance could void the user s authority to operate the equipment ATTENTION The use of a shielded interface cable is required to comply with the Class B limits of Part 15 of FCC rules The length of the AC cable must be 2 meters 6 6 feet or less Canadian DOC Regulations This digital apparatus does not exceed the Class B limit for radio noise emissions from digital apparatus se...

Page 6: ...ions from here on that directly involve danger to life and health when a high degree of safety is required for example in the control of nuclear reactions at nuclear power facilities automatic flight control of aircraft air traffic control operation control in mass transport systems medical equipment for sustaining life and missile firing control in weapons systems and when provisionally the safet...

Page 7: ...a Microsoft Windows Vista Home Basic operating system 32 bit 64 bit Microsoft Windows Vista Home Premium operating system 32 bit 64 bit Microsoft Windows Vista Business operating system 32 bit 64 bit Microsoft Windows Vista Enterprise operating system 32 bit 64 bit Microsoft Windows Vista Ultimate operating system 32 bit 64 bit Where there is no distinction between the different versions of the ab...

Page 8: ...ge caused by errors or omissions or by statements of any kind in this manual its updates or supplements whether such errors are omissions or statements resulting from negligence accidents or any other cause PFU further assumes no liability arising from the application or use of any product or system described herein nor any liability for incidental or consequential damages arising from the use of ...

Page 9: ...is Manual This manual uses the following symbols in the explanations in addition to the warning indications This symbol alerts operators to particularly important information Be sure to read this information This symbol alerts operators to helpful advice regarding operation A TRIANGLE symbol indicates that special care and attention is required The drawing inside the triangle shows the specific ca...

Page 10: ...JITSU ISIS scanner driver QuickScan image capturing software and Adobe Acrobat Warning Label The following picture shows the warning label used in this scanner High Temperature The part around this label includes the glass surface inside the ADF becomes hot during the operation Be careful not to touch the glass surface inside the ADF ATTENTION Do NOT remove from the scanner stain or scratch the wa...

Page 11: ...ic shock Be sure to ground before plugging into a power outlet Unplug from the outlet before removing the ground connection Use this scanner only at the indicated power voltage Do not connect to multiple power strips Use this scanner only at the indicated power voltage and current Improper power voltage and current might cause fire or electric shock Do not connect to multiple power strips Do not t...

Page 12: ...quids etc get inside the scanner immediately turn off the scanner and disconnect the power plug from the power outlet Then contact the store where you bought the scanner or an authorized FUJITSU scanner service provider Pay particular attention to this warning in households where there are small children Unplug the scanner when a trouble occurs Immediately unplug the scanner when a trouble occurs ...

Page 13: ... objects or stand on top of the scanner Do not place heavy objects on the scanner or use the scanner s surface top to perform other work Improper installation might cause injuries and equipment failure Do not use the scanner immediately after moving it from a cold place into a warm room Do not use the device immediately after moving it from a cold place into a warm room Condensation may occur whic...

Page 14: ...is not used for a long period of time When the scanner is not going to be used for a long period of time be sure to disconnect the power plug from the power outlet Do not install the scanner in direct sunlight Do not install the scanner under direct sunlight or near heating apparatus Doing so might cause excessive heat to build up inside the scanner which can cause scanner trouble or even fire Ins...

Page 15: ...ROUBLESHOOTING CONTENTS MAP TOP Chapter 1 NAMES AND FUNCTIONS OF PARTS This chapter describes the scanner parts and their functions All Rights Reserved Copyright 2007 2008 PFU LIMITED file 10 232 227 50 Manual fi 6130_6230_Lynx3L OG R02 02_081030 contents EN 01 c01 htm 2008 10 30 15 13 35 ...

Page 16: ... and its attachments carefully Make sure it contains all the parts listed in the package contents list that is included in the package box If any parts are missing or defective contact the dealer where you purchased the scanner or an authorized FUJITSU scanner service provider All Rights Reserved Copyright 2007 2008 PFU LIMITED file 10 232 227 50 Manual fi 6130_6230_Lynx3L OG R02 02_081030 content...

Page 17: ...paper in order not to scan skewed pages 6 ADF open lever Pull this lever toward you to open the ADF 7 Operator panel This panel consists of a Function No Display four operating push buttons and a LED 8 Stacker Scanned documents are ejected from the ADF onto this stacker 9 Stacker extension 1 fi 6130 only 10 Stacker extension 2 fi 6130 only 11 Stacker extension fi 6230 only 12 Flatbed FB fi 6230 on...

Page 18: ... The document cover with a black document holding pad is optionally available This type is convenient for scanning documents in black background when loading them from the flat bed Name Black Document Pad fi 624BK Parts No PA03540 D801 Rear No Name 1 Security Slot 2 EXT connector for imprinter connection fi 6130 only 3 USB connector 4 DC inlet Removable Parts file 10 232 227 50 Manual fi 6130_6230...

Page 19: ...er are displayed below No Name 1 ADF paper chute 2 Pick roller 3 Brake roller 4 Document cover fi 6230 only All Rights Reserved Copyright 2007 2008 PFU LIMITED file 10 232 227 50 Manual fi 6130_6230_Lynx3L OG R02 02_081030 contents EN 01 c01_02_01 htm 3 3 2008 10 30 15 13 38 ...

Page 20: ...ner ON and OFF Lights when the scanner is turned ON About the settings on the launcher refer to FUJITSU TWAIN32 scanner driver help which is included in the Setup CD ROM and Appendix 1 Before Using the Scan or Send to Button Indications on the Function Number Display Indication Function 8 Blinks only one time upon turning on the scanner P Indicates that the scanner has been turned ON and is being ...

Page 21: ...displayed press the Scan button or Send to button to return to the Ready Status 1 If this alarm occurs turn the power off and on again If the alarm continues after turning the power on again contact the dealer where you bought the scanner or an authorized FUJITSU scanner service provider All Rights Reserved Copyright 2007 2008 PFU LIMITED file 10 232 227 50 Manual fi 6130_6230_Lynx3L OG R02 02_081...

Page 22: ... may differ slightly if the OS that you are using is other than Windows XP Also when the FUJITSU TWAIN32 or FUJITSU ISIS scanner driver is updated the screens and operations noted in this chapter will differ slightly In such case refer to the relevant manuals or materials which are to be supplied when updating the driver All Rights Reserved Copyright 2007 2008 PFU LIMITED file 10 232 227 50 Manual...

Page 23: ... Panel is in the Ready Status Power button HINT To turn the scanner OFF hold the Power button down for at least two seconds About Power ON OFF Control You can select to power the scanner on off either by pressing the Power button or by connecting disconnecting the AC cable The procedure is as follows 1 Confirm if the scanner is connected correctly to the PC then power on the scanner For details on...

Page 24: ... fi 6130dj or fi 6230dj and then select Properties from the menu For Windows XP or Windows Server 2003 right click fi 6130dj or fi 6230dj and then select Properties For Windows 2000 or Windows Vista double click the fi 6130dj or fi 6230dj icon The properties dialogbox of fi 6130dj or fi 6230dj appears file 10 232 227 50 Manual fi 6130_6230_Lynx3L OG R02 02_081030 contents EN 02 c02_01_01 htm 2 5 2...

Page 25: ...2 1 Turning the Scanner ON 6 Click the Device Set tab 7 Click the Power Control button file 10 232 227 50 Manual fi 6130_6230_Lynx3L OG R02 02_081030 contents EN 02 c02_01_01 htm 3 5 2008 10 30 15 13 43 ...

Page 26: ...ecting disconnecting the AC cable 9 Click the OK button ATTENTION Do not specify the above setting when Enable USB power feeding is selected for Power SW Control on Software Operation Panel To clear the USB power feeding setting always use Software Operation Panel Refer to Chapter 8 SCANNER SETTINGS Power Save Mode file 10 232 227 50 Manual fi 6130_6230_Lynx3L OG R02 02_081030 contents EN 02 c02_0...

Page 27: ...e operator panel goes out but the Power LED stays lit in green To return from the Power Save mode perform one of the following Load the document on the ADF paper chute Press any button on the operator panel The scanner will be turned OFF when pressing down the Power button for at least two seconds Execute a command from the scanner driver All Rights Reserved Copyright 2007 2008 PFU LIMITED file 10...

Page 28: ...nt stack For details see Section 7 3 Maximum Document Loading Capacity A4 letter size paper or smaller that makes a document stack of 5 mm or less Maximum 50 sheets at A4 letter 20 lb or 80 g m2 2 Fan the documents as follows Select a stack of documents 5 mm or less high Hold the document with both hands and fan it out several times Turn the document by 90 degrees and then fan it in the different ...

Page 29: ...lace up to three cards at a time into the Automatic Document Feeder If the card is embossed i e a card with raised lettering place one card at a time It is recommended that the front side of the card be placed face down in the Automatic Document Feeder The card to be scanned should be within the ISO7810 compliance type ID 1 Dimensions 3 4 inch height x 2 1 inch width 86 mm x 54 mm Thickness 0 056 ...

Page 30: ...n 3 10 Correcting Skewed Documents Raising the resolution Cards should be clean from oil and without labels Cards cannot be scanned when the imprinter is installed 4 Adjust the side guides to the width of the documents Move the side guides so that they touch both sides of the documents If there is any space between the side guides and the edges of documents the scanned image may be skewed Side gui...

Page 31: ...nsion wider than the right angle Otherwise it may be damaged A Stacker B Stacker extension 5 Start up the scanner application and scan the document For details on how to scan documents using the ScandAll PRO application see Section 2 6 How to Use ScandAll PRO All Rights Reserved Copyright 2007 2008 PFU LIMITED file 10 232 227 50 Manual fi 6130_6230_Lynx3L OG R02 02_081030 contents EN 02 c02_02_01 ...

Page 32: ... bed with the scanning face down and the top left corner aligned with the reference point Reference point 3 Gently close the document cover 4 Start up the scanner application and scan the document For details on how to scan documents using the ScandAll PRO application see Section 2 6 How to Use ScanAll PRO All Rights Reserved Copyright 2007 2008 PFU LIMITED file 10 232 227 50 Manual fi 6130_6230_L...

Page 33: ...ment on the scanner s ADF paper chute or Flatbed For details on how to load documents see Sections 2 2 Loading Documents on the ADF for Scanning and 2 3 Loading Documents on the Flatbed for Scanning 2 Launch an application you want to use for scanning The following shows an example screen when ScandAll PRO is selected 3 Select a scanner to use file 10 232 227 50 Manual fi 6130_6230_Lynx3L OG R02 0...

Page 34: ...2 4 Scanning Documents 4 In the application invoke a scanner driver file 10 232 227 50 Manual fi 6130_6230_Lynx3L OG R02 02_081030 contents EN 02 c02_04_01 htm 2 3 2008 10 30 15 13 50 ...

Page 35: ...se procedures and operations may differ from those examples herein For more information about how to scan documents by using ScandAll PRO see Section 2 6 How to Use ScandAll PRO If you want to use other applications for scanning refer to the respective manuals that come with the applications All Rights Reserved Copyright 2007 2008 PFU LIMITED file 10 232 227 50 Manual fi 6130_6230_Lynx3L OG R02 02...

Page 36: ...how to invoke a scanner driver via ScandAll PRO see Section 2 6 How to Use ScandAll PRO FUJITSU TWAIN 32 Scanner Driver The FUJITSU TWAIN 32 Scanner Driver is a driver for scanning documents with the scanner based on a TWAIN compliant application Usually you can configure the scanner settings in the scanner driver s setup dialog box invoking a scanner driver via an application Depending on the app...

Page 37: ...ents simply and quickly You can also set values of Best Better and Normal as desired in a window that appears when the button is clicked Scan Type You can specify the scanning side s of document or feeding source fi 6230 only Front Side Back Side Duplex or Flatbed You can specify Front Side or Duplex for long page documents whose size is longer than A3 Paper Size You can select the size of documen...

Page 38: ...gs Preview Button Documents are scanned preliminarily before the actual scanning You can confirm the image of the documents in the preview window OK Close Button Clicking this button saves the current settings and closes this window Reset Button This button is used to undo changes of settings Help Button Clicking this button opens the FUJITSU TWAIN 32 Scanner Driver Help window The window also ope...

Page 39: ...his tab for configuring settings on the scanner s Operator Panel Filter Tab Select this tab for setting the image processing filter s Digital Endoser A character string alphanumerics can be added in the scanned document Page Edge Filler Fills up the margins of the scanned document images with a selected color Compression Tab Select this tab for setting the compression rate of JPEG Transfer Advance...

Page 40: ...rom an ISIS compliant application Usually you configure settings for scanning in the setup dialog box of the scanner driver which is invoked from an application Depending on the application setting the setup dialog box may not be displayed HINT How to invoke a scanner driver varies depending on the application For details refer to the manual or help of the application you use For information about...

Page 41: ...for scanning line drawings and text only documents 16 level Grayscale Documents are scanned in 16 gray levels In this mode each pixel uses 4 bits 256 level Grayscale Documents are scanned in 256 gray levels In this mode each pixel uses 8 bits 24 bit Color Documents are scanned as 24 bit full color images This mode is suitable for scanning color photographs More memory is used than in Grayscale mod...

Page 42: ...h When shorter sheets are included in a batch of documents to scan output images are adjusted to their original size Automatic The page size of the scanned documents is automatically detected and the images are output in the detected page size The skew of documents is also automatically detected and corrected to output correct images Long Page The page size of the scanned long page document is aut...

Page 43: ...lit Image You can split a scanned image into two You can also rotate the split images by specifying the rotation angle Scan Area Button Clicking this button displays the Scan Area dialog box You can specify an area to be scanned for a page of the selected size By dragging the rectangle on the page with the mouse you can change the size of the area You can also specify the area by typing in numbers...

Page 44: ...2 5 How to Use the Scanner Drivers Image Processing Tab Quick Set file 10 232 227 50 Manual fi 6130_6230_Lynx3L OG R02 02_081030 contents EN 02 c02_05_01 htm 9 16 2008 10 30 15 13 56 ...

Page 45: ...ings You can specify the following image processing related settings separately DTC Variance You can select a DTC Variance setting depending on the brightness of the image Edge Processing You can select a setting depending on how sharp you want to make the image Low Mid High Outlines of images are emphasized Select a setting from Low Mid and High Smoothing Jaggies are smoothed Reverse Image Format...

Page 46: ...d error can be detected so that you can stop scanning at error detection and receive an error message Do not stop scanning upon detection If this checkbox is marked the scanner ignores multifeed errors and continues scanning Multifeed Recovery Mark the On checkbox under Multifeed Recovery Auto cancel Timer Scanning is not restarted for the set period of time minutes after a multifeed error If scan...

Page 47: ... Gamma Brightness Contrast Shadow and Highlight only when you select Custom as a Gamma pattern Type in a numerical value in each box click the forward backward arrows or drag the slider to increase decrease the numerical value Of those items Shadow and Highlight can be specified only when a Color or Grayscale setting is selected under Mode Color Dropout Tab file 10 232 227 50 Manual fi 6130_6230_L...

Page 48: ...images For example when scanning text in black with the red frame selecting red color scans only text in black This setting is available only when Black and White or Grayscale setting is selected Compression Tab file 10 232 227 50 Manual fi 6130_6230_Lyn OG R02 02_081030 contents EN 02 c02_05_01 htm 13 16 2008 10 30 15 13 56 ...

Page 49: ...m highest listed first to lowest as follows YUV 4 4 4 YUV 4 2 2 YUV 4 1 1 The higher the compression rate the smaller the file size is but the quality of the scanned image is degraded Imprinter Tab You can configure settings for using the imprinter option to be purchased separately This tab is not displayed unless the imprinter option is installed file 10 232 227 50 Manual fi 6130_6230_Lyn OG R02 ...

Page 50: ...elect from 3 to 8 as the number of digits Other single width space ATTENTION To print characters and you have to type in and respectively because these are special characters Take note that typing in only one character displays the counter Date You can specify how to indicate the date format Format Type in the initial value Delimiter Select a delimiter which is a character that identifies the begi...

Page 51: ...nge 0 5 to 10 5 in 1 27 to 26 7 cm Minimum unit 0 1 in 0 01 cm Units You can specify the unit of the top margin in inch in cm or in pixel Font You can specify the font style from Normal Bold and Narrow for printing characters Rotation You can specify the text direction for printing characters About Tab On this tab you can view the information about the ISIS driver and the scanner connected to your...

Page 52: ...l PRO Help Launching ScandAll PRO From the Start menu select All Programs Fujitsu ScandAll PRO Fujitsu ScandAll PRO ScandAll PRO starts up Selecting a Scanner Driver ScandAll PRO supports both TWAIN and ISIS standards and allows you to invoke either the TWAIN driver or the ISIS driver for scanning images with the scanner This scanner comes with two drivers FUJITSU TWAIN 32 Scanner Driver and FUJIT...

Page 53: ...ppears 2 On the Scan tab under Device Driver select either of drivers To use FUJITSU TWAIN 32 Scanner Driver select TWAIN To use FUJITSU ISIS Scanner Driver select ISIS 3 Click the OK button to close the Setup dialog box Selecting a Scanner To scan documents with a scanner you have to select its name from the list beforehand The following explains how to select a scanner to use file 10 232 227 50 ...

Page 54: ...UJITSU ISIS select Fujitsu fi 6130 or Fujitsu fi 6230 and then click the Select button FUJITSU TWAIN 32 FUJITSU ISIS How to Display the Scanner Driver Setup Dialog Box You can configure settings for scanning documents with the selected scanner in the setup dialog box of a scanner driver Select the Scan menu and then select Setting to display the setup dialog box file 10 232 227 50 Manual fi 6130_6...

Page 55: ...ings such as the file format destination and scanning parameters image related properties and an application to link with and create a profile with these settings saved You can create more than one profile beforehand so you do not have to configure settings every time you scan documents You only switch between profiles Use Batch Scan when you want to scan a large volume of documents using various ...

Page 56: ...bar The Scan Settings dialog box appears 3 In the Scan Settings dialog box configure various settings for saving scanned document images Save to file Checkbox file 10 232 227 50 Manual fi 6130_6230_Lynx3L OG R02 02_081030 contents EN 02 c02_06_01 htm 5 14 2008 10 30 15 14 02 ...

Page 57: ...file containing all pages or to divide into files each containing the specified number of pages This becomes selectable only when a multi page format is selected File Overwrite Warning You can select whether to receive a confirmation message when scanned document image files with the same names already exist in the destination folder If you select Do not display confirmation dialog those files are...

Page 58: ...g box If so you can also change settings in the dialog box displayed Click the Scan button to scan documents Click the Close button when you finish scanning If you do not want to display the scanner driver s dialog box clear the Show TWAIN dialog before each batch scan process checkbox in the Scan Settings dialog box A document is scanned with the scanner and the scanned document image is displaye...

Page 59: ...olbar For information about other scanning operations see Chapter 3 SCANNING VARIOUS TYPES OF DOCUMENTS For more details about the features and operations of ScandAll PRO refer to ScandAll PRO Help Batch Scan You can save various settings as profiles beforehand Batch Scan allows you to scan documents by using those profiles Creating Editing Profiles 1 From the Scan menu select Batch Scan Settings ...

Page 60: ...Select a profile you want to change settings for and click the Edit button The selected profile appears in the Profile Editor dialog box Go to step 3 To delete an existing profile from the profile list Select a profile you want to delete and then click the Delete button When you see a confirmation message click the Yes button The selected profile is deleted HINT If the Type of a profile in the pro...

Page 61: ...ording to the set Name Rule Filter Tab You can select a filter to use for scanning Linking Tab You can select what to do with scanned document images after scanning send by e mail upload to the FTP server or Microsoft SharePoint Server print with a printer or open with an application Where there is no distinction between Microsoft Office SharePoint Portal Server 2003 and Microsoft Office SharePoin...

Page 62: ...ments see Section 2 2 Loading Documents on the ADF for Scanning 2 From the Scan menu select Batch Scan Settings The Batch Scan Settings dialog box appears 3 Select a profile you want to use for scanning 4 Click the Scan button A document is scanned with the scanner and the scanned document image is displayed on the ScandAll PRO window and then the image is saved to file file 10 232 227 50 Manual f...

Page 63: ...on the ADF for Scanning 2 From the Scan menu select Batch Scan and then select a profile name you want to use A document is scanned with the scanner and the scanned document image is displayed on the ScandAll PRO window and then the image is saved to file file 10 232 227 50 Manual fi 6130_6230_Lyn OG R02 02_081030 contents EN 02 c02_06_01 htm 12 14 2008 10 30 15 14 02 ...

Page 64: ...the Select the Batch Profile drop down list on the toolbar select a profile to use 3 Click the Start Batch Scan button on the toolbar A document is scanned with the scanner and the scanned document image is displayed on the ScandAll PRO window and then the image is saved to file file 10 232 227 50 Manual fi 6130_6230_Lyn OG R02 02_081030 contents EN 02 c02_06_01 htm 13 14 2008 10 30 15 14 02 ...

Page 65: ...2 6 How to Use ScandAll PRO All Rights Reserved Copyright 2007 2008 PFU LIMITED file 10 232 227 50 Manual fi 6130_6230_Lyn OG R02 02_081030 contents EN 02 c02_06_01 htm 14 14 2008 10 30 15 14 02 ...

Page 66: ...hapter Windows XP screenshots are used as examples The screens and operations provided herein may be different from actual ones if the operating system you are using is not Windows XP Please take note that when the FUJITSU TWAIN 32 scanner driver is updated the screens and operations herein may also be slightly different If so refer to the document provided with the update All Rights Reserved Copy...

Page 67: ... PRO Fujitsu ScandAll PRO in the order presented Then ScandAll PRO starts up 3 From ScandAll PRO display the setup dialog box of FUJITSU TWAIN 32 For information about how to display the scanner driver s setup dialog box see Section 2 6 How to Use ScandAll PRO 4 Select ADF Duplex under Scan Type 5 Click the OK button Changes made on this dialog box are saved and the setup dialog box of FUJITSU TWA...

Page 68: ...ents see Section 2 6 How to Use ScandAll PRO Scanned document images are displayed in the ScandAll PRO window All Rights Reserved Copyright 2007 2008 PFU LIMITED file 10 232 227 50 Manual fi 6130_6230_Lynx3L OG R02 02_081030 contents EN 03 c03_01_01 htm 2 2 2008 10 30 15 14 05 ...

Page 69: ...ing 1 Open the document cover 2 Remove the document cover as shown in the figure below 3 Read the document on the document bed face down 4 Launch ScandAll PRO From the Start menu select All Programs Fujitsu ScandAll PRO Fujitsu ScandAll PRO in the order presented Then ScandAll PRO starts up file 10 232 227 50 Manual fi 6130_6230_Lynx3L OG R02 02_081030 contents EN 03 c03_02_01 htm 1 2 2008 10 30 1...

Page 70: ...setup dialog box of FUJITSU TWAIN 32 closes 8 From the ScandAll PRO window perform a scan For information about how to scan documents see Section 2 6 How to Use ScandAll PRO ATTENTION Do not move the document during scanning Scanned document images are displayed in the ScandAll PRO window 9 When scanning ends re attach and gently close the document cover All Rights Reserved Copyright 2007 2008 PFU...

Page 71: ...ment on the document bed face down 4 Launch ScandAll PRO From the Start menu select All Programs Fujitsu ScandAll PRO Fujitsu ScandAll PRO in the order presented Then ScandAll PRO starts up 5 From ScandAll PRO display the setup dialog box of FUJITSU TWAIN 32 For information about how to display the scanner driver s setup dialog box see Section 2 6 How to Use ScandAll PRO file 10 232 227 50 Manual ...

Page 72: ...m a scan For information about how to scan documents see Section 2 6 How to Use ScandAll PRO ATTENTION Do not move the document during scanning Scanned document images are displayed in the ScandAll PRO window 9 When scanning ends re attach and gently close the document cover All Rights Reserved Copyright 2007 2008 PFU LIMITED file 10 232 227 50 Manual fi 6130_6230_Lynx3L OG R02 02_081030 contents ...

Page 73: ...ction drop down list For details see Section 3 10 Correcting Skewed Documents 2 Center all documents as shown in the figure below 3 Place the documents on the ADF paper chute and then adjust the side guides so that they lightly touch the widest sheets of paper ATTENTION When placing a stack of documents on the scanner make sure that all documents are directly under the pick roller Off center docum...

Page 74: ...O in the order presented Then ScandAll PRO starts up 3 From ScandAll PRO display the setup dialog box of FUJITSU TWAIN 32 For information about how to display the scanner driver s setup dialog box see Section 2 6 How to Use ScandAll PRO 4 Select Long page Front Side or Long page Duplex from Scan Type Select Long page Front Side for single sided scanning Long page Duplex for double sided scanning T...

Page 75: ...o Use ScandAll PRO Scanned document images are displayed in the ScandAll PRO window ATTENTION You cannot use ScandAll PRO while the following options are enabled Multi Image Output Auto Color Detection If you want to scan a document that is longer than 34 inches 864 mm specify a resolution of 200 dpi or lower All Rights Reserved Copyright 2007 2008 PFU LIMITED file 10 232 227 50 Manual fi 6130_623...

Page 76: ... Page Detection is selected Long Page Scanning Automatic Page Size Detection When scanning a paper document and converting the scanned document image to PDF by using Acrobat unexpected images may be output when 1 Setting Edge Shadow Removal in Acrobat and setting Digital Endorser or Black Background options in the TWAIN driver at the same time Character strings on images or part of background may ...

Page 77: ...sented Then ScandAll PRO starts up 3 In ScandAll PRO select PDF File SinglePage PDF File PDF A file or SinglePage PDF A file to save scanned document images When you want to perform Scan In the File Format drop down list select one of the above settings When you want to perform Batch Scan Select a profile you want to use for scanning to display it in the Profile Editor dialog box Select the File f...

Page 78: ... and PDF A file create one file containing multiple images 4 To configure PDF related settings click the PDF Option button The Output PDF file dialog box appears In this dialog box you can change the compression rate turn on the OCR function to make searchable PDF files and enhance the security of created PDF files by adding a password to Basic Tab Change the compression rate for creating PDF file...

Page 79: ... they are created from scanned document images Unless OCR optical character recognition is turned on scanned document images are saved as PDF files in a format that computers cannot recognize or in other words they are not made searchable Through OCR text on the image is recognized and text information is embedded into the image making the image file searchable Note that if you turn on OCR scannin...

Page 80: ...PRO Scanned document images are displayed in the ScandAll PRO window ATTENTION ScandAll PRO creates PDF files from scanned document images but does not offer the function to open PDF files You can open PDF files with ScandAll PRO anyway but the displayed images may not be satisfactory or the operation of ScandAll PRO may become unstable To view PDF files it is recommended an application that can o...

Page 81: ... Scan dialog box appears 4 Select FUJITSU fi 6130dj or FUJITSU fi 6230dj from the Scanner drop down list and then click the Scan button file 10 232 227 50 Manual fi 6130_6230_Lynx3L OG R02 02_081030 contents EN 03 c03_06_01 htm 6 10 2008 10 30 15 14 17 ...

Page 82: ...gs dialog box appears 3 Change settings as follows Color Grayscale Monochrome Background removal Edge shadow removal none JBIG2 or CCITT Group 4 Off Off The TWAIN Driver dialog box appears 5 Configure settings such as the scan resolution and document size and then click the Scan button 6 To finish scanning select Scanning complete and click the OK button Scanned images are displayed file 10 232 22...

Page 83: ...anned document images as described above the file size may increase greatly To reduce the file size save images following the procedure below It may take more time than you save as described above 1 Select File Print 2 In the dialog box below select Adobe PDF from the Name drop down list file 10 232 227 50 Manual fi 6130_6230_Lynx3L OG R02 02_081030 contents EN 03 c03_06_01 htm 8 10 2008 10 30 15 ...

Page 84: ... the Adobe PDF Settings tab 5 Select a desired setting from the Default Settings drop down list The following shows an example when Smallest File Size is selected file 10 232 227 50 Manual fi 6130_6230_Lynx3L OG R02 02_081030 contents EN 03 c03_06_01 htm 9 10 2008 10 30 15 14 17 ...

Page 85: ...tton in the Print dialog box 8 Enter a file name and then click the Save button in the Save PDF File As dialog box All Rights Reserved Copyright 2007 2008 PFU LIMITED file 10 232 227 50 Manual fi 6130_6230_Lyn OG R02 02_081030 contents EN 03 c03_06_01 htm 10 10 2008 10 30 15 14 17 ...

Page 86: ...he following shows the procedure to change settings in the setup dialog box of the FUJITSU TWAIN 32 Scanner Driver 1 Place the document on the scanner For how to load documents on the ADF paper chute see Section 2 2 Loading Documents on the ADF for Scanning For how to load documents on the Flatbed see Section 2 3 Loading Documents on the Flatbed for Scanning fi 6230 only 2 Launch ScandAll PRO From...

Page 87: ...or drop down list under More For example when you want to obtain only black text image from a document containing black text outlined in green select Green from the list If you want no color to be dropped out select None file 10 232 227 50 Manual fi 6130_6230_Lynx3L OG R02 02_081030 contents EN 03 c03_07_01 htm 2 3 2008 10 30 15 14 19 ...

Page 88: ... the TWAIN Driver dialog box closes 8 From the ScandAll PRO window perform a scan For information about how to scan documents see Section 2 6 How to Use ScandAll PRO Scanned document images are displayed in the ScandAll PRO window All Rights Reserved Copyright 2007 2008 PFU LIMITED file 10 232 227 50 Manual fi 6130_6230_Lynx3L OG R02 02_081030 contents EN 03 c03_07_01 htm 3 3 2008 10 30 15 14 19 ...

Page 89: ...IN 32 scanner driver 1 Place the document on the ADF paper chute For details on how to place documents see Section 2 2 Loading Documents on the ADF for Scanning 2 Launch ScandAll PRO From the Start menu select All Programs Fujitsu ScandAll PRO Fujitsu ScandAll PRO in the order presented Then ScandAll PRO starts up 3 From ScandAll PRO display the setup dialog box of FUJITSU TWAIN 32 For information...

Page 90: ...atio scroll bar to specify a degree of accuracy needed to skip blank pages The value displayed to the right of the slider bar shows a noise dots ratio 1 If a scanned page includes dots less than this value the page is recognized as blank You can select OFF or a value from 0 2 to 3 0 in increments of 0 2 1 Ratio of black dots included in a scanned area for white pages In Color Grayscale mode Use th...

Page 91: ...river dialog box closes 10 From the ScandAll PRO window perform a scan For information about how to scan documents see Section 2 6 How to Use ScandAll PRO Scanned document images are displayed in the ScandAll PRO window All Rights Reserved Copyright 2007 2008 PFU LIMITED file 10 232 227 50 Manual fi 6130_6230_Lynx3L OG R02 02_081030 contents EN 03 c03_08_01 htm 3 3 2008 10 30 15 14 21 ...

Page 92: ...ction The following shows the procedure to change settings in the FUJITSU TWAIN 32 Scanner Driver 1 Place the document on the ADF paper chute For details on how to place documents see Section 2 2 Loading Documents on the ADF for Scanning 2 Launch ScandAll PRO From the Start menu select All Programs Fujitsu ScandAll PRO Fujitsu ScandAll PRO in the order presented Then ScandAll PRO starts up 3 From ...

Page 93: ...d simultaneously Check overlapping and length The scanner monitors both document thickness and length to detect multifeeds For more information on multifeed detection see Section 7 5 Multifeed Detection Conditions 7 Click the OK button You are returned to the TWAIN Driver dialog box 8 In the TWAIN Driver dialog box click the OK button Changes made are saved and the TWAIN Driver dialog box closes 9...

Page 94: ...n the ADF paper chute For details on how to place documents see Section 2 2 Loading Documents on the ADF for Scanning 2 Launch ScandAll PRO From the Start menu select All Programs Fujitsu ScandAll PRO Fujitsu ScandAll PRO in the order presented Then ScandAll PRO starts up 3 From ScandAll PRO display the setup dialog box of FUJITSU TWAIN 32 For information about how to display the scanner driver s ...

Page 95: ...paper sizes of index sheets or documents to which sticky notes or index tabs are attached set the Priority to 2 When detecting paper sizes of sheets or documents whose one side s background is in dark color set the Priority to 3 Priority Document type suited for scanning 0 Document whose side s linearity is high 1 Index sheet or document to which sticky notes or index tabs are attached 2 Index she...

Page 96: ...WAIN Driver dialog box 8 In the TWAIN Driver dialog box click the OK button Changes made are saved and the TWAIN Driver dialog box closes 9 From the ScandAll PRO window perform a scan For information about how to scan documents see Section 2 6 How to Use ScandAll PRO Scanned document images are displayed in the ScandAll PRO window All Rights Reserved Copyright 2007 2008 PFU LIMITED file 10 232 227...

Page 97: ...ace the document on the scanner For how to load documents on the ADF paper chute see Section 2 2 Loading Documents on the ADF for Scanning For how to load documents on the Flatbed see Section 2 3 Loading Documents on the Flatbed for Scanning fi 6230 only 2 Launch ScandAll PRO From the Start menu select All Programs Fujitsu ScandAll PRO Fujitsu ScandAll PRO in the order presented Then ScandAll PRO ...

Page 98: ...ing Multi Images The Multi Image dialog box appears 5 Select Multi Image Output under Output mode file 10 232 227 50 Manual fi 6130_6230_Lynx3L OG R02 02_081030 contents EN 03 c03_11_01 htm 2 3 2008 10 30 15 14 27 ...

Page 99: ...etting select a side and then configure settings for each side in the TWAIN Driver dialog box 8 In the TWAIN Driver dialog box click the OK button Changes made are saved and the TWAIN Driver dialog box closes 9 From the ScandAll PRO window perform a scan For information about how to scan documents see Section 2 6 How to Use ScandAll PRO Scanned document images are displayed in the ScandAll PRO win...

Page 100: ...ialog box of the FUJITSU TWAIN 32 Scanner Driver 1 Place the document on the scanner For how to load documents on the ADF paper chute see Section 2 2 Loading Documents on the ADF for Scanning For how to load documents on the Flatbed see Section 2 3 Loading Documents on the Flatbed for Scanning fi 6230 only 2 Launch ScandAll PRO From the Start menu select All Programs Fujitsu ScandAll PRO Fujitsu S...

Page 101: ...rome Auto Detection The Multi Image dialog box appears 5 Select Auto Color Detection under Output mode file 10 232 227 50 Manual fi 6130_6230_Lynx3L OG R02 02_081030 contents EN 03 c03_12_01 htm 2 3 2008 10 30 15 14 30 ...

Page 102: ...n the TWAIN Driver dialog box click the OK button Changes made are saved and the TWAIN Driver dialog box closes 8 From the ScandAll PRO window perform a scan For information about how to scan documents see Section 2 6 How to Use ScandAll PRO Scanned document images are displayed in the ScandAll PRO window All Rights Reserved Copyright 2007 2008 PFU LIMITED file 10 232 227 50 Manual fi 6130_6230_Ly...

Page 103: ...scanner For how to load documents on the ADF paper chute see Section 2 2 Loading Documents on the ADF for Scanning For how to load documents on the Flatbed see Section 2 3 Loading Documents on the Flatbed for Scanning fi 6230 only 2 Launch ScandAll PRO From the Start menu select All Programs Fujitsu ScandAll PRO Fujitsu ScandAll PRO in the order presented Then ScandAll PRO starts up 3 From ScandAl...

Page 104: ...age in Two Pages The Option dialog box appears 5 Select the Rotation tab 6 Mark the Split Image checkbox file 10 232 227 50 Manual fi 6130_6230_Lynx3L OG R02 02_081030 contents EN 03 c03_13_01 htm 2 3 2008 10 30 15 14 32 ...

Page 105: ...tection The resolution is set to 1200dpi 7 Click the OK button You are returned to the TWAIN Driver dialog box 8 In the TWAIN Driver dialog box click the OK button Changes made are saved and the TWAIN Driver dialog box closes 9 From the ScandAll PRO window perform a scan For information about how to scan documents see Section 2 6 How to Use ScandAll PRO Scanned document images are displayed in the...

Page 106: ...d documents on the ADF paper chute see Section 2 2 Loading Documents on the ADF for Scanning For how to load documents on the Flatbed see Section 2 3 Loading Documents on the Flatbed for Scanning fi 6230 only 2 Launch ScandAll PRO From the Start menu select All Programs Fujitsu ScandAll PRO Fujitsu ScandAll PRO in the order presented Then ScandAll PRO starts up 3 From ScandAll PRO display the setu...

Page 107: ...Detection or Black Background from the Automatic Size and Skew detection drop down list If you select a setting other than Automatic Page Size Detection or Black Background Hole punch removal is not available file 10 232 227 50 Manual fi 6130_6230_Lynx3L OG R02 02_081030 contents EN 03 c03_14_01 htm 2 4 2008 10 30 15 14 34 ...

Page 108: ...e Section 2 6 How to Use ScandAll PRO Scanned document images are displayed in the ScandAll PRO window Punch hole marks cannot be removed when Hole marks are not aligned along with the edge of the document Hole mark sizes vary or hole marks appear at various intervals Punch hole marks at various intervals can be removed when Priority is set to 3 The document is not rectangular The document of dark...

Page 109: ...with a color or punch holes may not be filled with a color at all If these happen select Automatic Page Size Detection and specify 3 for Priority to improve hole punch removal accuracy All Rights Reserved Copyright 2007 2008 PFU LIMITED file 10 232 227 50 Manual fi 6130_6230_Lynx3L OG R02 02_081030 contents EN 03 c03_14_01 htm 4 4 2008 10 30 15 14 34 ...

Page 110: ...Send to buttons The following shows the procedure to do so 1 From the Start menu select Control Panel 2 Select Scanners and Cameras 3 Display the fi 6130dj Properties or fi 6230dj Properties dialog box In Windows XP or Windows Server 2003 right click on the fi 6130dj or fi 6230dj icon In Windows 2000 or Windows Vista double click on the fi 6130dj or fi 6230dj icon 4 Select the Events tab 5 Select ...

Page 111: ...vent occurs In Windows XP select Start this program under Actions and select an application from the drop down list on the right 7 Click the OK button HINT To link another button perform steps 3 to 7 again 8 Launch ScandAll PRO From the Start menu select All Programs Fujitsu ScandAll PRO Fujitsu ScandAll PRO and then ScandAll PRO starts up 9 From the Tool menu select Preferences file 10 232 227 50...

Page 112: ... HINT You have to create profiles beforehand For information about how to create profiles refer to Batch Scan in Section 2 6 How to Use ScandAll PRO 12 Click the OK button 13 Exit ScandAll PRO When you press the linked button ScandAll PRO starts up and batch scan is executed according to the selected profile s settings file 10 232 227 50 Manual fi 6130_6230_Lynx3L OG R02 02_081030 contents EN 03 c...

Page 113: ...isplay 2 When the displayed number and the event number you have selected in step 5 Send to 1 9 matches stop pressing the Function button 3 Press the Send to button Function Number Display Function Button Send to Button Scan Button All Rights Reserved Copyright 2007 2008 PFU LIMITED file 10 232 227 50 Manual fi 6130_6230_Lynx3L OG R02 02_081030 contents EN 03 c03_15_01 htm 4 4 2008 10 30 15 14 36 ...

Page 114: ... PDF file of either Patch Code A4 or Patch Code Letter as many as you need Patch Code A4 Image data of a patch code sheet with A4 size Patch Code Letter Image data of a patch code sheet with Letter size ATTENTION Use white paper to print out patch code sheets To make photocopies of the printed patch code sheet make the same size and same density of photocopies as the original patch code sheets Usi...

Page 115: ...eet by selecting the Remove the next page of a separation sheet checkbox 5 Insert patch code sheets to wherever you want the file folder to separate 6 Specify the created batch profile and then perform the batch scan For how to perform the batch scan see Batch Scan in Section 2 6 How to Use ScandAll PRO file 10 232 227 50 Manual fi 6130_6230_Lynx3L OG R02 02_081030 contents EN 03 c03_16_01 htm 2 4...

Page 116: ... Name Rule button on the File format and Name scheme tab in the Profile Editor dialog box Mark the Create Directories Separately checkbox in the Name Rule dialog box The created folder is named with the title of the document counter and is used to store the scanned data Example of storing data in folders file 10 232 227 50 Manual fi 6130_6230_Lynx3L OG R02 02_081030 contents EN 03 c03_16_01 htm 3 ...

Page 117: ...16 Splitting Documents by Patch Code All Rights Reserved Copyright 2007 2008 PFU LIMITED file 10 232 227 50 Manual fi 6130_6230_Lynx3L OG R02 02_081030 contents EN 03 c03_16_01 htm 4 4 2008 10 30 15 14 38 ...

Page 118: ...de length 300 mm or less Barcode margins 5 mm or more on each side of barcode Barcode base color White This may not be recognized correctly depending on the hue of white color of the paper scanned Resolution 200 dpi to 600 dpi Barcode angle Horizontal and vertical ATTENTION Scanning documents having barcode types not defined for this function could separate the image data wrongly This may even del...

Page 119: ...Sheet checkbox HINT To suppress scanning the image of the sheet on which barcodes are printed check the Remove separation sheet checkbox In duplex scan mode you can disable scanning the rear side of the barcode printed sheets by selecting the Remove the next page of a separation sheet checkbox 4 Click the Setup button The Barcode Setting dialog box appears file 10 232 227 50 Manual fi 6130_6230_Ly...

Page 120: ...in the barcode detecting area the one recognized first will be enabled 5 Insert the barcode printed sheets to wherever you want the file folder to separate 6 Specify the created batch profile and then perform the batch scan For how to perform the batch scan see Batch Scan in Section 2 6 How to Use ScandAll PRO file 10 232 227 50 Manual fi 6130_6230_Lynx3L OG R02 02_081030 contents EN 03 c03_17_01 ...

Page 121: ...clicking the Name Rule button on the File format and Name scheme tab Select the Use Barcode Characters radio button and mark the Create Directories Separately checkbox in the Name Rule dialog box The created folder is named with the barcode recognition character string and is used to store the scanned data Example of storing data in folders file 10 232 227 50 Manual fi 6130_6230_Lynx3L OG R02 02_0...

Page 122: ...3 17 Scanning Using Barcodes All Rights Reserved Copyright 2007 2008 PFU LIMITED file 10 232 227 50 Manual fi 6130_6230_Lynx3L OG R02 02_081030 contents EN 03 c03_17_01 htm 5 5 2008 10 30 15 14 41 ...

Page 123: ...n a Multifeed error occurs press Send to to eject sheet in the scanner s transport path Examine the last sheet scanned If no paper is glued on the ejected sheet return the sheet to the Hopper and press the Scan button If glued paper is present on the ejected sheet return the sheet to the Hopper press the Function button once Slow Blink rate of the function number display will change to Fast Blink ...

Page 124: ...before errors are sent to memory Extraneous images may be generated during a Multifeed error Automode 2 Bypass by length When a Multifeed error occurs press Send to to eject paper in the scanner s transport path Examine the last sheet scanned If no paper is glued on the ejected sheet return the sheet to the Hopper and press the Scan button If glued paper is present on the ejected sheet return the ...

Page 125: ... pattern If this checkbox is marked the remembered length and location of glued paper overlap pattern are deleted from memory Note that the overlap pattern is automatically cleared once you change the bypass mode while Do not remember is selected under Remember multifeed pattern at power off If Remember is selected in this situation the pattern will not be cleared Up to eight patterns can be remem...

Page 126: ...anning by using the Scan button after a multifeed error configure the driver settings as described below TWAIN driver Mark the Enable Scanner Panel and Enable Scan Button checkboxes on the Startup tab of the Option dialog box ISIS driver Mark the On checkbox under Multifeed Recovery and set Auto cancel Timer to 0 or any value minutes on the Paper Handling tab of the Properties for Fujitsu fi 6130 ...

Page 127: ...detected under Document check area specification Preferences in the Software Operation Panel dialog box The Intelligent Multifeed Function bypasses multifeed errors within the specified area 4 Select Intelligent Multifeed Setting in the Software Operation Panel and then select one of the three modes described above Descriptions 1 After a multifeed error press the Send to button to eject sheets fro...

Page 128: ...ors are detected based on the settings that have been configured in the Software Operation Panel or driver dialog box Auto mode1 Bypass by combination of length and position The scanner remembers the length and location of glued paper overlap pattern that caused a multifeed error and continues scanning When glued paper of a similar pattern is detected the scanner automatically ignores it to avoid ...

Page 129: ...ss to cool down Do not turn off the scanner when you clean the Feed and Eject rollers WARNING Do not use any aerosol sprays or alcohol based sprays to clean the scanner Dust blown up by strong air from the spray may enter the inside of the scanner This may cause the scanner to fail or malfunction Sparks caused by static electricity generated when blowing off dust and dirt from the outside of the s...

Page 130: ...t where you bought your scanner or an authorized FUJITSU service provider 2 Pre moistened with Cleaner F1 Cleaning Wipes are used instead of moistened cloths HINT It may take long before the cleaner vaporizes if a large quantity is used When cleaning the scanner parts dampen a cloth with modest quantities of the cleaner In addition wipe off the cleaner completely with a soft lint free cloth to lea...

Page 131: ...ts such as carbonless paper Documents containing a large amount of calcium carbonate Documents written by pencil Documents on which the toner is not fused sufficiently Detergent for cleaning windows or glass cleaner can be used instead of Cleaner F1 However do not use paint thinner or other organic solvents All Rights Reserved Copyright 2007 2008 PFU LIMITED file 10 232 227 50 Manual fi 6130_6230_...

Page 132: ... following locations using a soft cloth moistened with Cleaner F1 Plastic cover Document bed ATTENTION Do not allow moisture to get inside the device during cleaning 3 Wait for cleaned parts to dry 4 Gently close the document cover All Rights Reserved Copyright 2007 2008 PFU LIMITED file 10 232 227 50 Manual fi 6130_6230_Lynx3L OG R02 02_081030 contents EN 04 c04_02_01 htm 2008 10 30 15 15 27 ...

Page 133: ...ut CAUTION The glass surface of the ADF becomes hot during the operation of the scanner Before you start to clean the inner parts of the scanner disconnect the AC adapter from the power outlet and wait at least 15 minutes to let the glass cool down 1 Open the ADF by pushing on the ADF open lever and turning the ADF to the front ADF open lever CAUTION Be careful the ADF may close and pinch your fin...

Page 134: ...oller along the grooves on the roller taking care not to scratch the roller surface When cleaning the Brake roller remove it from the scanner For how to remove the Brake Roller see Section 5 3 Replacing the Brake Rollers Pick roller Lightly clean the Pick roller along the grooves on the roller taking care not to scratch the roller surface Take particular care in cleaning this roller as black debri...

Page 135: ... Number display is not P or 0 If you open the ADF when the indication of the Function Number display is P or 0 the Feed rollers Eject rollers will not rotate even you perform the operation of step 2 below 2 Simultaneously hold down the Send to and Scan buttons on the Operator Panel The Feed rollers Eject rollers start to rotate slowly 3 Hold a soft cloth moistened with cleaning fluid against the s...

Page 136: ...clean the Feed rollers Eject rollers 3 Press down on the center of the ADF to return it to its original position until the ADF button locks Press center of ADF ATTENTION When the ADF has returned to its original position make sure that it is completely closed Feeding errors may occur if the ADF is not closed completely All Rights Reserved Copyright 2007 2008 PFU LIMITED file 10 232 227 50 Manual f...

Page 137: ...ows XP Also when the FUJITSU TWAIN32 or FUJITSU ISIS scanner driver is updated the screens and operations noted in this chapter will differ slightly Refer to the manuals provided with the update WARNING When operating the scanner the ADF s inside glass becomes very hot Before you replace the consumables turn off its power and unplug the AC adapter from the outlet Wait for at least 15 minutes All R...

Page 138: ... Reset the Consumables Counters Description P N Standard Replacement Cycle Brake roller PA03540 0001 After 200 000 sheets or one year Pick roller PA03540 0002 After 200 000 sheets or one year The replacement cycles above are rough guidelines for the case of using A4 Letter woodfree or wood containing paper 64 g m2 17 lb This cycle varies according to the type of the paper used and how frequently t...

Page 139: ...nters use Software Operation Panel on your computer as shown below Checking the Consumables Counters 1 Turn on the scanner and confirm if it is connected correctly to your computer 2 From the start menu select All Programs Scanner Utility for Microsoft Windows Software Operation Panel The Software Operation Panel dialog box appears file 10 232 227 50 Manual fi 6130_6230_Lynx3L OG R02 02_081030 con...

Page 140: ...r Number of sheets scanned since last replacement of the Pick roller Remaining Ink Remaining ink in the imprinter s sold separately ink cartridge Displayed only when the imprinter option is used Resetting the Consumables Counters Reset the consumables counter s every time you replace the consumable s following the procedure given below 1 Click the Clear button beside the replaced consumable file 1...

Page 141: ...e remaining ink indication percentage is reset to 100 3 If you want to close the Software Operation Panel dialog box click the OK button Consumables Replacement Message The following message may appear while using the scanner file 10 232 227 50 Manual fi 6130_6230_Lynx3L OG R02 02_081030 contents EN 05 c05_02_01 htm 3 4 2008 10 30 15 15 34 ...

Page 142: ...d that you replace the consumable as soon as possible To stop the scanning and replace the consumable right away click the Cancel button For the replacement of consumables refer to the following sections Pick roller 5 4 Replacing the Pick Roller Brake roller 5 3 Replacing the Brake Roller All Rights Reserved Copyright 2007 2008 PFU LIMITED file 10 232 227 50 Manual fi 6130_6230_Lynx3L OG R02 02_08...

Page 143: ...N Be careful the ADF may close and pinch your finger 3 Remove the Brake roller from the scanner 1 Grab both sides of the Brake roller cover and press to the inside and pull down towards you as shown in the illustration below 2 Lift up the right side of the Brake roller and remove the right side of the shaft Then pull the left side of the shaft out of its hole to remove it file 10 232 227 50 Manual...

Page 144: ...e roller to the scanner Attach the Brake roller to the scanner in reverse order of removing 1 Set the left side of the shaft into place first then fix the right side of the shaft 2 Close the Brake roller cover 7 Close the ADF Press down on the center of the ADF to return it to its original position until the ADF button locks file 10 232 227 50 Manual fi 6130_6230_Lynx3L OG R02 02_081030 contents E...

Page 145: ...Reset the Brake roller counter For how to reset the Brake roller counter see Section 5 2 How to Check and Reset the Consumables Counters All Rights Reserved Copyright 2007 2008 PFU LIMITED file 10 232 227 50 Manual fi 6130_6230_Lynx3L OG R02 02_081030 contents EN 05 c05_03_01 htm 3 3 2008 10 30 15 15 36 ...

Page 146: ...er chute 2 Remove the ADF paper chute from the scanner ADF paper chute 3 Open the ADF by pulling the ADF open lever and turning the ADF to the front ADF open lever CAUTION Be careful the ADF may close and pinch your finger 4 Remove the Pick roller from the scanner file 10 232 227 50 Manual fi 6130_6230_Lynx3L OG R02 02_081030 contents EN 05 c05_04_01 htm 1 5 2008 10 30 15 15 39 ...

Page 147: ... direction of the arrow Lever 3 Slide the Pick roller in the direction of teh arrow and then lift it up to remove the shaft from the hole CAUTION Be careful not to touch the gear beside the lever of the Pick Roller as grease is applied to it file 10 232 227 50 Manual fi 6130_6230_Lynx3L OG R02 02_081030 contents EN 05 c05_04_01 htm 2 5 2008 10 30 15 15 39 ...

Page 148: ...he slot in the Pick roller Pick roller shaft Screw Slot Pick roller ATTENTION Make sure that the Pick roller is correctly attached The incompletely attached Pick roller might cause document jams or other feed errors When attaching the Pick roller to the shaft make sure that the roller s tab clicks into place 7 Attach the Pick roller shaft to the scanner Attach the Pick roller shaft to the scanner ...

Page 149: ... that both sides of the side guide are firmly locked 8 Close the ADF Press down on the center of the ADF to return it to its original position until the ADF open leverlocks 9 Attach the ADF paper chute to the scanner file 10 232 227 50 Manual fi 6130_6230_Lynx3L OG R02 02_081030 contents EN 05 c05_04_01 htm 4 5 2008 10 30 15 15 39 ...

Page 150: ... Reset the Pick roller counter For how to reset the Pick roller counter see Section 5 2 How to Check and Reset the Consumables Counters All Rights Reserved Copyright 2007 2008 PFU LIMITED file 10 232 227 50 Manual fi 6130_6230_Lynx3L OG R02 02_081030 contents EN 05 c05_04_01 htm 5 5 2008 10 30 15 15 39 ...

Page 151: ...s to check before contacting the agent where you bought the scanner and how to check device labels ATTENTION For information about troubles that are not described here and the details of the errors refer to the FUJITSU TWAIN32 Scanner Driver Help All Rights Reserved Copyright 2007 2008 PFU LIMITED file 10 232 227 50 Manual fi 6130_6230_Lynx3L OG R02 02_081030 contents EN 06 c06 htm 2008 10 30 15 1...

Page 152: ...y pulling the ADF open lever and turning the ADF to the front ADF open lever CAUTION Be careful the ADF may close and pinch your finger 3 Remove the jammed document ATTENTION Staples paper clips etc cause document jams Be sure to fully check the document and feed path and remove any small metal objects such as these Also before you start scanning be sure to remove any staples clips etc from the do...

Page 153: ... ADF even though any error message is not displayed Follow the procedure below to remove the documetns remaining in the ADF 1 Remove all documents from the ADF paper chute 2 Open the ADF by pulling the ADF open lever toward you 3 Remove the remaining documents 4 Close the ADF All Rights Reserved Copyright 2007 2008 PFU LIMITED file 10 232 227 50 Manual fi 6130_6230_Lynx3L OG R02 02_081030 contents...

Page 154: ... Status Function Number Display Function Button When the Error Recovery Guide is installed on your computer its window appears when Windows is started up If any error or device alarm occurred this software displays information such as error names and error codes regarding the error alarm Record the information and click Details on its window to learn detailed information for troubleshooting HINT T...

Page 155: ...mprinter option sold separately For details refer to 614PR Imprinter Operator s Guide Permanent Errors device alarms Motor and Optical Systems E and a number are displayed alternately Indication Meaning Remedy E0 Flatbed motor malfunction fi 6230 only 1 Confirm that the transfer lock is released 2 When a device alarm is indicated turn off and on the scanner If the alarm is still displayed on the F...

Page 156: ...nd on If the alarm is still displayed on the Function Number Display record the indicated error code and contact the store where you purchased the scanner or an authorized FUJITSU scanner service provider H6 The imprinter fuse has blown out when imprinter option is installed in fi 6130 H7 The lamp fuse has blown out H8 The background switching motor fuse has blown out Options only when imprinter o...

Page 157: ...the alarm is still displayed on the Function Number Display record the indicated error code and contact the store where you purchased the scanner or an authorized FUJITSU scanner service provider All Rights Reserved Copyright 2007 2008 PFU LIMITED file 10 232 227 50 Manual fi 6130_6230_Lynx3L OG R02 02_081030 contents EN 06 c06_02_01 htm 4 4 2008 10 30 15 13 09 ...

Page 158: ...ed On Indication on Function No display goes out The scanning does not start Quality of scanned pictures or photos is not satisfactory when scanning in black and white Quality of scanned text of lines is unsatisfactory Images are distorted or blurred Vertical lines appear in the scanned image The Function Number display indicates alarm with E or other alphabetical letter plus a number after the sc...

Page 159: ...apter correctly YES Did you press the Power button NO Press the Power button YES If you cannot solve the problem after taking measures check the items in Section 6 4 Items to Check Before Contacting the Dealer Where You Bought the Scanner and contact the dealer or an authorized FUJITSU scanner service provider All Rights Reserved Copyright 2007 2008 PFU LIMITED file 10 232 227 50 Manual fi 6130_62...

Page 160: ...rmal YES Does the display remain blank again even after you have turned ON the scanner NO The scanner operation is normal YES If you cannot solve the problem after taking measures check the items in Section 6 4 Items to Check Before Contacting the Dealer Where You Bought the Scanner and contact the dealer or an authorized FUJITSU scanner service provider All Rights Reserved Copyright 2007 2008 PFU...

Page 161: ...ocument correctly on ADF paper chute YES Is the ADF closed completely NO Remove the document in the ADF paper chute open the ADF and then close it completely YES Is the interface cable connected correctly NO Connect the interface cable correctly Refer to 2 2 Connecting the Scanner to Your PC in fi 6130 fi 6230 Getting Started YES Is the connector of interface cable broken YES Use a new interface c...

Page 162: ...4 Items to Check Before Contacting the Dealer Where You Bought the Scanner and contact the dealer or an authorized FUJITSU scanner service provider All Rights Reserved Copyright 2007 2008 PFU LIMITED file 10 232 227 50 Manual fi 6130_6230_Lynx3L OG R02 02_081030 contents EN 06 c06_03 03 htm 2 2 2008 10 30 15 13 14 ...

Page 163: ... rollers inside the ADF or the document bed and document holding pad of the Flatbed fi 6230 only clean NO Clean the dirty locations For details on how to clean the dirty locations see Chapter 4 DAILY CARE YES If you cannot solve the problem after taking measures check the items in Section 6 4 Items to Check Before Contacting the Dealer Where You Bought the Scanner and contact the dealer or an auth...

Page 164: ...aper powder or dust on the document YES Remove the debris from the document Such debris on the document may be transferred onto the the upper lower glasses and rollers inside the ADF or the document holding pad of the Flatbed fi 6230 only causing the scanned image dirty NO If you cannot solve the problem after taking measures check the items in Section 6 4 Items to Check Before Contacting the Deal...

Page 165: ... object on the ADF during scanning NO Was something causing the scanner to vibrate during scanning YES Do not allow anything to cause the scanner to vibrate while scanning NO Is the scanner installed on a flat level surface Or are the rubber pads attached to the bottom of the scanner NO Install the scanner on a flat level surface Or attach the rubber pads YES If you cannot solve the problem after ...

Page 166: ... any debris paper powder or dust on the document YES Remove the debris from the document Such debris on the document may be transferred onto the upper lower glasses and rollers inside the ADF or the document holding pad of the Flatbed fi 6230 only producing vertical lines in the scanned image NO Do the lines disappear on images with low resolution settings YES After this scan the documents with lo...

Page 167: ...he scanner again Refer to 2 1 Installing the Scanner in fi 6130 fi 6230 Getting Started YES Does the Function Number Display indicate any alarm after turning ON the scanner again NO The scanner operation is normal YES If you cannot solve the problem after taking measures check the items in Section 6 4 Items to Check Before Contacting the Dealer Where You Bought the Scanner and contact the dealer o...

Page 168: ...detection conditions see Section 7 5 Multifeed Detection Conditions Specify the multifeed detection range if needed See Section 3 9 Detecting Multifeeds YES Have you scanned a very thick paper or plastic card YES When scanning documents like this disable the Multifeed Detection NO Were the documents fanned before loaded onto the ADF paper chute NO Fan the documents before loading or reduce the num...

Page 169: ... Pick rollers and Brake rollers worn out YES Check the consumables counters Replace the consumables if needed For how to replace the consumables see Chapter 5 REPLACING CONSUMABLES NO If you cannot solve the problem after taking measures check the items in Section 6 4 Items to Check Before Contacting the Dealer Where You Bought the Scanner and contact the dealer or an authorized FUJITSU scanner se...

Page 170: ...led correctly NO Correctly install the consumables For how to install them see Chapter 5 REPLACING CONSUMABLES YES Is any of consumables Pick rollers and Brake rollers dirty YES Clean the dirty consumables For how to clean them see Section 4 3 Cleaning the ADF NO Is any of consumables Pick rollers and Brake rollers worn out YES Check the consumables counters Replace the consumables if needed For h...

Page 171: ...rrectly NO Correctly install the consumables For how to install them see Chapter 5 REPLACING CONSUMABLES YES Is any of consumables Pick rollers and Brake rollers dirty YES Clean the dirty consumables For how to clean them see Section 4 3 Cleaning the ADF NO Is any of consumables Pick rollers and Brake rollers worn out YES Check the consumables counters Replace the consumable if needed For how to r...

Page 172: ...ters Replace the consumables if needed For how to replace the consumables see Chapter 5 REPLACING CONSUMABLES NO Have you adjusted the scan scale NO Display the properties of the scanner that you are using on Scanners and Cameras in the control panel then adjust the scan scale YES Check the items in Section 6 4 Items to Check Before Contacting the Dealer Where You Bought the Scanner and contact th...

Page 173: ...t NO Display the properties of the scanner that you are using on Scanners and Cameras in the control panel then adjust the Sub scan Setting YES Check the items in Section 6 4 Items to Check Before Contacting the Dealer Where You Bought the Scanner and contact the dealer or an authorized FUJITSU scanner service provider All Rights Reserved Copyright 2007 2008 PFU LIMITED file 10 232 227 50 Manual f...

Page 174: ... Model Example fi 6130 For details on model see 6 5 Checking Labels on the Scanner Serial No Example 000001 For details on serial No see 6 5 Checking Labels on the Scanner Production date Month Year 2007 05 May 2007 For details on production date see 6 5 Checking Labels on the Scanner Date of purchase Month Day Year Symptom Frequency of trouble Total scanned pages ADF Do you have warranty for this...

Page 175: ...ror message Type of interface Example USB interface Interface controllers Feed system trouble Item Findings Document type Main purpose of use Last cleaning date Month Day Year Last consumables replacement date Month Day Year Operator panel status at trouble file 10 232 227 50 Manual fi 6130_6230_Lynx3L OG R02 02_081030 contents EN 06 c06_04_01 htm 2 3 2008 10 30 15 13 12 Windows Vista 1 1 2007 1 1...

Page 176: ...pe Example Front Side Back Side Duplex Resolution Example 600 dpi 75 dpi Image mode Example Color Grey Black and white Other Item Findings Can both the photograph showing the original document conditions and the scanned image be sent by e mail or Fax All Rights Reserved Copyright 2007 2008 PFU LIMITED file 10 232 227 50 Manual fi 6130_6230_Lynx3L OG R02 02_081030 contents EN 06 c06_04_01 htm 3 3 2...

Page 177: ... the scanner Positions of Labels on the Scanner The following shows where the two labels are located on the scanner Label A example Indicates scanner information Label B example Indicates various standards that the scanner conforms with All Rights Reserved Copyright 2007 2008 PFU LIMITED file 10 232 227 50 Manual fi 6130_6230_Lynx3L OG R02 02_081030 contents EN 06 c06_05_01 htm 2008 10 30 15 14 48...

Page 178: ...er 7 ADF AND PAPER SPECIFICATION This chapter describes the required document size and paper quality for ensuring correct operation when scanning documents on the ADF All Rights Reserved Copyright 2007 2008 PFU LIMITED file 10 232 227 50 Manual fi 6130_6230_Lynx3L OG R02 02_081030 contents EN 07 c07 htm 2008 10 30 15 14 49 ...

Page 179: ...ize The following shows the size of documents that can be scanned on the ADF Maximum Minimum A B A B 216 8 5 in 356 14 in 53 2 1 in 74 2 9 in Unit mm All Rights Reserved Copyright 2007 2008 PFU LIMITED file 10 232 227 50 Manual fi 6130_6230_Lynx3L OG R02 02_081030 contents EN 07 c07_01_01 htm 2008 10 30 15 14 50 ...

Page 180: ...oto attached documents Wrinkled or curled documents See HINT below Folded or torn documents Tracing paper Coated paper Carbon paper Photosensitive paper Perforated documents Documents that are not square or rectangular Very thin documents Photographs Do not use the following documents Paper clipped or stapled documents Documents on which the ink is still wet Documents smaller than A8 in size Docum...

Page 181: ...canner could be damaged if photographs or sheets of paper attached to the scanned document have contact with the Brake or Pick rollers during scanning Scanning documents of calendered paper such as photographs may damage the surface of them HINT When using the ADF the leading edge of all document sheets must be evenly aligned Make sure that curling at the leading edge is within the following toler...

Page 182: ... flexible may not feed smoothly and excessive noise may occur Note If the cards do not feed smoothly try Scanning one card at a time Enabling Automatic Paper Size Detection For how to configure this setting see Section 3 10 Correcting Skewed Documents Raising the resolution Cards should be clean from oil and without labels Cards cannot be scanned when the imprinter is installed All Rights Reserved...

Page 183: ...hute is determined by the size and weight of the document The following graph shows the maximum document loading capacity of ADF according to paper weight Unit Conversion g m2 40 52 64 75 80 90 104 127 lb 11 14 17 20 21 24 28 34 kg 35 45 55 64 5 69 77 5 90 110 All Rights Reserved Copyright 2007 2008 PFU LIMITED file 10 232 227 50 Manual fi 6130_6230_Lynx3L OG R02 02_081030 contents EN 07 c07_03_01...

Page 184: ...using the ADF document trouble might occur if there are punched holes in the shaded area in the following figure If hole punched documents must be scanned use the Flatbed fi 6230 only All Rights Reserved Copyright 2007 2008 PFU LIMITED file 10 232 227 50 Manual fi 6130_6230_Lynx3L OG R02 02_081030 contents EN 07 c07_04_01 htm 2008 10 30 15 14 55 ...

Page 185: ...s Punched holes are not allowed within 35 mm of the vertical center line of the document Detection by Document Overlapping and Length Sheets of the same thickness and length shall be set in the ADF at a time Document thickness 0 05 to 0 26 mm Document length deviation 1 or less Punched holes are not allowed within 35 mm 1 38 in of the vertical center line of the document Other paper shall not be g...

Page 186: ...7 5 Multifeed Detection Conditions All Rights Reserved Copyright 2007 2008 PFU LIMITED file 10 232 227 50 Manual fi 6130_6230_Lynx3L OG R02 02_081030 contents EN 07 c07_05_01 htm 2 2 2008 10 30 15 14 56 ...

Page 187: ...TS MAP TOP Chapter 8 SCANNER SETTINGS This chapter explains the how settings can be done for the scanner using the Software Operation Panel All Rights Reserved Copyright 2007 2008 PFU LIMITED file 10 232 227 50 Manual fi 6130_6230_Lynx3L OG R02 02_081030 contents EN 08 c08 htm 2008 10 30 15 14 57 ...

Page 188: ...onfigure settings and functions for the fi 6130 and the fi 6230 Start up the Software Operation Panel 1 Confirm if the scanner is connected correctly to the PC then power on the scanner 2 From the Start menu select All Programs Scanner Utility for Microsoft Windows Software Operation Panel The Software Operation Panel window appears file 10 232 227 50 Manual fi 6130_6230_Lynx3L OG R02 02_081030 co...

Page 189: ...nk level only for the imprinter option Power saving Select the waiting time before entering the Power saving mode Setting range 15 to 55 minutes set in steps of 5 min 15 min Offset Setting Adjust the start position for the document scanning Up down Left right setting range 2 to 2 mm set in 0 5 mm steps Up down left right 0 mm Vertical magnification Adjustment Adjust the magnification in the feedin...

Page 190: ...ed mm wide with white or black on the scanned image When the backing background color is white the end sections are filed with white and when the background color is black filled with black ADF Top left right 0 15 mm Bottom 7 to 7 mm can be set in increments of 1 mm FB Top bottom left right 0 15 mm A Image area B Filled area A B Area to be output Top Bottom Left Right 0 mm Dropout color Drop out a...

Page 191: ...of paper feeding retries Specify the picking retry times when picking fails during scanning 1 to 12 7 Useful life counter When the Page counter Consumable counter described in Section 5 2 How to Check and Reset the Consumables Counters exceeds the value specified here the counter back ground color becomes yellow For each consumable 10 000 to 2 550 000 with 10 000 increment 200 000 Manual feed time...

Page 192: ...de do the following 1 Start up the Software Operation Panel See Section 8 1 Scanner Settings 2 Select Device Setting from the left side list in the window 3 Use the slide control bar to set the waiting time before entering the power saving mode You can set the waiting time in the range of 15 to 55 minutes in steps of 5 min All Rights Reserved Copyright 2007 2008 PFU LIMITED file 10 232 227 50 Manu...

Page 193: ...e to adjust the Offset and the Scan scale for correction ATTENTION The factory default settings are appropriate so normally there is no need to make any adjustment 1 Start up the Software Operation Panel See Section 8 1 Scanner Settings 2 Select Device Setting from the left side list in the window and click Offset file 10 232 227 50 Manual fi 6130_6230_Lynx3L OG R02 02_081030 contents EN 08 c08_03...

Page 194: ...f 0 5 mm Vertical Adjusts the vertical Offset Setting range 2 mm to 2 mm in steps of 0 5 mm Scan scale setting Target Select ADF or FB as target Vertical Adjusts the vertical document length Scan scale Setting range 3 1 to 3 1 in steps of 0 1 All Rights Reserved Copyright 2007 2008 PFU LIMITED file 10 232 227 50 Manual fi 6130_6230_Lynx3L OG R02 02_081030 contents EN 08 c08_03_01 htm 2 2 2008 10 3...

Page 195: ...canner provides can prevent such troubles With the Multifeed Detection the scanner indicates a message and halts the scanning immediately when a multifeed is detected Note that the Multifeed Detection is not available for the range about 30 mm from the leading edge of document Configure the settings for the Multifeed Detection as follows 1 Start up the Software Operation Panel See Section 8 1 Scan...

Page 196: ...s selected If the detected document length does not reach the selected length it will be recognized just as an error and thus will not be recognized as a Multifeed ATTENTION When scanning documents of different lengths together in the same stack select Checking Overlapping Ultrasonic If something like stamps memos or photos is glued to the document it may be recognized as a Multifeed when selectin...

Page 197: ...tings configured in this dialog box Otherwise let the checkbox unmarked Clearing this checkbox sets both the starting and ending positions to 0 making the whole range of the document to be checked for multifeeds Disable Disables the Multifeed Detection for the specified range file 10 232 227 50 Manual fi 6130_6230_Lynx3L OG R02 02_081030 contents EN 08 c08_04_01 htm 3 5 2008 10 30 15 15 05 ...

Page 198: ...sition will be 0 and the ending potion be equal to or not smaller than the document length If the starting position is set larger than the document length with Disable the the whole range covering the entire document length will be checked with Enable the Multifeed Detection will be disabled To detect multifeeds the detection range should be specified with at least 5 mm in length Configure the set...

Page 199: ...to each other Setting Example 3 Bad Example Selected range Enable Start 100mm End 102mm Unit mm Since the detection range length is less than the minimum value 5 mm the Multifeed Detection cannot be performed correctly All Rights Reserved Copyright 2007 2008 PFU LIMITED file 10 232 227 50 Manual fi 6130_6230_Lynx3L OG R02 02_081030 contents EN 08 c08_04_01 htm 5 5 2008 10 30 15 15 05 ...

Page 200: ...ler function This function fills the end portion of the image so that it looks clean Configure the settings for the Page Edge Filler as follows 1 Start up the Software Operation Panel See Section 8 1 Scanner Settings 2 Select Device Setting 2 from left side list in the window and select Paper Edge Filler ADF or Paper Edge Filler FB from its lower level 3 Specify the length for each end section top...

Page 201: ...wise specified the background color is white You can also change it to the Black background using the scanner driver If you are using the TWAIN driver do the following to change the background color to black Select the Option button and then select Black background from Automatic Size and Skew detection on the Rotation tab ATTENTION Note that if the Page Edge Filler is too wide some characters in ...

Page 202: ...setting For example when scanning the document containing black letters each with a green frame you can scan only the black part of letters by specifying green to be dropped out Configure the settings for the Dropout Color as follows 1 Start up the Software Operation Panel See Section 8 1 Scanner Settings 2 Select Device Setting 2 from left side list in the window and select Dropout color from its...

Page 203: ...ing the setting through Software Operation Panel you cannot select other colors than red green and blue If you want to drop out any other colors use the scanner driver setting window For details on how to configure settings through the scanner driver setting window see Section 3 7 Excluding a Color from Images Dropout Color All Rights Reserved Copyright 2007 2008 PFU LIMITED file 10 232 227 50 Man...

Page 204: ...ing of two separate documents can be shortened Configure the settings for the Pre Pick as follows 1 Start up the Software Operation Panel See Section 8 1 Scanner Settings 2 Select Device Setting 2 from left side list in the window and select Pre Pick from its lower level 3 Select Yes or No for Pre Pick Select Yes to make Pre pick valid and select No to make it invalid file 10 232 227 50 Manual fi ...

Page 205: ...o reload the document after ejecting all the pre picked document This setting is also available by scanner driver setting In this case scanner driver setting has a priority All Rights Reserved Copyright 2007 2008 PFU LIMITED file 10 232 227 50 Manual fi 6130_6230_Lynx3L OG R02 02_081030 contents EN 08 c08_07_01 htm 2 2 2008 10 30 15 15 09 ...

Page 206: ...ing Ultrasonic at Multifeed detection by the procedure in Section 8 4 Multifeed Detection in advance Configure the settings for the Intelligent Multifeed function as follows 1 Start up the Software Operation Panel See Section 8 1 Scanner Settings 2 Select Device Setting 2 from left side list in the window and select Intelligent Multifeed Function from its lower level 3 Select one of the following ...

Page 207: ...ltifeed Detection will be bypassed from the next scanning and on Auto mode 2 When the scanner detects a multifeed and stops document feeding reload the document from the ADF paper chute In this mode the scanner memorizes the size of the paper attached to the document when a multifeed was detected for the first time If this pattern is determined to be a multifeed the Multifeed Detection will be byp...

Page 208: ...the number of paper feeding retry times as follows 1 Start up the Software Operation Panel See Section 8 1 Scanner Settings 2 Select Device Setting 2 from left side list in the window and select Number of paper feeding retries from its lower level 3 Specify the retry times from 1 to 12 All Rights Reserved Copyright 2007 2008 PFU LIMITED file 10 232 227 50 Manual fi 6130_6230_Lynx3L OG R02 02_08103...

Page 209: ...s Counters or a message see the replacement message appears Configure the settings for the life counter as follows 1 Start up the Software Operation Panel See Section 8 1 Scanner Settings 2 Select Device Setting 2 from left side list in the window and select Useful life counter from its lower level 3 Specify the counter value to change its color for each consumable Pick roller Brake roller Setting...

Page 210: ...ed timeout You can cancel the Manual feed timeout immediately by pressing the Send to button within the timeout period specified Configure the settings for the Manual feed timeout as follows 1 Start up the Software Operation Panel See Section 8 1 Scanner Settings 2 Select Device Setting 2 from left side list in the window and select Manual feed timeout from its lower level 3 Select whether to enab...

Page 211: ...the document to be loaded within the specified timeout period even if scanning starts with no document loaded in the ADF paper chute All Rights Reserved Copyright 2007 2008 PFU LIMITED file 10 232 227 50 Manual fi 6130_6230_Lynx3L OG R02 02_081030 contents EN 08 c08_11_01 htm 2 2 2008 10 30 15 15 14 ...

Page 212: ...urn on off the scanner in conjunction with the computer power on off if the scanner is connected to the computer through an USB cable Configure the settings for power on off control as follows 1 Start up the Software Operation Panel See Section 8 1 Scanner Settings 2 Select Device Setting 2 from the left side list in the window and select Power SW Control from its lower level file 10 232 227 50 Ma...

Page 213: ...e scanner in conjunction with the computer select Enable USB power feeding ATTENTION Some computer or USB hub models continue supplying power to the USB bus even after they are turned off In such a situation the option Enable USB power feeding may not function properly All Rights Reserved Copyright 2007 2008 PFU LIMITED file 10 232 227 50 Manual fi 6130_6230_Lynx3L OG R02 02_081030 contents EN 08 ...

Page 214: ...Guide TROUBLESHOOTING CONTENTS MAP TOP Chapter 9 SCANNER SPECIFICATION This chapter lists the scanner specifications All Rights Reserved Copyright 2007 2008 PFU LIMITED file 10 232 227 50 Manual fi 6130_6230_Lynx3L OG R02 02_081030 contents EN 09 c09 htm 2008 10 30 15 15 16 ...

Page 215: ...0 x 11 69 in Note 2 Paper weight 41 g m2 to 210 g m2 11 to 56 lb Note 3 Scanning speed A4 letter portrait Note 4 Binary monochrome Simplex 40 sheets min Duplex 80 sides min 200 dpi Grayscale Color Simplex 30 sheets min Duplex 60 sides min Binary monochrome 300 dpi Grayscale Color Capacity of ADF 50 sheets A4 letter 80 g m2 20 lb Note 5 Optical resolution 600 dpi Output resolution Binary monochrome...

Page 216: ... see Chapter 7 ADF AND PAPER SPECIFICATION 6 At a high resolution of 600 dpi or more scanning may be disabled depending on the scan mode the size of documents and or memory capacity of your computer 7 If you connect the scanner with USB 2 0 it is required that the USB port and the Hub are compliant with USB 2 0 The scanning speed may slow down when you connect the scanner with USB 1 1 If your ompu...

Page 217: ... Weight fi 6130 4 2 kg 9 24 lb fi 6230 8 8 kg 19 36 lb Input power Voltage AC 100 to 240 V 10 Phases Single phase Frequency 50 60 3 Hz Power consumption fi 6130 38 W or less fi 6230 45 W or less Ambient condition Device status Operating Not operating Temperature 5 to 35ºC 41 to 95ºF 20 to 60ºC 4 to 140ºF Humidity 20 to 80 8 to 95 Calorific value fi 6130 32 6 kcal H or less fi 6230 38 6 kcal H or l...

Page 218: ...HOOTING CONTENTS MAP TOP 9 3 External Dimensions The following shows the external dimensions fi 6130 fi 6230 Unit mm All Rights Reserved Copyright 2007 2008 PFU LIMITED file 10 232 227 50 Manual fi 6130_6230_Lynx3L OG R02 02_081030 contents EN 09 c09_03_01 htm 2008 10 30 15 15 20 ...

Page 219: ...ner to Your PC in fi 6130 fi 6230 Getting Started 2 From the Start menu select Control Panel The Control Panel window appears 3 Double click on the Printers and Other Hardware icon The Printers and Other Hardware window appears 4 Double click on the Scanners and Cameras icon The Scanners and Cameras window appears 5 Display the fi 6130dj Properties or fi 6230dj Properties dialog box In Windows XP ...

Page 220: ...ber from 1 to 9 displayed on the Function Number Display press the Send to button 8 Select the application with its process excuted by the event For Windows XP click Start this program under Actions and select the application from the menu file 10 232 227 50 Manual fi 6130_6230_Lynx OG R02 02_081030 contents EN App cApdx01_01 htm 2 4 2008 10 30 15 15 22 ...

Page 221: ...OS Settings to Configure on the Scanner Function Number Display Function button Send to button Scan button When using the Scan button No setting is needed Pressing the Scan button starts up the application configured file 10 232 227 50 Manual fi 6130_6230_Lynx OG R02 02_081030 contents EN App cApdx01_01 htm 3 4 2008 10 30 15 15 22 ...

Page 222: ... 9 then pressing the Send to button Pressing the Send to button starts up the application configured HINT To perform the event configured with Send to 2 for example display 2 on the Function Number Display Each time the Function button is pressed the number displayed changes as follows 1 2 3 9 C 1 2 3 All Rights Reserved Copyright 2007 2008 PFU LIMITED file 10 232 227 50 Manual fi 6130_6230_Lynx O...

Reviews: