7
1F03 1781
2
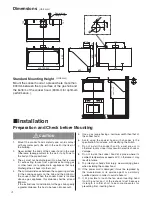
Mount the body
Hook the keyholes of the mounting bracket by
the washer-head wood screws, and tighten the
screws.
Washer-head
Wood screw
Washer-head
Wood screw
3
Fix the body
Put 2 washer-head wood screws (
∅
5.1
×
45) to
the rear of the body and tighten them securely.
4
Connection of duct and exhaust outlet
Connect
∅
150 flexible tube duct or the like with
the exhaust outlet.
Make the exhaust outlet secure and air-tight
using non-flammable tape such as aluminium
tape, etc. (not supplied)
Note
The longer the exhaust duct, the lower the
ventilation.
Flexible tube duct
Taping with non-flammable
materials (Alminum tape etc.)
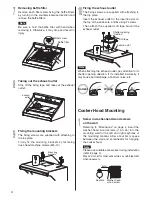
Assembly
2
Attaching baffle filters
Align the baffle filter by placing the bottom of the
baffle filter in the catches, hold it in place with
one hand, and use the other hand to fasten each
filter screw at the top firmly (turn clockwise to
fasten).
Catch
Tighten
Baffle filter
Filter screw
1
Stripping off the fixing tape
Strip off the oil tray fixing tape.
Fixing tape
Oil tray
3
Attaching rectifier panel
Holding the rectifier panel with both hands, place
the bottom of the panel in bottom of the catches
and in line with the rectifier panel mounting guide
holes.
Tighten the rectifier panel screw to attach the
panel firmly.
Note
Make sure that the rectifier panel is fixed
securely. It may be a cause of dropping if not
fixed firmly.
Rectifier panel
Catch
Rectifier panel
mounting guide hole
Rectifier panel screw


