80
5. Inspection
FinePix S5100/S5500 Service Manual
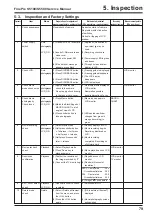
Sequemnce
Item
Mode
Preparations for adjustment
(measurement points, subject, other)
Method of adjustment
(VRs, waveforms, required values)
Measuring
equipment and jigs
Measurement points
(VRs, positions)
11
12
13
Battery low check
Current
consumption
check
Factory setting
Factory setting
when updating
packaging
Movie
LCD_ON
Movie
photography
LCD_ON
Playback
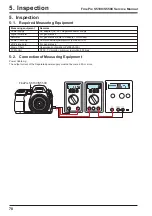
(1) Connect Power Cable Jig
(2) Set voltage
(3) Turn on the Power SW
(4) Set to pre-end voltage
(5) Set to end voltage
(1) Connect Power Cable Jig
(2) Set voltage
(3) Turn on the Power SW
(4) Press the <LCD> button to
switch the LCD monitor
ON
(5) After the through screen is
displayed, check current
consumption
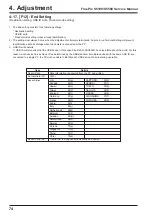
(1) Return all settings to initial
values
IMAGE DISP:
ON
Power saving:
2 MIN
FORMAT:
OK
FRAME NO.:
CONT.
Beep:
CENTER
SHUTTER:
CENTER
Date/Time:
Not set
Time DIFF.:
Not set
LCD:
ON
USB MODE:
Card Reader
START-IMAGE OFF
LANG.:
ENGLISH
VIDEO(US/CA): NTSC
(EU/EG/GE/AS):PAL
CCD-RAW:
OFF
Self Timer:
OFF
Mode Dial:
AUTO
White Balance: AUTO
(2) Inspection battery/
inspection xD-Picture card
not inserted in camera
(3) Battery cover closed
(4) LCD surface free of
contamination
(5) Clean exterior of camera
(1) No damage to exterior
when checking (6) of 13
items
(2) Update packaging in
accordance with parts list
display
Refer to Battery Adjustment
for connection details
(2) Set voltage to 5.0 ± 0.5V
(3) Starts normally
(4) Set voltage 4.34 ± 0.2V
(5) Set voltage to 3.94 ± 0.2V.
Lens retracts and main
power switched OFF
(2) Set voltage to 5.0 ± 0.05V
(3) Starts normally
(5) Maximum current
consumption 450mA
* Setting and clearing date
(1) Connect the USB cable
from the PC to the camera
(ensure that the PC is
switched ON)
(2) Open the card cover and
switch power ON
(POWER_ON) while
pressing the shutter button
(3) Switch power OFF
(POWER_OFF)
(4) Check that the date has
been cleared
Power
Cable Jig
Regurated
power
supply
Power
Cable Jig
Ammeter
Summary of Contents for FinePix S5100
Page 23: ...23 3 Schematics FinePix S5100 S5500 Service Manual 3 6 Circuit Diagrams 3 6 1 CAM BLOCK ...
Page 24: ...24 3 Schematics FinePix S5100 S5500 Service Manual 3 6 2 DCDC BLOCK ...
Page 25: ...25 3 Schematics FinePix S5100 S5500 Service Manual 3 6 3 KSW BLOCK ...
Page 26: ...26 3 Schematics FinePix S5100 S5500 Service Manual 3 6 4 LCD EVF BLOCK ...
Page 27: ...27 3 Schematics FinePix S5100 S5500 Service Manual 3 6 5 MOTOR BLOCK ...
Page 28: ...28 3 Schematics FinePix S5100 S5500 Service Manual 3 6 6 PROCESS BLOCK ...
Page 29: ...29 3 Schematics FinePix S5100 S5500 Service Manual 3 6 7 CCD FPC BLOCK ...
Page 30: ...30 3 Schematics FinePix S5100 S5500 Service Manual 3 6 8 IPS STROBE BLOCK ...
Page 31: ...31 3 Schematics FinePix S5100 S5500 Service Manual 3 6 9 MSW BLOCK 3 6 10 RSW BLOCK ...
Page 33: ...33 3 Schematics FinePix S5100 S5500 Service Manual SIDE B ...
Page 34: ...34 3 Schematics FinePix S5100 S5500 Service Manual 3 7 2 MAIN PWB ASSY SIDE A ...
Page 35: ...35 3 Schematics FinePix S5100 S5500 Service Manual SIDE B ...
Page 36: ...36 3 Schematics FinePix S5100 S5500 Service Manual 3 7 3 KSW FPC ASSY SIDE A ...
Page 37: ...37 3 Schematics FinePix S5100 S5500 Service Manual SIDE B ...
Page 38: ...38 3 Schematics FinePix S5100 S5500 Service Manual 3 7 4 MSW FPC ASSY SIDE A ...
Page 39: ...39 3 Schematics FinePix S5100 S5500 Service Manual SIDE B ...
Page 40: ...40 3 Schematics FinePix S5100 S5500 Service Manual 3 7 5 RSW FPC ASSY SIDE A SIDE B ...
Page 41: ...41 3 Schematics FinePix S5100 S5500 Service Manual SIDE A SIDE B 3 7 6 CCD FPC ASSY ...
Page 96: ...26 30 Nishiazabu 2 chome Minato ku Tokyo 106 8620 Japan FUJI PHOTO FILM CO LTD ...

