background image

21

Using

the

Camera

2

20

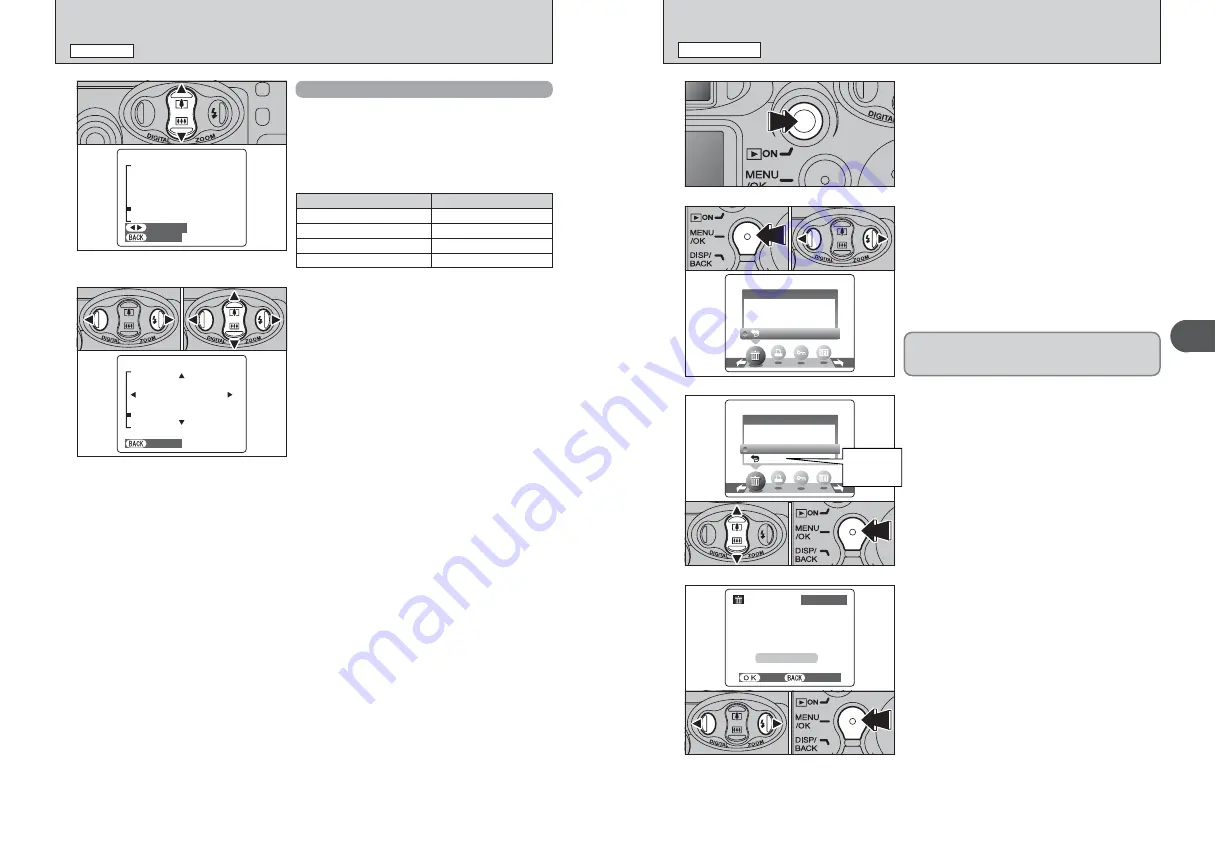
ERASING IMAGES (ERASE FRAME)

PLAYBACK MODE

1

Press the “Playback” button for approx. 1 second to
turn the camera on in Playback mode.

2

3

1

Press the “MENU/OK” button during playback to
display the menu.

2

Press “

d

” or “

c

” to select “

o

” ERASE.

1

Press “

a

” or “

b

” to select “FRAME”.

2

Press the “MENU/OK” button to confirm the
selection.

See P.30 for information on “ALL FRAMES”.

FRAME

FRAME

ALL FRAMES

ALL FRAMES

BACK

BACK

ERASE

ERASE

4

1

Press “

d

” or “

c

” to select the frame (file) to be

erased.

2

Press the “MENU/OK” button to erase the
displayed frame (file).

To erase another image, repeat steps 

1

and 

2

.

When image erasing is completed, press the
“DISP/BACK” button.

YES

YES     

     CANCEL

CANCEL


100−0009

100−0009

ERASE

ERASE OK?

OK?

FRAME

FRAME

0

1

0

2

0

1

0

2

FRAME

FRAME

ALL FRAMES

ALL FRAMES

BACK

BACK

ERASE

ERASE

Return to 
single-frame 
playback

!

Press the “MENU/OK” button repeatedly to erase consecutive
images. Take care not to erase important image.

0

1

0

2

Erased frames (files) cannot be recovered. Back up
important frames (files) onto your computer or
another media.

VIEWING YOUR IMAGES (PLAYBACK)

PLAYBACK MODE

Playback zoom

Press “

a

(

[

)” or “

b

(

]

)” during single-frame

playback to zoom in (enlarges) or out on a still
image. A zoom bar appears.
Press the “DISP/BACK” button to return to single-
frame playback.

 PANNING

PANNING
CANCEL

CANCEL

1

Press “

d

” or “

c

” to select to “PANNING”.

2

Press “

a

”, “

b

”, “

d

”, or “

c

” to display another

area.

Press the “DISP/BACK” button to return to
playback zoom.

CANCEL

CANCEL

0

1

0

2

Zoom scales

Quality mode

Max. zoom scale

5

(2816 

×

2120)

Approx. 17.6

×

3

(2048 

×

1536)

Approx. 12.8

×

1

(1280 

×

960)

Approx. 8

×

`

(640 

×

480)

Approx. 4

×

Summary of Contents for FinePix FinePix A605

Page 1: ...vanced Features Software Installation Settings Viewing Images BL00396 100 1 1 2 3 4 5 6 This manual will show you how to use your FUJIFILM DIGITAL CAMERA FinePix A605 correctly Please follow the instr...

Page 2: ...or granting any right license or title to you other than those explicitly granted under this Agreement 5 Limited Warranty FUJIFILM warrants to you that Media is free from any defect in material and wo...

Page 3: ...NCTIONS g AUTO PLAY AUTOMATIC PLAYBACK 37 Y TRIMMING 38 r RECORDING MOVIES 40 MOVIE MENU 42 y QUALITY SETTINGS IN MOVIE MODE 42 r PLAYING BACK MOVIES 43 Playing Back Movies 43 PLAYBACK MODE MOVIE MENU...

Page 4: ...ce to other equipment in the hospital or aircraft For details please check with the applicable regulations Handling Your Digital Camera This camera contains precision electronic components To ensure t...

Page 5: ...icture Card slot Battery compartment Tripod mount Viewfinder Battery cover Viewfinder lamp LCD monitor DISP Display BACK button Strap mount MENU OK button a Tele b Wide P 18 Lens c Flash button P 24 d...

Page 6: ...tor Align the indicators on the xD Picture Card slot and xD Picture Card and then push the card firmly all the way into the slot If the xD Picture Card is oriented incorrectly it will not go all the w...

Page 7: ...camera settings will be retained for roughly 3 hours even when the camera has no power batteries removed and AC power adapter disconnected 2 3 0 1 0 2 Power OFF Power ON Leave the lens cover closed P...

Page 8: ...Changing the date order 1Press d or c to select the date order 2Press a or b to set the date order Refer to the table below for details of the settings 3Always press the MENU OK button to complete the...

Page 9: ...the picture being taken If necessary playback the shot to check the image When the camera takes the picture the viewfinder lamp lights orange shooting disabled The viewfinder lamp then turns green an...

Page 10: ...ed on the FinePix A605 or still images excluding some uncompressed images recorded on any FUJIFILM digital camera that supports xD Picture Cards 18 USING THE ZOOM DIGITAL ZOOM Pressing a or b the digi...

Page 11: ...DISP BACK button 0 1 0 2 0 1 0 2 Return to single frame playback Press the MENU OK button repeatedly to erase consecutive images Take care not to erase important image 0 1 0 2 Erased frames files cann...

Page 12: ...viewfinder and lens are in different positions Accordingly you should use the LCD monitor to take pictures in Macro mode TAKING PICTURES SELECTING THE CAMERA SETTINGS STILL PHOTOGRAPHY FUNCTIONS 3 Ad...

Page 13: ...to take the actual picture The flash fires as required by the shooting conditions If pressing the Shutter button while the flash is charging the picture will be taken without the flash Auto Flash Mode...

Page 14: ...he MENU OK button to confirm the selection 0 1 0 2 0 3 PHOTOGRAPHY MENU Important Please read STILL PHOTOGRAPHY MENU 2 When you enable the setting an icon appears in the top left corner of the LCD mon...

Page 15: ...cent lamps Shooting under Cool White fluorescent lamps 8 Shooting in incandescent light When the flash fires the white balance setting for the flash is used Consequently to achieve a particular effect...

Page 16: ...re erasing them P 35 To stop the procedure mid way To cancel erasing of all the frames files while it is in progress press the DISP BACK button Some unprotected frames files will be left unerased 0 1...

Page 17: ...OF setting for a frame you have specified cancel frame perform steps 1 to 3 and then 1Press d or c to select the frame file with the DPOF setting you want to cancel 2Set the number of prints to 0 zero...

Page 18: ...s press the DISP BACK button FRAME SET Protection is a setting that prevents frames files from being accidentally erased However the FORMAT function erases all the frames files including protected fra...

Page 19: ...s d or c to select the protected frame file 2Press the MENU OK button to unprotect the displayed frame file FRAME RESET Press the MENU OK button to protect all the frames files SET ALL Press the MENU...

Page 20: ...ess the MENU OK button to display the menu on the LCD monitor 1 0 1 0 2 2 1Press d or c to select Y TRIMMING 2Press the MENU OK button 0 1 0 2 3 1Pressing a or b during single frame playback zooms in...

Page 21: ...or close up shots P 23 Movies recorded with the digital zoom have slightly lower image quality Choose the zoom mode that best suits the scene being shot The exposure is adjusted for the scene being sh...

Page 22: ...ile playback is stopped to go back to the previous file or advance to the next file respectively Fast forward Rewind Press d or c during playback to skip forwards or backwards through the movie Skip p...

Page 23: ...gs press the MENU OK button to confirm the changes 1Press a or b to select a menu option 2Press d or c to change the setting and then press c for FORMAT DATE TIME TIME DIFFERENCE DISCHARGE or qRESET 3...

Page 24: ...d to subsequently turn the camera off when not being used See P 47 for details FORMAT OK Erases all files See P 47 for details BEEP LOW HIGH OFF LOW Sets the volume of the tone emitted when the camera...

Page 25: ...f may cause the Frame number memory to not function File number runs from 0001 to 9999 Once 9999 is exceeded the directory number changes from 100 to 101 The maximum number is 999 9999 The displayed f...

Page 26: ...Required to use the FinePix Internet Service The software can still be installed even if you do not have an Internet connection Operating System 1 CPU Windows 98 including the Second Edition Windows M...

Page 27: ...2 000 colors When using ImageMixer VCD2 for FinePix 1024 768 or better Internet connection 4 i To use the FinePix Internet Service or mail attachment function An Internet connection and e mail transmi...

Page 28: ...t the camera directly to the Macintosh using the USB cable mini B The software may not operate correctly if you use an extension cable or connect the camera via a USB hub i Push the USB connector full...

Page 29: ...NSTALLATION ON A Mac OS X 1 Turn your Macintosh on and start up Mac OS X Do not launch any other applications 2 When the bundled CD ROM is loaded into the CD ROM drive the FinePix icon appears Double...

Page 30: ...l hydride batteries Please use the optional charger P 69 Check that the camera is turned off Plug the AC power adapter connector into the DC IN 3V socket and then plug the AC power adapter into the po...

Page 31: ...B cable mini B Disconnecting the printer USB socket mini B AC 3V sold separately 5 Press the MENU OK button to download the data to the printer and print the frames specified in the DPOF settings Pres...

Page 32: ...to a computer Refer to Section 5 the first time you connect the camera to your computer Install the software first Do not connect the camera with the computer before installing all the software This m...

Page 33: ...n to save the images at this point To proceed without saving the images click the Cancel button The Windows CD ROM may also be required during installation In this event change CD ROMs as directed by...

Page 34: ...using Acrobat Reader refer to the Acrobat Reader Help menu h What is explained in How to Use FinePixViewer How to Use FinePixViewer covers a range of topics including batch processing and ordering pr...

Page 35: ...ure Card of 16 MB to 512 MB and SmartMedia of 3 3 V 4 MB to 128 MB h PC Card Adapter DPC AD The PC Card Adapter allows the xD Picture Card and SmartMedia to be used as a PC Card Standard ATA compliant...

Page 36: ...ct to strong magnetic fields such as near motors transformers or magnets h In contact with chemicals such as next to rubber or vinyl products Damage by Water or Sand The FinePix A605 can be damaged on...

Page 37: ...than those manufactured by FUJIFILM are used h The xD Picture Card may feel warm when it is removed from the camera after taking pictures This is normal h Do not put labels on the xD Picture Card Peel...

Page 38: ...e xD Picture Card is not formatted i The xD Picture Card contact area is soiled i Camera fault i Format the xD Picture Card in the camera i Wipe the contact area on the xD Picture Card with a soft dry...

Page 39: ...d The image is blurred There is speckling on the image Can t format the xD Picture Card i The batteries have run out i The batteries are loaded backwards i The battery cover is not closed properly i T...

Page 40: ...of available frames recording time or file size varies slightly depending on the subjects photographed Note also that the divergence between standard number of available frames and the actual number o...

Page 41: ...batteries with the and marks WARNING Unplug from power socket Do not use in the bathroom or shower Do not disassemble Explanation of Terms Deactivated batteries Leaving an Ni MH battery unused in sto...

Page 42: ...ut of the slot too quickly Use your finger to hold it and gently release the card Request regular internal testing and cleaning for your camera Build up of dust in your camera can cause a fire or elec...

Page 43: ...Printed in China FGS 406104 Ni 26 30 Nishiazabu 2 chome Minato ku Tokyo 106 8620 Japan http home fujifilm com products digital...

Reviews: