12
13
Function
5.Press the
/
button to select
Reset
.
Press the button.
All the settings resume to factory default value and it
exit the setting screen automatically.
Note: Do this operation only it is necessary.
2
4.Press the
/
button to select
Timer
.
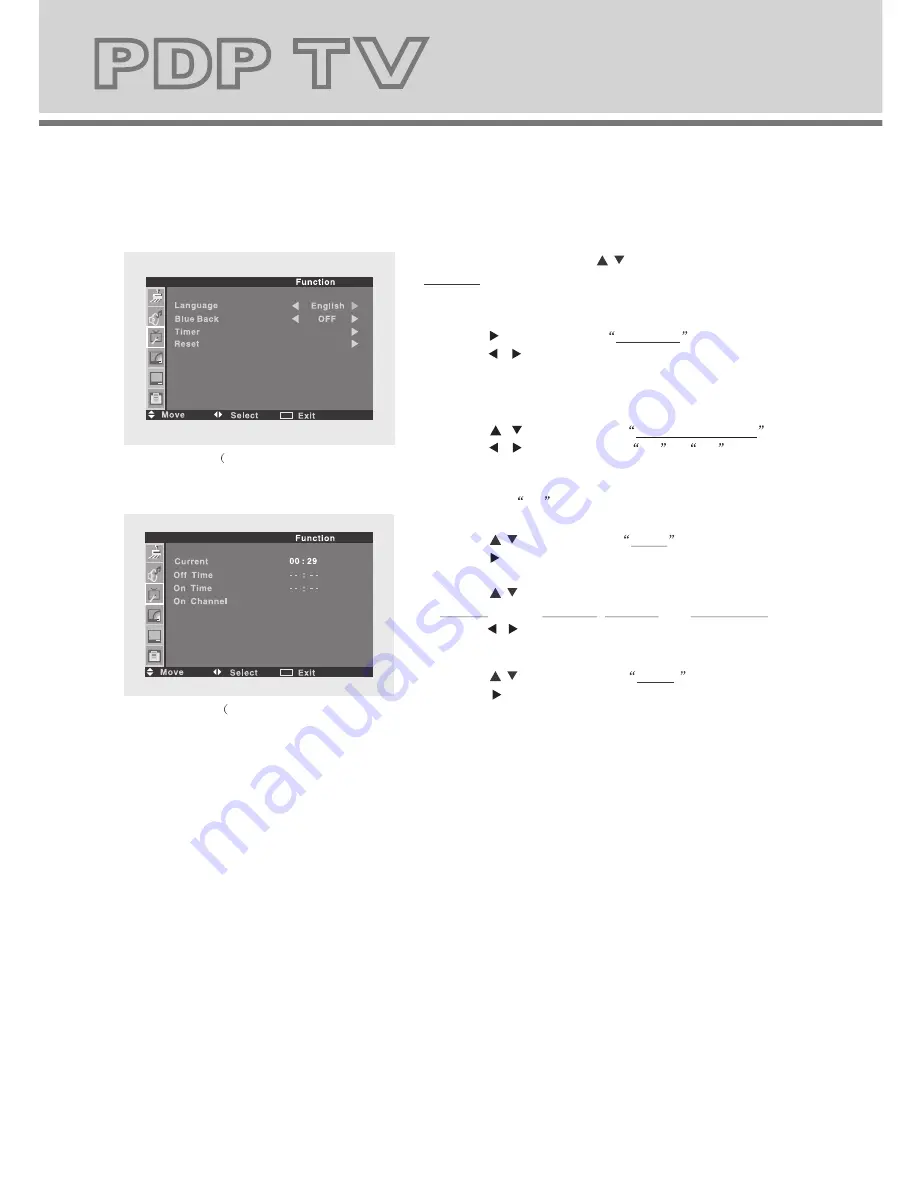
Press the button to enter the timer setting screen.
(Fig.3-2)
Press the
/
button to select the hour /minute part
of Current (time), Off Time, On Time and On Channel.
Press the / button to set the value of selected item.
6.Press the
MENU
button to return to upper menu.
1.Press the
MENU
then the
/
button to enter the
Function menu screen. (Fig.3-1)
2.Press the button to select Language
.
Press the / button to set the desired
OSD language.
9.Press the
MENU
button to return upper menu.
Note: This menu is avaliable only when the
SOURCE
menu is set to
TV
.
1.Press the
MENU
then the
/
button to enter the TV
menu screen. (Fig.4-1)
2.Press the button to select Auto Tune
.
Press the button , auto tunning begins. (Fig. 4-2)
5.Press the
/
button to select Skip
.
Press the / button to set to
On
or
Off
.
6.Press the
/
button to select Color System
.
Press the / button to set the color system
(Auto, PAL, SECAM).
7.Press the
/
button to select Sound System
.
Press the / button to set the sound system
(Auto, B/G, I, D/K, L/LL).
0
0
8.Press the
/
button to select Channel Swap
.
Press the button, adjust screen appears.
Example: Exchange the stations stored in channel 3
and 12.
(Fig.4-5)
Press the
/
button to select Channel 1
,
Press the / button to set the letter to
3
.
Press the
/
button to select Channel 2
,
Press the / button to set the letter to
12
.
Press the
/
button to select Swap
,
Press the button, exchange finished.
3.Press the
/
button to select Manual Tune
.
Press the button,
Manual Tune
screen appears.
Press the
/
button to select Channel
,
Search
or
Store
in turn.
Press the button to set the options to proper value.
"Store OK" appears when the station is saved in the internal
memorize. (Fig. 4-3)
4.Press the
/
button to select Fine Tune .
Press the button,
Fine Tune
screen appears.
Press the
/
button to select Fine Tune .
Press the / button, fine tune scans begins.
After fine tune stops, press the
/
button to select
Store
.
Press the / button, "Store OK" appears. (Fig.4-4)
1
1
87 MHz
87 MHz
64
64
0
0
64 MHz
64 MHz
Fig.3-1)
Fig.3-2)
Fig.4-1)
Fig.4-2)
Fig.4-3)
Fig.4-4)
Fig.4-5)
TV
3.Press the
/
button to select Blue Back(ground)
.
Press the / button to set to
On
or
Off
.
On: blue screen Off: noise screen
Note: This option is available only when the main source
is set to
TV
.
MENU
MENU
MENU
MENU
MENU
MENU
MENU
Store
Summary of Contents for PDP TV
Page 2: ...USER MANUAL ...


