background image

Using This Guide 

6

Using This Guide

This section describes the notations and configuration of this manual.

Contents of this Guide

This guide consists of the following chapters:

 1 Machine Components and their Functions

Describes basic operation such as identifying the major components, how to switch 

the machine on and off, etc.

 2 Operating Procedure

Describes the direct scanning operation and related functions.

 3 Maintenance

Describes procedures for cleaning the machine.

 4 Problem Solving

Describes troubles that may occur with the machine and their solutions.

 5 Appendix

Describes key specifications of this machine, optional products and notes and restric-
tions.

Conventions

z

The screen images and illustrations that are used in this guide are based on the
machine configuration with the various options installed. Some of the items in the
screen images may not be displayed or some of the features may not be available
depending on the machine configuration used.

z

In this document, "Computer" refers to a personal computer or workstation.

z

The following icons are used in this guide.


:indicates important information which you should read.


:indicates additional information on operations or features.


:Indicates cross-references to the content.

z

The following conventions are used in this guide:
"  "

: The cross-reference is within this manual.

"  "

: The cross-references are in other manuals.

[   ]

: Refers to CD-ROM, feature names, touch screen messages,

and entered text.

[   ]

: Refers to the names of folders, files, applications, and buttons

or menus displayed in the touch screen, as well as the names
of menus, commands, windows, or dialog boxes and their but-
tons and menus displayed on the computer screen.

<   >  button

: Indicates hardware buttons on the control panel.

Important

Note

See

Summary of Contents for DocuScan C1500

Page 1: ...444E2 1 DocuScan C1500 DocuScan C1500 Problem Solving Maintenance Appendix Operating Procedure Machine Components and their Functions Problem Solving Maintenance Appendix Operating Procedure Machine Components and their Functions ...

Page 2: ...ocedures Fuji Xerox is not responsible for any breakdown of machines due to infection of computer virus or computer hacking Important 1 This manual is copyrighted with all rights reserved Under the copyright laws this manual may not be copied or modified in whole or part without the written consent of the publisher 2 Parts of this manual are subject to change without prior notice 3 We welcome any ...

Page 3: ...Components 16 Options 17 Power On Off 20 Powering On 20 Powering Off 20 Power Saver Mode 21 Cancelling the Power Saver Mode 21 About Document 22 Available Document 22 Documents that Require the Use of the Document Carrier 22 Precautions When Handling Documents 22 2 Operating Procedure Setting Documents 24 Setting Thick Documents 25 Overview of Direct Scanning 27 Preparation for Direct Scanning 28 ...

Page 4: ...Table of Contents 2 Troubleshooting 38 Document Jams 40 5 Appendix Specifications 42 List of Options 43 Notes and Restrictions 44 Notes and Restrictions on Using the Machine 44 Index 45 ...

Page 5: ... for quick reference It will be useful in case you forget how to perform operations or if a problem occurs with the machine The equipment is certified by NEMKO in compliance with IEC60950 1 AS NZS 3260 The equipment is manufactured under an ISO 9001 Quality System The equipment is also certified in compliance with applicable standards by various national bodies The equipment was tested and is cert...

Page 6: ...e The CD ROM that came with the machine contains the following Scanner Driver The scanner driver is software to import scanned documents on the machine to the TWAIN supported application on your computer Utilities help The help describes operations such as the installation of Scanner Driver PDF manuals The PDF version of the User Guide supplied with this machine ...

Page 7: ...ovided with the machine DocuScan C1500 User Guide this document This guide describes how to operate the scanning function clear jams perform daily administration and cautions in using this machine DocuWide 6035 6055 Utilities help A guide to installing the printer driver configuring the printer environment etc This help is included in the CD ROM provided with the machine ...

Page 8: ...uration with the various options installed Some of the items in the screen images may not be displayed or some of the features may not be available depending on the machine configuration used z In this document Computer refers to a personal computer or workstation z The following icons are used in this guide indicates important information which you should read indicates additional information on ...

Page 9: ... a certain item in a procedure executed on the computer Example When you see the procedure to search for files and folders click Start Search For Files or Folders this means that you need to click Start click Search and then click For Files or Folders in order to search for files and folders ...

Page 10: ...ions or connection to external devices may not be covered by the product warranty Contact your local Fuji Xerox representative for more information Used for item that if not followed strictly can lead death or severe or fatal injuries and the possibility to do it is comparatively high Used for items that if not followed strictly can lead to severe or fatal injuries Used for items that if not follo...

Page 11: ...ironment may bring about minute electric current in a connector It may generate heat and eventually cause a fire accident To avoid the risk of electric shock and a fire accident only use the power cord supplied with this product or the ones designated by Fuji Xerox The power cord is exclusive use for this product Do not use it for any other product Do not damage or alter the power cord Damage and ...

Page 12: ...locate this product in the following places z Near radiators or any other heat sources z Near volatile flammable materials such as curtains z In the hot humid dusty or poorly ventilated environment z In the place receiving direct sunlight z Near cookers or humidifiers Locate this product on a level and sturdy surface that can withstand a weight of 75 Kg Otherwise if tilted the product may fall ove...

Page 13: ... supplied with this product Do not carry out any other maintenance procedures not described in the documentation This product features safety design not to allow operators access to hazard areas The hazard areas are isolated from operators by covers or protectors which require a tool to remove To prevent electric shock and injuries never remove those covers and protectors To avoid the risk of elec...

Page 14: ...marked on or supplied with this product To avoid the risk of burn injuries and electric shock never touch the area with the High Temperature or Sharp Edges marks on Keep electrical and mechanical safety interlocks active Magnetic materials may accidentally activate the product and cause injuries Do not attempt to remove a paper jammed deeply inside the product particularly a paper wrapped around a...

Page 15: ...ference when the product is operated in a commercial environment This product generates uses and can radiate radio frequency energy and if not installed and used in accordance with the customer documentation may cause harmful interference to radio communica tions Operation of this product in a residential area is likely to cause harmful interfer ence in which case the user is required to correct t...

Page 16: ... be illegal to copy or print in your country z Currency z Banknotes and checks z Bank and government bonds and securities z Passports and identification cards z Copyright material or trademarks without the consent of the owner z Postage stamps and other negotiable instruments This list is not inclusive and no liability is assumed for either its completeness or accu racy In case of doubt contact yo...

Page 17: ... Functions This chapter describes the basic operation of this machine such as machine components power on off and power saver mode z Machine Components and their Functions 16 z Power On Off 20 z Power Saver Mode 21 z About Document 22 ...

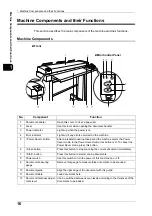
Page 18: ...ined inactive period the machine enters the Power Saver mode In the Power Saver mode this button is lit To cancel the Power Saver mode press this button 6 Stop button Press this button to stop scanning the current document immediately 7 Start button Press this button to start scanning documents 8 Power switch Use this switch to turn the power of this machine on or off 9 Document measuring gauge Re...

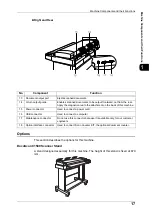
Page 19: ...13 Document output port Ejects scanned documents 14 U turn output guide Enables scanned documents to be output frontward not from the rear Apply the magnetic area to the attachment on the back of this machine 15 Power connector Used to connect a power cord 16 USB connector Used to connect a computer 17 Maintenance connector Do not use this connector because it is available only for our customer en...

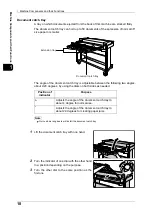
Page 20: ...wo angles about 4 29 degrees by using the dials on both sides as needed Note Our customer engineers will install the document catch tray 1 Lift the document catch tray with one hand 2 Turn the indicator of one dial with the other hand to a position depending on the purpose 3 Turn the other dial to the same position as the first one Position of indicator Purpose A Adjusts the angle of the document ...

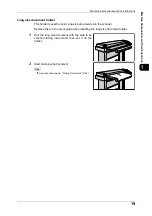
Page 21: ...older is used to insert long size documents into the scanner Remove the U turn output guide when installing the long size document holder 1 Roll the long size document with the side to be scanned facing inward and then set it on the holder 2 Start scanning the document See How to set documents Setting Documents P 24 ...

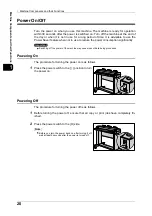
Page 22: ...n use to reduce the power consumption significantly Important Switching off the power of the machine may cause loss of data being processed Powering On The procedure for turning the power on is as follows 1 Press the power switch to the position to turn the power on Powering Off The procedure for turning the power off is as follows 1 Before turning the power off ensure that all copy or print jobs ...

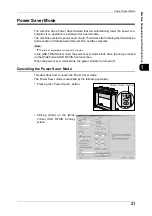
Page 23: ...data between this machine and the computer Note The time of power save is fixed at 15 minutes In the USB TWAIN driver case the power saver mode starts when Cancel is clicked on the Wide Format USB TWAIN Source screen When the power saver mode starts the power indicator is turned off Cancelling the Power Saver Mode This describes how to cancel the Power Saver mode The Power Saver mode is cancelled ...

Page 24: ...adhesive tape or documents on which corrective fluids have been used are placed in the scanner Take extreme caution when using stick type glue or glue spray Soiling of the scanning area can cause unwanted lines on the scans z Do not use documents that have been folded wrinkled perforated or had holes punched in them It may result in paper jams and tearing z When rolled documents are to be used ens...

Page 25: ...g Procedure This chapter describes how to set documents and how to scan them z Setting Documents 24 z Overview of Direct Scanning 27 z Preparation for Direct Scanning 28 z Importing Documents by Direct Scanning 29 ...

Page 26: ...achine Note The document guide can be moved to the right edge according to the width of the document Once placed the document is automatically fed in and then stops at a certain position Then the machine starts scanning automatically Important Hold the document until the scanning starts or a jam may occur The method to scan documents can be set on the Wide Format USB TWAIN Source screen For the se...

Page 27: ...ever position and its corresponding document thickness are shown below 1 Measure the thickness of the document to be scanned 2 Adjust the document thickness adjustment lever to the thickness of documents to be scanned 3 With the side to be scanned facing down align the document with the document guide and then insert it until the leading edge touches the inte rior of the machine 4 Remove the eject...

Page 28: ...2 Operating Procedure 26 Operating Procedure 2 5 Return the lever to its default position 1st scale 0mm after the scan is finished ...

Page 29: ...III Service optional z Using Color Copy Assistant for DocuWide Color Copy Assistant Pro for DocuWide optional Note For details of the optional equipment refer to their respective manuals This section describes how to scan documents using the USB TWAIN driver Note Use USB2 0 based USB standard cable max 5 meters Adjust edit iamge quality while previewing Software for importing documents DW ScanIII ...

Page 30: ...ine Connect this machine and your computer with USB Installing USB TWAIN Driver USB TWAIN driver is a software that provides the function for importing images in the software for importing documents onto the computer It is included on the CD ROM that is provided with the machine Note For the installation procedure refer to the manuals contained on the CD ROM Setting on the DocuScan C 1500 Connecti...

Page 31: ... supported applications Refer to Readme contained in the CD ROM that is provided with the machine For the DocuWorks operation Click on Help and refer to the DocuWorks online help For the USB TWAIN driver operation Click on Help and refer to the USB TWAIN driver online help Note If the machine has entered the Power Saver mode cancel the mode Specifying the Scanner Before scanning specify this machi...

Page 32: ...ty on the Image options tab Show Preview checkbox If you select this the preview screen appears after the docu ment is scanned If you do not select this the scanned document is saved with out displaying the preview screen See Adjusting Image Quality on Preview Screen P 31 Note In order to save the displayed image after the preview select Save 3 Click Scan to enter the scan mode Cancel button Click...

Page 33: ...nts before saving them You can confirm images by enlarging reducing them on the screen 1 Adjust or edit the images as needed and then press Reload Go directly to Step 2 if adjustment or editing is unnecessary Reload Re displays the scan data saved in the scanner memory Images adjusted or edited on the preview screen are displayed according to the adjusted edited setting Save Saves the preview imag...

Page 34: ......

Page 35: ...3 3 Maintenance This chapter describes how to clean the machine z Cleaning the Machine 34 ...

Page 36: ...with water and a small amount of neutral detergent if needed to wipe it off then rewipe with another clean dry cloth Do not use any cleaning agent other than water or a neutral detergent If any liquid remains the machine may malfunction and the documents may be damaged 1 Turn the power switch off Important It may result in a shock hazard if you clean the machine with the power turned on 2 Open the...

Page 37: ...ne 35 Maintenance 3 4 Wipe the glass of the document scanning unit clean with a dry cloth Important Do not put excessive force on the glass or it may result in a machine malfunction or injury 5 Shut the document handler ...

Page 38: ......

Page 39: ...4 4 Problem Solving This chapter describes what to do when an error occurs on the machine z Troubleshooting 38 z Document Jams 40 ...

Page 40: ... On Off P 20 Is the power cord discon nected from the machine Is the voltage of power sup ply proper for the machine Ensure that the power supply is 208 240 V and 9 A See Specifications P 42 The scanned image has unde sirable stains Is the scanning area soiled Clean the scanning area See Cleaning the Machine P 34 The scanned image has unde sirable lines Is the scanning area soiled Clean the scanni...

Page 41: ...etting Thick Documents P 25 Document is not fed into the docu ment feeder Does the document satisfy the minimum size require ment The minimum size of the document that can be loaded is 176 x 210 mm See Available Document P 22 The corner of an document is folded Is the document curled Flatten the curled document before setting it Document is not scanned at the desired size Is the document placed pr...

Page 42: ...achine stops with the error indi cator lit Clear the document jam and then set the document again 1 Open the document handler by raising the lever at the right end 2 Remove the jammed document 3 Shut the document handler 4 Make sure there is no tear wrinkle or crease on the document and then set it again ...

Page 43: ...5 5 Appendix This chapter describe the specifications of the machine optional products and notes and restrictions z Specifications 42 z List of Options 43 z Notes and Restrictions 44 ...

Page 44: ... green and blue color chan nel Scanning Speed The following speeds can be selected Monochrome Normal 152 4mm sec Low speed 76 2mm sec Super low speed 25 4mmm sec Full Color Normal 50 8mm sec Low speed 25 4mm sec Interface USB2 0 Hi Speed Output Format Compression Type RAW for monochrome scanning JPEG for color scanning The format type depends on the application Driver Wide Format USB TWAIN Source ...

Page 45: ...ment stock tray A document stock tray attachable to DocuScan C1500 Scan Counter KIT A resettable counter to count the number of Documents DW Scan3 Service A software program to import scanned documents to the computer connected to this machine with USB Color Copy Assistant for Docu Wide 1 0 Color Copy Assistant Pro for DocuWide 1 0 A software program to import scanned documents to the computer con...

Page 46: ...ing the power off z Turning off the machine erases all the print data remaining in the machine and the information stored in the machine memory Before switching off the power during normal operation ensure that the operation is completed In addition wait five seconds or more before turning on the power again z The machine may not start or stop normally by turning the power on and off fre quently I...

Page 47: ... indicator 16 I Interface 42 P Power consumption 42 Power indicator 16 Power Saver button 16 Power Saver Mode 21 Power source 42 Power switch 16 Problem Solving 37 S Scan Resolution 42 Scan Size 42 Scan size 42 Start button 16 Stop button 16 T Type 42 U USB TWAIN driver 28 U turn output guide 17 W Weight 42 Index ...

Page 48: ......
Page 49: ...DocuScan C1500 User Guide Fuji Xerox Co Ltd ME4444E2 1 Edition 1 September 2008 Copyright 2008 by Fuji Xerox Co Ltd ...

Page 50: ...444E2 1 DocuScan C1500 DocuScan C1500 Problem Solving Maintenance Appendix Operating Procedure Machine Components and their Functions Problem Solving Maintenance Appendix Operating Procedure Machine Components and their Functions ...

Reviews: