background image

Setup Menu

129

Syst

em S

e

tt

in

g

s

5

When the [Delete All Settings] Button is Selected

Selecting this button deletes all the information registered for the selected address. To delete 
all the registered information, select [Yes].

Important • Deleted information cannot be recovered.

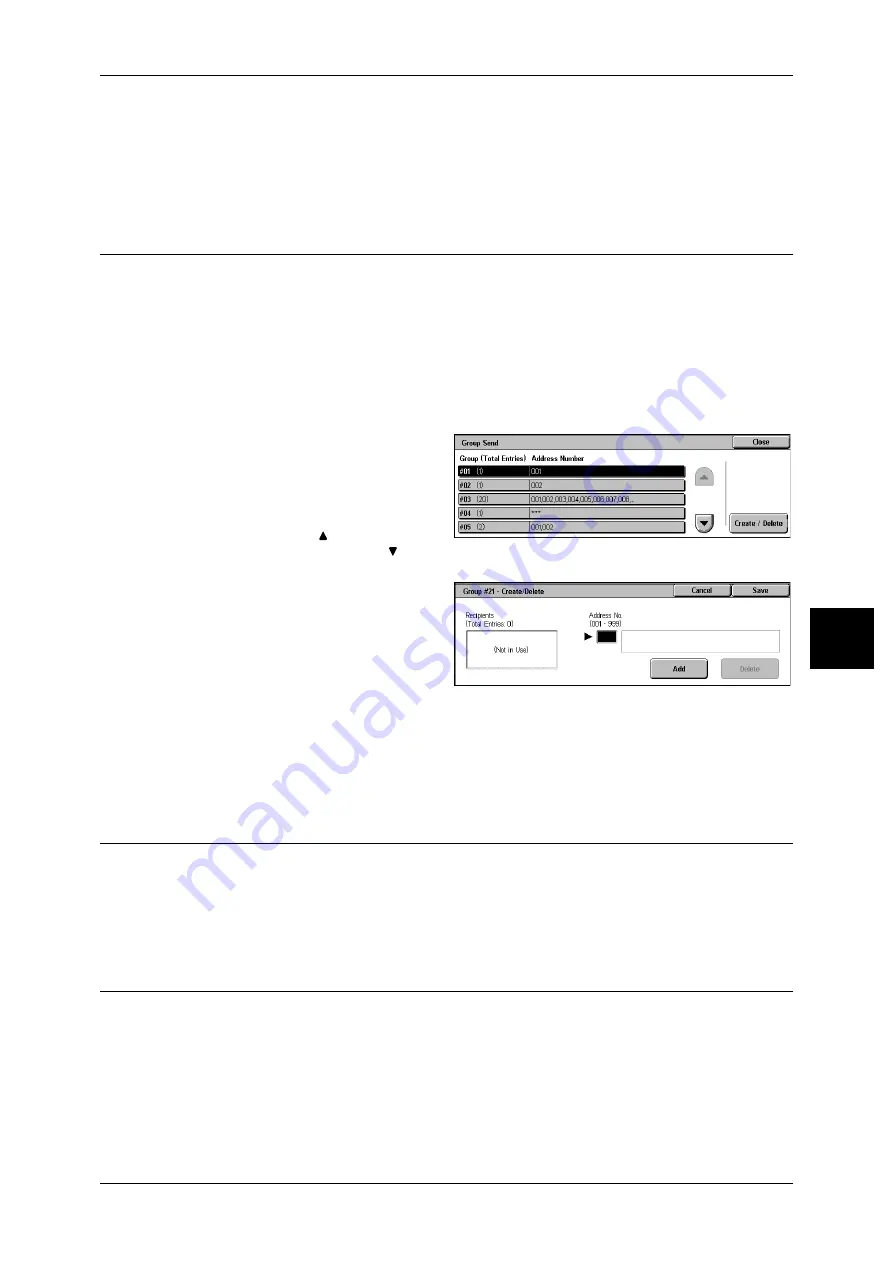
Group Send

You can register addresses for broadcast transmission as a group. Each group can 
include up to 20 address numbers. The maximum number of groups that can be 
registered is 50.

Note that recipients to be added to a group must already be stored in the address book.

Note

• It is not possible to include a group in another group.

• As shown in the following example, you can use wildcards for specifying the numbers.

- 01

: Specifies the 10 addresses with address numbers 010 to 019. 

-

∗∗∗

: Specifies all address numbers.

1

Select [Group Send].

2

Select a group number you want to 
register, and select [Create/
Delete].

Note

• Select [

] to return to the 

previous screen or [

] to 

move to the next screen.

3

Enter an address number (3 digits) 
you want to register with the 
numeric keypad, and select [Add].

4

Repeat the procedure of Step 3 to 
register the address numbers.

5

Select [Save].

„

Delete

Deletes a registered address. Enter the address number you want to delete with the numeric 
keypad, and select [Delete].

Comments

You can register comments to be added to cover sheets. A maximum of 50 comments 
can be registered, each of which can be up to 36 characters.

For information about how to enter characters, refer to "2 Product Overview" > "Entering Text" in the 
User Guide.

Paper Size/Type

This is same as [Paper Size/Type] displayed under [Paper Tray Settings] in [Common Settings]. For 
details, refer to "6 System Settings" > "Common Settings" > "Paper Tray Settings" > "Paper Size/Type 
(DocuCentre series models)/Paper Tray Attributes ApeosPort series models)" in the Administrator 
Guide.

[Paper Size/Type] under [Setup Menu] is displayed only when you enable [Paper Tray Attributes on 
Setup Menu]. For details, refer to "6 System Settings" > "Common Settings" > "Paper Tray Settings" > 
"Paper Tray Attributes on Setup Menu" in the Administrator Guide.

Summary of Contents for ApeosPort-II 6000

Page 1: ......

Page 2: ...orporation and Fuji Xerox Co Ltd All Xerox and Fuji Xerox product names are either registered trademarks or trademarks of Xerox Corporation and Fuji Xerox Co Ltd The data saved in the hard disk of the...

Page 3: ...1 2 Fax 23 Telephone Line Connectors 24 Control Panel 25 Fax Procedure 26 Step 1 Loading Documents 26 Step 2 Selecting Features 28 Step 3 Specifying the Destination 29 Step 4 Starting the Fax Job 30 S...

Page 4: ...Delayed Start Specifying Send Priority Send Time 59 Send Header Adding Sender Name and Phone Number to Faxes 60 Cover Note Transmitting Documents With a Cover Page 60 iFax Subject Specifying the iFax...

Page 5: ...Selecting the Operation Mode from the System Administrator Menu 101 Step 4 Selecting an Item on the System Settings Screen 101 Step 5 Setting a Feature 102 Step 6 Exiting the System Administration Mod...

Page 6: ...tomatically Printed Reports Lists 143 8 Authentication and Auditron Administration 145 Overview of Auditron Administration 146 Manageable Features and Services 146 9 Using the iFax Service 151 iFax Ov...

Page 7: ...1 Notes and Restrictions on the Use of the Machine 171 Notes and Restrictions in the Interrupt Mode 171 Notes and Restrictions on the Use of the iFax Feature 172 Notes and Restrictions when Connecting...

Page 8: ......

Page 9: ...hine This chapter describes how to use this guide as well as safety notes you need to read before using the machine z Preface 8 z Types of Manuals 9 z Using This Guide 10 z Safety Notes 13 z Regulatio...

Page 10: ...ut copy print scan features refer to the User Guide and the Administrator Guide For information about optional accessories for the printer functionality also refer to the guide provided with each opti...

Page 11: ...solving problems that may occur with the machine Quick Reference Guide Introduces the basic operations of the machine as well as daily management and maintenance Manual HTML A guide for installing pri...

Page 12: ...ettings Describes how to configure the system settings 6 Job Status Describes how to confirm job status and delete jobs 7 Machine Status Describes how to confirm the machine configurations and error i...

Page 13: ...s features and options displayed on the touch screen The names of menus windows dialog boxes buttons and other items displayed on computer monitors button Hardware buttons on the machine s control pan...

Page 14: ...s or paper is described in this guide as follows Long Edge Feed LEF Loading with one of the long edges of the document or paper Short Edge Feed SEF Loading with one of the short edges of the document...

Page 15: ...e information Used for item that if not followed strictly can lead death or severe or fatal injuries and the possibility to do it is comparatively high Used for items that if not followed strictly can...

Page 16: ...et hand It may cause electric shock Do not place an object on the power cord Always keep the plug connection free of dust The dusty and damp environment may bring about minute electric current in a co...

Page 17: ...ectric shock or a fire accident Never locate this product in the following places z Near radiators or any other heat sources z Near volatile flammable materials such as curtains z In the hot humid dus...

Page 18: ...formance and condition always use it in the following environment z Temperature 10 32 C zHumidity 15 85 When the product is left in a chilly room and the room is rapidly warmed up by heater dew conden...

Page 19: ...al parts such as staples or clips z Heavy objects If liquid is spilled over or metal parts are slipped into the product it may cause electric shock or a fire accident Do not use conductive paper such...

Page 20: ...heat roller Otherwise it may cause injuries or burns Switch off the product promptly and contact your local Fuji Xerox representative Never touch the paper output area of the finisher during operatio...

Page 21: ...ox representative for its disposal Keep the toner cartridges out of the reach of children If a child accidentally swallows toner spit it out rinse mouth with water drink water and consult a physician...

Page 22: ...e harmful interference to radio or television reception which can be determined by turning this product off and on the user is encouraged to try to correct the interference by one or more of the follo...

Page 23: ...ner Black that is recommended for this product z For environmental protection and efficient use of resources Fuji Xerox reuses returned toner cartridges to make recycle parts recycle materials or ener...

Page 24: ......

Page 25: ...necessary For more information contact our Customer Support Center z Telephone Line Connectors 24 z Control Panel 25 z Operations during Faxing 32 z About Internet Fax 34 z About Server Fax 41 z Fax...

Page 26: ...act our Customer Support Center The phone line connectors are normally covered up When connecting your own telephone contact our Customer Support Center No Name on the machine cover Name on the touch...

Page 27: ...e button Used to insert a pause into a destination number In this manual this button is indicated as the Dial Pause button 4 One touch button panels Panels for one touch buttons You can leaf through p...

Page 28: ...mation on the paper size settings refer to 6 System Settings Common Settings Other Settings Paper Size Settings in the Administrator Guide The sizes on the left are detected as the sizes shown on the...

Page 29: ...eder Note The indicator lights up when the document is loaded correctly Document Glass The document glass supports a single sheet a book or other similar documents up to 297 x 432 mm A3 11 x 17 inches...

Page 30: ...he message area Step 2 Selecting Features You can select the Fax or iFax feature or the Fax Server feature on the All Services screen Important The fax and iFax features are not available while the Fa...

Page 31: ...o use a combination of the methods If the same recipient was specified for several pending documents you can send the documents with a single phone call This feature is referred to as Batch Send Note...

Page 32: ...g Numbers Using Address Number P 45 For information on specifying a fax number using one touch buttons refer to Specifying a Destination Using One Touch Buttons P 45 You can send an iFax For informati...

Page 33: ...splayed after selecting Next Original 3 Load the next document 4 Press the Start button If you have more documents repeat Steps 3 and 4 5 When all documents have been scanned select Last Original Step...

Page 34: ...control panel 2 Select Cancel Note If two or more jobs are in progress a confirmation screen appears for each job Select Start or Cancel depending on whether you want to start or cancel the job If th...

Page 35: ...ngs while scanning the document 1 Select Next Original 2 Select Change Settings 3 Set Resolution Original Size and Lighten Darken For each setting refer to Resolution Specifying the Scanning Resolutio...

Page 36: ...iFax compatible machine of the recipient Confirm the profile that can be processed by the recipient s iFax compatible machine before specifying a profile For more information refer to Sending iFax iFa...

Page 37: ...In such case the machine will not be notified of such transmission error After sending an important e mail we suggest you to confirm it is received such as by calling the recipient Note You can receiv...

Page 38: ...t sent Note You can use the address number one touch buttons group dial number or address book to specify e mail addresses For more information refer to Speed Dialing Entering Numbers Using Address Nu...

Page 39: ...lling Meter Print Report Print Report List in the Administrator Guide Printing size Basically received iFax is printed at the same size as the document sent by the sender Note When TIFF S is selected...

Page 40: ...more information refer to 6 System Settings Setpu Menu Mailbox in the Administrator Guide 1 Display the Fax Internet Fax screen and select iFax Fax several times to display iFax in the address field...

Page 41: ...ample Fax number 0312345678 F code if necessary T33S 123 Host name of the receiving machine myhost Domain name of the receiving machine example com Note If the hard disk of the machine becomes full du...

Page 42: ...ethod of registering a job flow refer to Job Flow Sheets P 121 Important Do not set the address of the machine as the forwarding address Note Mailbox Number and Passcode are required by the sender Inf...

Page 43: ...d the manual on the Driver CD Kit CD ROM Important While the Fax Server feature is enabled the Fax feature is detected as not installed even if a Fax Kit is installed on the machine During that time t...

Page 44: ...feature use the values specified under System Settings Scan Mode Settings Scan Defaults z Background Suppression z Lighten Darken z Sharpness Features Available for Sending Server Fax When SMTP is Us...

Page 45: ...the same operation for each recipient When an Additional G3 Port Kit optional is installed you can use the extra lines to make multiple transmissions simultaneously with Broadcast Send If you specify...

Page 46: ...ed in Address Book 1 Select Address Book 2 Select the button in which you want to search and search for a fax number Note Repeat this step to specify multiple recipients 3 Select the check boxes of re...

Page 47: ...le enter 10 to specify 10 numbers from 100 to 109 z Specify all the address numbers Enter to specify all the address numbers Note When you specify address numbers confirm that the corresponding fax nu...

Page 48: ...ed to each line You can use a line for your purpose For information on local terminal information refer to Local Terminal Information P 116 Important If certain recipients are prohibited in the System...

Page 49: ...se or Pause One pause is 3 seconds You can enter pauses of 6 seconds 9 seconds etc by additional button presses Press the Pause button Example 0 123 0 123 Transmit using a password S When a password h...

Page 50: ...s using the pop up menu 1 Select the recipient to be removed or confirmed from Address Recipient 2 Select any item from the pop up menu Remove Removes the recipient Details The Recipient Details scree...

Page 51: ...ting Density Level You can adjust the fax density from seven levels 1 Use and to select the density level 2 Sided Originals Transmitting 2 sided Originals This feature enables you to scan and then tra...

Page 52: ...sides of the remaining pages Use this item when the back side of the first page is blank 2 Sided Skip Blank Pages Select to transmit only documents whose surface is not blank You can send documents w...

Page 53: ...ter address numbers refer to Address Book P 124 The machine scans a document at the specified resolution but if the machine of the recipient does not support the resolution the machine automatically c...

Page 54: ...ded Originals P 49 Original Size Specifying the Scan Size for the Original You can specify the scan size before sending a fax When a scan size is specified it is scanned at the specified size regardle...

Page 55: ...ntation load B5 documents in portrait orientation The recommended document size combinations are A4 portrait and A3 landscape or B5 portrait and B4 landscape If the combination of the document sizes i...

Page 56: ...t or Right Page then Left is selected Right Page Only Scans the right page only You can select this item when Left Page then Right or Right Page then Left is selected Top Page Only Scans the top page...

Page 57: ...ge size the scanned image is rotated or reduced to fit the maximum size When speed dialing is used the maximum image size will be the size registered in Address Number When speed dialing is not used t...

Page 58: ...iFax with a Digital Signature by S MIME 71 1 Select Fax Internet Fax on the All Services screen 2 Select the Transmission Options tab and then select a feature on the Transmission Options screen Note...

Page 59: ...ivered successfully For this reason the result of the Delivery Receipts may differ from the actual delivery status If Transmission Report is activated and the transmission completes unsuccessfully Tra...

Page 60: ...poor telephone lines as can be the case with overseas calls Also select this mode when transmitting over noisy or poor telephone lines domestically G4 Auto Do not use this mode Note G4 Auto is displa...

Page 61: ...tart feature is set the setting is cleared and transmission begins as soon as the power is turned on Note You can specify a time within 24 hours in 1 minute increments You cannot specify a date You ca...

Page 62: ...gs Common Settings Machine Clock Timers in the Administrator Guide For information on the sender name and G3 ID refer to Local Terminal Information P 116 The recipient name is only added if it has bee...

Page 63: ...item Recipient s Comment The Cover Note Comment Recipient s Comment screen is displayed Refer to Cover Note Comment Recipient s Comment Screen P 61 Sender s Comment The Cover Note Comment Sender s Co...

Page 64: ...cipient name registered for the address number is printed This field is blank if a recipient name has not been registered Recipient s Comment The comment for the number specified with Comment is print...

Page 65: ...o enter characters refer to 2 Prodect Overview Entering Text in the User Guide Note If no subject is entered the following will be automatically entered as a subject InternetFAX From Send Date and Tim...

Page 66: ...Note This feature is not available for Fax Server 1 Select Recipient Print Sets on the Transmission Options screen 2 Select any item 1 Set The remote machine will output one copy Multiple Sets Specif...

Page 67: ...machine You need to confirm the remote mailbox number and its passcode Important You cannot use polling to retrieve documents from multiple remote mailboxes simultaneously The retrieved document is s...

Page 68: ...Number and Passcode Private Polling Fax Signal Method 1 Select Advanced Features tab to display the Advanced Features screen 2 Select Polling 3 Select On 4 Select the Transmission Options tab to disp...

Page 69: ...hines manufactured by different companies When using F Code transmission use an F Code and password The F Code which is also called a sub address by other companies must be registered entered Set the...

Page 70: ...ttings to allow documents that have been sent to and stored in a mailbox to be printed automatically For information on how to set up the mailbox to automatically print the stored documents refer to 6...

Page 71: ...s not available for some models An optional package is necessary For more information contact our Customer Support Center The profiles that can be processed differ depending on the iFax compatible mac...

Page 72: ...Stored Document Size A4 B4 A3 z Resolution Standard Fine Superfine 400 dpi Superfine 600 dpi Note When a fax is sent to a machine that does not support TIFF F the recipient machine will not be able to...

Page 73: ...llows a recipient to confirm whether the contents of the iFax are changed or whether the iFax is sent from the proper sender To use this feature the machine s mail address must be linked to a certific...

Page 74: ...acsimile Information Services For information on Facsimile Information Services refer to Receiving Faxes P 85 Note Depending on the remote machine the Polling feature may be unavailable This feature i...

Page 75: ...Entering Text in the User Guide Enter the password if necessary You can specify to any machine that supports our DTMF method feature The above dialing format can be registered in address number to ena...

Page 76: ...to Public Mailbox Screen P 74 z When selecting Private Mailbox Private Mailbox is displayed When selecting Private Mailbox the Mailbox screen appears Select a mailbox to store the polling documents Fo...

Page 77: ...P 106 1 Pick up the receiver of the external telephone or select On hook Manual Send Receive on the Advanced Features screen 2 The keyboard screen appears Manual Receive Manual Send Use the drop down...

Page 78: ...to 1198 locations using the numeric keypad in combination with the address number at one time One touch buttons correspond to the numbers registered for the address numbers from 001 to 070 When using...

Page 79: ...gister the last two digits of the address number of the initiating station which is already registered at the relay station as a relay station ID for the Relay Broadcast Send operation z Register the...

Page 80: ...fault no password is set For setting a password contact our Customer Support Center If a password has not been set you do not need to enter one z Relay station ID The last two digits of the initiating...

Page 81: ...the initiating station is as follows Relay Broadcast Send Specify the number of digits of the relay station ID 1 For relay station IDs and address numbers that are 2 digits 2 For relay station IDs and...

Page 82: ...ature when sending documents to the substantial number of recipients whose machines are located in remote locations Note Multiple Relay Broadcast can be performed from a secondary relay station There...

Page 83: ...etup of the address number to On Assign the secondary relay station to an address number from 001 to 099 z As the relay station ID assign the last two digits of the Address Number for the primary rela...

Page 84: ...Advanced Features tab to display the Advanced Features screen 2 Pick up the telephone receiver or select On hook Manual Send Receive 3 Select Manual Send from the drop down menu 4 Use the keyboard sh...

Page 85: ...fication method for the initiating station is 3 digits in F Code or to 001 to 099 when the specification method for the initiating station is 2 digits in F Code Then set Relay Station Setup of the add...

Page 86: ...ation ID is set the initiating station is notified of the results of the remote Relay Broadcast Send When the relay station ID is 00 or 000 the initiating station is not notified of the results of a r...

Page 87: ...he Machine Status button 2 Select Fax Receiving Mode on the Machine Status screen 3 Select Manual Receive or Auto Receive Manual Receive Allows you to manually receive a fax sent from a remote machine...

Page 88: ...ace it when the Online indicator on the control panel lights up Important Make sure that the receiver is placed properly in the cradle Otherwise the line will remain busy Using Mailbox Receive Documen...

Page 89: ...d on the screen Press More Characters on the screen to display symbols Note When the line type is set to a pulse line Tone does not appear If you want to send tones or to use the touch tone services w...

Page 90: ...on can be specified using the numeric keypad address numbers or one touch buttons The address book cannot be used z The call destination can also be specified using the keyboard displayed on the scree...

Page 91: ...ures Note The Send from Mailbox feature is not available for some models An optional package is necessary For more information contact our Customer Support Center z Checking Selecting Mailbox Document...

Page 92: ...to the left of the document icon indicating the order in which it was selected Documents are processed in this order 3 Select any item Refresh Displays the refreshed information Document s Displays t...

Page 93: ...nt Print Prints the selected document Note When a print document stored by Save to Mailbox of a print driver is printed the settings specified on the control panel or CentreWare Internet Services will...

Page 94: ...paper loaded on the bypass tray in case the specified paper tray cannot be used For information on Receive Paper Size settings refer to Receiving Paper Size P 113 2 Sided Printing Allows you to set 2...

Page 95: ...ginal Orientation setting of Edge Erase or the 2 Sided Originals setting of Layout Adjustment tab are the same Reset Resets the print settings Print Prints the selected document Original Original Orie...

Page 96: ...s are authenticated are displayed on the Job Flow Sheets screen Features that can be registered are listed below Forward Multiple forwarding recipients can be configured for each forwarding method z F...

Page 97: ...x on your computer Note Some models do not support the features described in this chapter An optional package is necessary For more information contact our Customer Support Center The computer screen...

Page 98: ...same procedure to register fax destinations from another machine ApeosPort II 7000 6000 Docucentre II 7000 6000 to this machine The registration requires CentreWare Internet Services For information o...

Page 99: ...machine enter a user ID and passcode into the User Name and Password fields respectively Ask your system administrator for the user ID and passcode If communications are encrypted you must specify an...

Page 100: ......

Page 101: ...r is intended for system administrators and explains the features whose set values can be changed and their setting procedures z System Settings Procedure 100 z System Settings Menu List 103 z Common...

Page 102: ...tration mode enter the system administrator User ID If Passcode Entry from Control Panel in Login Setup Auditron Administration is activated the passcode needs to be entered It is recommended to chang...

Page 103: ...be set System Settings You can set or change the default values Note When Fax Server is selected in the System Settings Scan Mode Settings is replaced with Scan Fax Mode Settings Common Settings Set...

Page 104: ...m Administration mode For more information refer to Login Setup Auditron Administration P 130 Login Setup Auditron Administration You can set restrictions on users using features of the machine or adm...

Page 105: ...ll Report P 107 z Relay Broadcast Report P 107 z Scan File Transfer Report P 107 z Fax Server Report P 107 z 2 Sided Report P 108 z Recipient on Activity Report P 108 z Job Flow Error Report P 108 Oth...

Page 106: ...14 z Pseudo Photo Gradation Mode P 114 z Box Selector Line Setup P 114 z Memory Full Procedure P 114 z Maximum Stored Pages P 114 z 2 Sided Originals Scan Option ApeosPort series models only P 114 z M...

Page 107: ...etup P 125 z Communication Mode P 126 z Resolution P 126 z Cover Note P 126 z Maximum Image Size P 126 z Delayed Start P 126 z Remote Mailbox P 126 z F Code P 127 z Relay Broadcast P 127 z Billing Day...

Page 108: ...d To disable the sound select Off Ringing Volume Select the sound to be made when an incoming call arrives at the machine You can select the volume from Soft Normal and Loud To disable the sound selec...

Page 109: ...h as when transferring to the computer on the network or when transferring using e mail Auto Print Off Does not print the report regardless of the data transmission result Auto Print On Automatically...

Page 110: ...make other settings relating to the machine itself Fax Service Switches between the Fax and Server Fax features Note This feature does not appear for some models An optional package is necessary For m...

Page 111: ...ode Settings 3 Select the item to be set or changed Screen Defaults You can set items relating to the Fax Internet Fax screen Fax Screen Default Set the default screen that appears when the Fax Intern...

Page 112: ...Pages Set the default value for 2 Sided Skip Blank Pages in the General Settings screen Note This feature is for customer engineer use For more information contact our Customer Support Center Transmis...

Page 113: ...bled No Broadcast Send is allowed Re enter Speed Dial Recipients This setting is required when you activated Re enter Recipients Select how to re enter a recipient after the first entry z Enter Once O...

Page 114: ...on Undelivered Faxes refer to Undelivered Faxes P 134 Save Cancelled Faxes When Yes is selected for Save Undelivered Faxes set whether to also save cancelled fax documents Saved Faxes Auto Delete Whe...

Page 115: ...eceived documents Multiple paper trays can be specified except for the bypass tray If the fax document cannot be printed on the paper loaded on the specified paper trays automatically it will be print...

Page 116: ...ull procedure is carried out For more information refer to 6 System Settings Common Settings Machine Clock Timers Auto Job Release in the Administrator Guide Cancel Job The stored data is discarded Ru...

Page 117: ...iving line and the destination for a mailbox print Note This feature does not appear for some models An optional package is necessary For more information contact our Customer Support Center The displ...

Page 118: ...th not more than 20 characters Company Logo Register a sender s name The sender name is the name of the local terminal as printed in the send headers and on cover notes Using the displayed keyboard an...

Page 119: ...A4 the size is reduced automatically to A4 for transmission TIFF F Select this profile when you specify super fine for the resolution or when you send A3 or B4 documents TIFF J Select this profile for...

Page 120: ...r Support Center Fax Transfer from Address Book Set whether to set restrictions when forwarding e mail received in SMTP format by iFax to fax addresses not in the address book Off Forwarding is not re...

Page 121: ...ttings relating to the e mail and iFax features For details on E mail Internet Fax Settings refer to 6 System Settings E mail Settings in the Administrator Guide However only Maximum E mail Size Incom...

Page 122: ...refer to System Settings Procedure P 100 2 Select Mailbox Stored Document Settings 3 Select the item to be set or changed Mailbox Settings You can set actions after retrieving documents by a client a...

Page 123: ...can be registered are listed below z Forwarding specification FTP SMB e mail fax iFax z Multiple forwarding specifications multiple processing execution z Print Depending on the method of storing in t...

Page 124: ...ems Name Set the name for the job flow sheet of up to 128 characters Description Set the description of the job flow sheet of up to 256 characters Keyword Enter a keyword of up to 12 characters for jo...

Page 125: ...he numeric keypad and select Save The specified address appears in Recipient Name E mail Address on the Send as iFax screen New Recipient Specify a new address Select the item you want to change and s...

Page 126: ...fax and iFax To specify an e mail or server FTP SMB address for insertion in the address book it is not possible to use an address number specified with the numeric keypad one touch dialing or a group...

Page 127: ...gle alphanumeric index character for use as a keyword to search the address book For information about how to enter characters refer to 2 Product Overview Entering Text in the User Guide Relay Station...

Page 128: ...st be registered in advance For information on comment registration refer to Comments P 129 1 Select Off or On 2 When On is selected select Comment 3 Select Recipient s Comment 4 Select On and select...

Page 129: ...Enter the password as required with the numeric keypad and select Save Note You can enter up to 20 digits for the password Relay Broadcast Set the instruction given to a relay station which is used wh...

Page 130: ...255 9 seconds in 0 1 second increments 5 Select Save 6 Exit the System Administration mode iFax Profile Set the format of the iFax profile A profile is specified to restrict attribute information suc...

Page 131: ...to move to the next screen 3 Enter an address number 3 digits you want to register with the numeric keypad and select Add 4 Repeat the procedure of Step 3 to register the address numbers 5 Select Sav...

Page 132: ...fax billing Important In order to register the billing data enable the fax feature for the Login Setup Auditron Administration prior to the operations For details on how to enable the fax feature refe...

Page 133: ...6 Job Status This chapter describes the job status feature z Job Status Overview 132 z Printing and Deleting Stored Documents 133 z Handling Error Terminations 136...

Page 134: ...Guide Checking Completed Jobs Displays the status of completed jobs Also displays their details For more information refer to 4 Job Status Checking Complete Jobs in the Administrator Guide Checking S...

Page 135: ...System Settings Login Setup Auditron Administration Charge Private Print Settings in the Administrator Guide Public Mailbox This section describes how to print or delete a document stored in a public...

Page 136: ...er This feature may not be displayed depending on the system settings 1 Select Undelivered Faxes 2 Select the document to be re sent or deleted Note Select Refresh to display the updated information S...

Page 137: ...ecipient for the undelivered fax document Besides the fax recipient the following features can be changed on the control panel Important If the fax number is changed the setting for adding a header wi...

Page 138: ...e in the Administrator Guide For a Fax Job A transmission report undelivered is printed For more information on transmission reports undelivered refer to Transmission Report Undelivered P 143 For deta...

Page 139: ...7 Machine Status This chapter describes the features for checking the machine status z Overview of Machine Status 138 z Machine Status 139 z Billing Meter Print Report 141...

Page 140: ...an also set print modes For more information refer to Machine Status P 139 Billing Meter Print Report You can check the number of pages printed by meter or user You can also print various reports list...

Page 141: ...of the machine machine configuration and software version 1 Select Machine Information For enquiry on maintenance and operation Indicates how to make maintenance and operating enquiries Serial Number...

Page 142: ...x Receiving Mode 2 Select a fax receiving mode Manual Receive Allows you to manually receive a fax from a remote machine This mode is convenient when you want to confirm the sender or use an external...

Page 143: ...eport list Note The items displayed vary depending on the optional features installed 1 Select Print Report List Note The image shown right is the screen displayed by selecting User Mode in the System...

Page 144: ...ing a range of address numbers is displayed Select a range of numbers and press the Start button z Group Send You can print the list of settings for Group Send only z Select All You can print the list...

Page 145: ...e report is the No User Administration Number registered for the Login Setup Auditron Administration feature Automatically Printed Reports Lists Some reports lists relating to the fax and scan service...

Page 146: ...nformation on specifying whether or not to have the report printed automatically refer to Broadcast Multi Poll Report P 107 Relay Broadcast Report You can check the result of a relay broadcast transmi...

Page 147: ...ature was used This chapter is intended for system administrators and explains the features whose set values can be changed and their setting procedures For Overview of Authentication and Authenticati...

Page 148: ...ork Access z Remote Access z Xerox Standard Accounting Local Machine Access The features and services that can be managed in Local Machine Access are as follows 1 This column shows whether authenticat...

Page 149: ...d 2 If ApeosWare Authentication Agent optional is used as an authentication system you can select features to restrict For information on ApeosWare Authentication Agent refer to the documentation prov...

Page 150: ...rinted pages sheets Manual Reception Printing Calling in Calling out Required Fax reception Receptions pages charging units printed pages sheets Fax to Mailbox Automatic Reception to Mailbox Not requi...

Page 151: ...the charges invoiced by the telecommunications company When fax received pages are split for printing the number of pages counted will be those received not those printed The number of charging units...

Page 152: ......

Page 153: ...9 Using the iFax Service This chapter describes how to use the Internet fax iFax service on the machine z iFax Overview 152 z Preparations 153 z Installation Procedure 154...

Page 154: ...d data as an e mail attachment using either corporate networks or the Internet unlike conventional fax machines which utilize public phone lines Also the machine can receive e mails transmitted from m...

Page 155: ...address for the machine TCP IP is used for e mail O O O Subnet mask Required when the network is divided into subnets U U U Gateway address Required when multiple networks are connected by gateways U...

Page 156: ...he e mail environment Configure the items for the iFax feature on the machine For details refer to 9 E mail Environment Settings in the Administrator Guide Note Configuration can also be performed usi...

Page 157: ...10 Using the Server Fax Service This chapter describes how to use the Server Fax service on the machine z Server Fax Overview 156 z Preparations 157 z Installation Procedure 158...

Page 158: ...Fax server and can transfer image data received by the Server Fax server to the machine via a network based on the settings you made Important While the Fax Server feature is enabled the Fax feature i...

Page 159: ...Server Fax on the machine System Requirements for the Machine z Scanner Kit needs to be installed on the machine z Server Fax Kit needs to be installed on the machine z The machine needs to be connec...

Page 160: ...ot support the Fax feature and supports the Server Fax feature only the Server Fax feature will be enabled automatically If your machine supports both the Fax and Server Fax features manually switch t...

Page 161: ...xample com Note When specifying a port number add and the port number to the end of the Internet address 3 Click the Properties tab 4 Click on the left of Protocol Settings to display the items in the...

Page 162: ...tails on the SMTP server settings refer to 9 E mail Environment Settings in the Administartor Guide The following settings are additionally required for the SMTP server z Domain Name z E mail Address...

Page 163: ...11 Problem Solving This chapter describes problems that may occur with the machine and their solutions z Troubleshooting 162 z Trouble during Faxing 163 z Error Code 166...

Page 164: ...information on paper or document jams refer to the Administrator Guide No Cause Is an error code displayed Action Refer to the Administrator Guide The image quality is poor Action Refer to the Adminis...

Page 165: ...correct the on hook feature allows you to call through general lines Cause The phone dial type is incorrect Action Specify the dial line type as the subscribed one Tone 10pps for the machine Cause An...

Page 166: ...Lighten Darken Adjusting Density Level P 49 Cause The destination machine has a problem Action Check it to the sender Note Image quality may be affected by a problem of the sender s machine as well as...

Page 167: ...an information code and press the Start button Cause The document is not correctly loaded on the sender s machine Action Check it to the sender Note Image quality may be affected by a problem of the...

Page 168: ...mit value for page split According to the setting combination the received document is printed as follows Refer to Border Limit P 113 or Auto Reduce On Receipt P 113 The mailbox selector feature is se...

Page 169: ...e specifications notes and restrictions optional components and printer emulation languages z Specifications 168 z Optional Components 170 z Notes and Restrictions 171 z Using the Telephone 175 z Larg...

Page 170: ...Transmission time 2 seconds 1 Communication Mode ITU T G3 Scanning density Standard 8 3 85 lines mm 200 100dpi 7 9 3 9 dots mm Fine 8 7 70 lines mm 200 200dpi 7 9 7 9 dots mm Superfine 16 15 4 lines m...

Page 171: ...Specifications 169 Appendix 12 Output format Format TIFF FX Compression method MH MMR JBIG Profile TIFF S TIFF F TIFF J Supported protocols Transmission SMTP Reception SMTP POP3...

Page 172: ...n Fax Kit Adds the fax feature G3 x 1 ch to the machine Internet Fax Kit Adds the Internet Fax iFax feature to the machine Fax Extension Board Kit Adds extra G3 facsimile lines to the machine Addition...

Page 173: ...gs J S MIME Settings in the System Administration mode setting Read Receipts MDN or Delivery Receipts DSN to On will be invalid and you will not get receipts Addresses Registered on Job Flows When an...

Page 174: ...n important e mail we suggest you to confirm it is received such as by calling the recipient Feature Combinations when Transmitting an iFax z Resolution on the General Settings screen When TIFF S is s...

Page 175: ...a document via a broadcast transmission it can be sent to both iFax and regular fax addresses at the same time To iFax addresses the document will be sent by e mail and to regular fax addresses the d...

Page 176: ...urity in order to avoid your e mail being read or tampered by third parties as other signals sent over the Internet Therefore for important information it is recommended to use other transmission meth...

Page 177: ...Saver button to switch out of the Power Saver mode 2 Specify the call destination z The call destination can be specified using the numeric keypad address numbers or one touch buttons The address boo...

Page 178: ...specified using the numeric keypad address numbers or one touch buttons The address book cannot be used z The call destination can be specified also with the keyboard displayed on the screen Pressing...

Page 179: ...n to open the Review screen In this screen you can check a list of the status of fax features whose settings have changed from the defaults You can also check the destination information for sending f...

Page 180: ...Layout Adjustment Original Size Options for Standard Size 17 papers sizes are preset Reduce Enlarge Options for Preset 12 scaling factors are preset Item Sub Item Feature changed location Changes Fax...

Page 181: ...Dial Tone A tone generated from the telephone line It indicates that you are connected to the line Dial Type The dial type of connected line The machine offers two dial types Tone and 10PPS ECM Error...

Page 182: ...iFax The profiles that can be used vary with the Internet Fax of the remote terminal When specifying a profile check that it can be handled by the other party s iFax compatible machine Receiving Pape...

Page 183: ...illing Meter Print Report 141 Book Scanning 53 54 Border Limit System Settings 113 Box Selector Line Setup System Settings 114 Box Selector List 142 Broadcast 76 Broadcast Communication Mode System Se...

Page 184: ...e Destination System Settings 115 G G3 58 G3 Line 1 2 4 Dial Type System Settings 116 G3 Line 1 2 4 Fax ID System Settings 116 G3 Line 1 2 4 Line Type System Settings 116 General Settings 49 General S...

Page 185: ...tination Line Setup System Settings 115 Output Destination System Settings 115 output format 169 overview of Auditron Administration 146 P polling 72 Power Off Report 144 Primary Relay Station ID 83 p...

Page 186: ...ifying destination using the keyboard screen 46 specifying iFax Profiles 69 specifying Send Priority 59 specifying Send Time 59 specifying the destination 29 Specifying the iFax Subject 63 specifying...

Page 187: ...ApeosPort II 7000 6000 DocuCentre II 7000 6000 User Guide Facsimile DE3679E2 1 Edition 1 June 2007 Fuji Xerox Co Ltd Copyright 2007 by Fuji Xerox Co Ltd...

Page 188: ......

Reviews: