


94
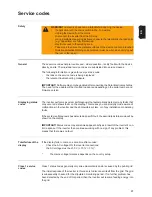
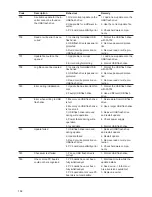
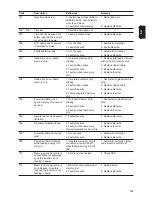
Class 4 service
codes
Some of the class 4 status codes necessitate intervention by a Fronius-trained service en-
gineer.
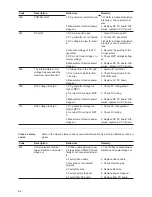
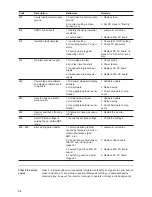
306
POWER LOW
1. DC power too low for feed-in
1. Wait for increased insolation
intensity or check solar mod-
ules
2. Measurement fault on power
stage set
2. Replace DC PC board. Oth-
erwise, replace AC PC board
307
DC LOW
1. DC main switch open
1. Close DC main switch
2. PV generator not connected
2. Connect PV generator
3. DC voltage too low for feed-
in
3. Wait for increased insolation
intensity or check solar mod-
ules
4. Reverse voltage of the PV
generator
4. Reverse the polarity of the
PV generator
5. DC mode: fixed v in-
correct voltage
5. Check MPP settings/voltag-
es
6. Measurement fault on power
stage set
6. Replace DC PC board. Oth-
erwise, replace AC PC board
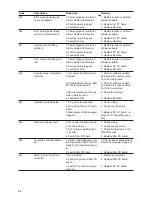
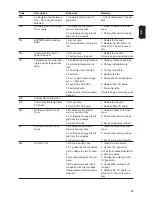
308
The intermediate circuit
voltage has exceeded the
maximum permitted limit
1. Voltage drop in the AC grid
1. Automatic correction
2. Poor contact: wall bracket <-
-> inverter
2. Check fixing screws in the
DATCOM area
3. Measurement fault on power
stage set
3. Replace AC PC board
309
DC1 voltage too high
1. PV generator voltage too
high at MPP 1
1. Check PV configuration
2. Incorrect DC wiring at MPP
1
2. Check DC wiring
3. Measurement fault on power
stage set
3. Replace DC PC board. Oth-
erwise, replace AC PC board
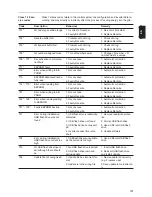
313
DC2 voltage too high
1. PV generator voltage too
high at MPP 2
1. Check PV configuration
2. Incorrect DC wiring at MPP
2
2. Check DC wiring
3. Measurement fault on power
stage set
3. Replace DC PC board. Oth-
erwise, replace AC PC board
Code
Description
Behaviour
Remedy
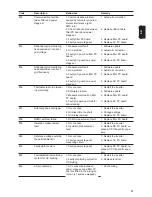
Code
Description
Behaviour
Remedy
401
Communication fault be-
tween Recerbo and power
stage set
1. Ribbon cable between pow-
er stage set and filter PC board
faulty or not connected proper-
ly
1. Check ribbon cable between
Recerbo and power stage set
2. Faulty ribbon cable
2. Replace ribbon cable
3. Recerbo not connected
properly
3. Check Recerbo plug
4. Faulty Recerbo
4. Replace Recerbo
5. Faulty power stage set
5. Replace power stage set
6. Faulty filter PC board
6. Replace filter PC board
Summary of Contents for Primo 3.0-1
Page 2: ...2 ...
Page 5: ...Allgemeine Informationen ...
Page 6: ......
Page 13: ...Fehler Suchhilfe ...
Page 14: ......
Page 32: ...32 ...
Page 33: ...Komponenten austauschen ...
Page 34: ......
Page 54: ...54 DC Trenner auf ON stellen 6 ...
Page 65: ...Sicherheitstechnische Überprüfung ...
Page 66: ......
Page 78: ...78 ...
Page 81: ...General information ...
Page 82: ......
Page 89: ...Error location aid ...
Page 90: ......
Page 108: ...108 ...
Page 109: ...Changing components ...
Page 110: ......
Page 130: ...130 Set the DC disconnector to ON 6 ...
Page 141: ...Safety Inspections ...
Page 142: ......
Page 154: ...154 ...
Page 155: ...Appendix ...
Page 158: ...158 ...
Page 159: ...159 ...