


121
EN
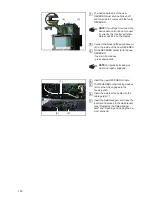
Replacing the external fan
Preparatory work
Set the DC disconnector to OFF
Disconnect the AC supply
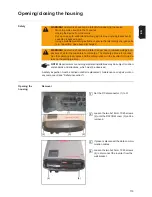
Remove the DATCOM cover
Disconnect the data communication cables if necessary
Release the device from the wall bracket and remove.
Remove the power stage set cover
Replacing the ex-
ternal fan
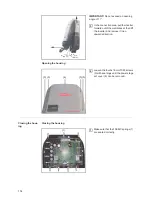
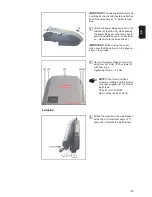
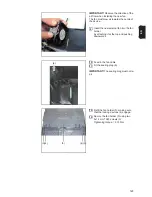
Replacing the right external fan:
Disconnect the Molex plug (2)
Release the cables from the clamping
noses and feed them out
Turn the inverter carefully so that the
back is accessible
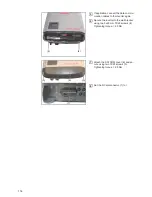
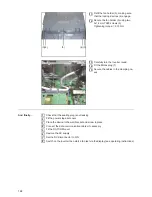
Remove the two 5x14 mm TX25
screws (3)
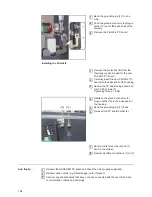
Release the fan holder (5) locking de-
vice (4) and open the holder
WARNING!
An electric shock can be fatal.
Follow the five safety rules.
1
2
3
4
5
6
(1)
(2)
1
2
3
(3)
(4)
(3)(4)
(5)
4
5
Summary of Contents for Primo 3.0-1
Page 2: ...2 ...
Page 5: ...Allgemeine Informationen ...
Page 6: ......
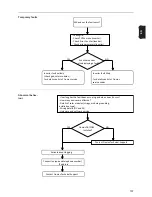
Page 13: ...Fehler Suchhilfe ...
Page 14: ......
Page 32: ...32 ...
Page 33: ...Komponenten austauschen ...
Page 34: ......
Page 54: ...54 DC Trenner auf ON stellen 6 ...
Page 65: ...Sicherheitstechnische Überprüfung ...
Page 66: ......
Page 78: ...78 ...
Page 81: ...General information ...
Page 82: ......
Page 89: ...Error location aid ...
Page 90: ......
Page 108: ...108 ...
Page 109: ...Changing components ...
Page 110: ......
Page 130: ...130 Set the DC disconnector to ON 6 ...
Page 141: ...Safety Inspections ...
Page 142: ......
Page 154: ...154 ...
Page 155: ...Appendix ...
Page 158: ...158 ...
Page 159: ...159 ...