background image

4 | Operating the system

36

B1650222_en | Operating instructions PE1e Pellet

4.5 Adjust pellet consumption counter after fuel delivery

4.5.1 Notes on filling the fuel stores

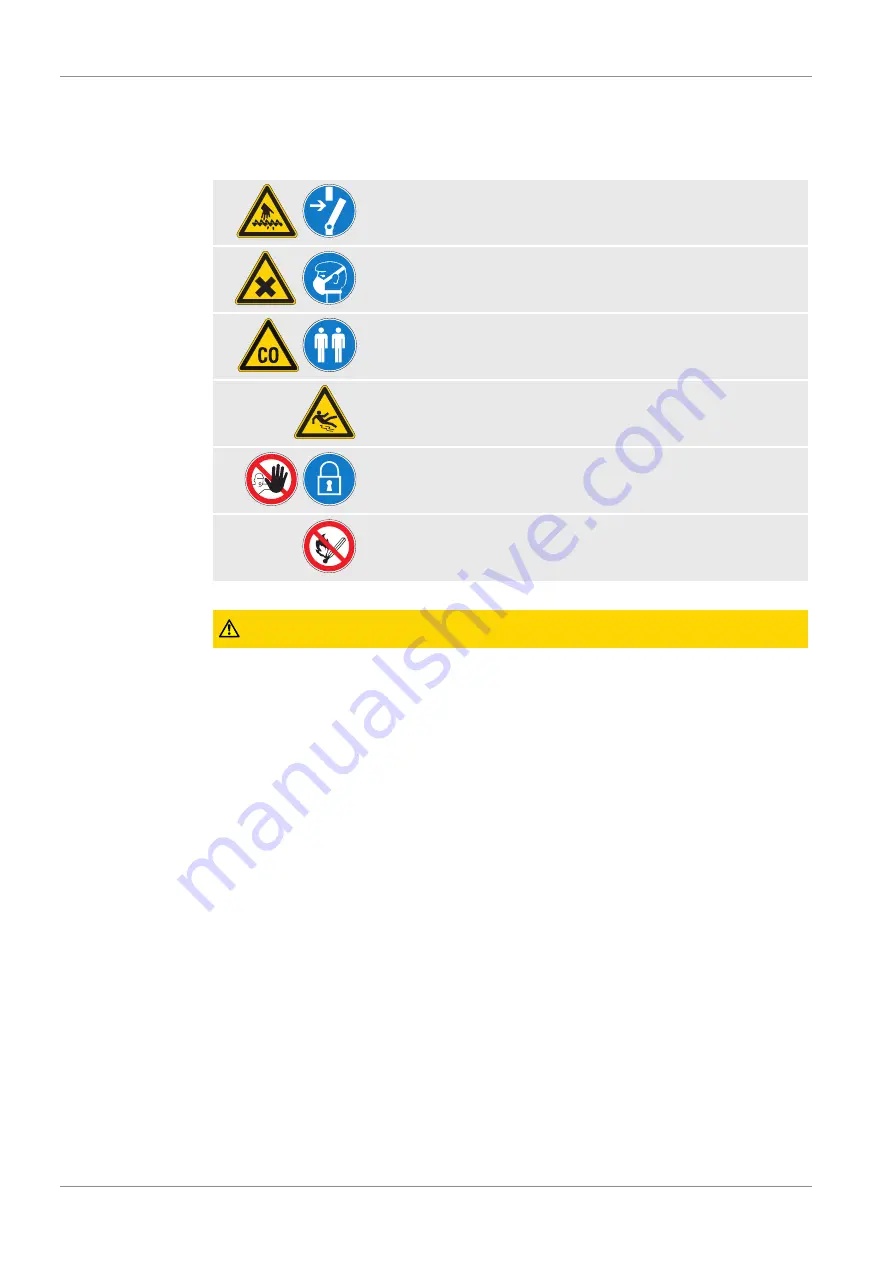
When working in the fuel

store:


Risk of injury due to moveable parts!

Shut off the feeder unit before entering the fuel store!


When cleaning the fuel store, an increased amount of dust may be
generated. Wear a dust mask when working in the fuel store.


Adequately ventilate the fuel store before entering. Keep the door open
and always have a second person present. Observe the CO
concentration limit (< 30ppm).

Slick surfaces in the fuel store present a slipping hazard!


Unauthorized access prohibited! Keep children away!

Keep the fuel store locked and store the key in a safe place!

No fire, open flames or smoking in the fuel store!

 CAUTION

Filling the store when the boiler is switched on

could result in damage and consequential injury!

When filling the fuel store:

r

Switch off the boiler by tapping “Boiler OFF”

Ä

The boiler follows the shutdown procedure and switches to "Boiler off" status

r

Allow the boiler to cool for at least half an hour

When the boiler has cooled down:

r

Before filling check the store for fines and clean if necessary

r

Close all openings to the store to seal out dust

r

Fill the store with pellets

Ä

Only use permitted pellets!

Ü

 "Permitted uses" [

}

 9]

Summary of Contents for PE1e

Page 1: ...r PE1e Pellet Operating instructions PE1e Pellet Translation of original German version of operating instructions for operators Read and follow all instructions and safety instructions All errors and...

Page 2: ...the touch display 20 4 3 2 Select information displays 26 4 3 3 Switch boiler ON OFF 28 4 3 4 Change boiler mode 28 4 3 5 Change date and time 29 4 3 6 Change desired DHW tank temperature 29 4 3 7 On...

Page 3: ...rement line of the underpressure controller 58 5 4 2 Cleaning the Lambda probe 59 5 4 3 Clean the heat exchanger and WOS springs 60 5 5 Emissions measurement by chimney sweep or regulatory body 62 5 5...

Page 4: ...s a significant contribution to safe appropriate environmentally friendly and economical operation of the system The constant further development of our products means that there may be minor differen...

Page 5: ...on System 4 Cyclone cover with sealing slider 16 Lambda probe 5 Service interface main switch and safety temperature limiter STL 17 Induced draught unit fan 6 Burn back sliding valve 18 Return tempera...

Page 6: ...d if measures are not observed it will lead to serious injury or death You must follow the instructions WARNING The dangerous situation may occur and if measures are not observed it will lead to serio...

Page 7: ...tective gloves Turn off the main switch Keep the doors closed Wear a dust mask Work under the supervision of a second person Lock Unauthorised access prohibited No fire open flames or smoking Warning...

Page 8: ...as insufficient combustion air or non standard fuel can cause serious faults in combustion e g spontaneous combustion of carbonisation gases or flash fires which can in turn cause serious accidents W...

Page 9: ...e parts authorised by the manufacturer may be used Any kind of change or modification made to the product will invalidate the manufacturer s conformity with the applicable guideline s In such cases th...

Page 10: ...e only the permitted fuels 2 5 Qualification of operating staff CAUTION If unauthorised persons enter the Installation room Risk of personal injury and damage to property r The operator is responsible...

Page 11: ...LIMITER STL protection against overheating The STL high limit thermostat switches off the combustion system when the boiler reaches 100 C The pumps continue to run Once the temperature falls below ap...

Page 12: ...pacemakers whilst in the immediate vicinity of the electrostatic particle separator Interference of the pacemaker by electromagnetic fields of the particle separator is possible Therefore r Maintain a...

Page 13: ...ws the shutdown procedure and switches to Boiler off mode r Allow the boiler to cool for at least 1 hour r Switch off the main switch and take precautions to prevent accidental switching on 2 9 Emerge...

Page 14: ...boiler closed r Shut down the boiler according to procedure r Ventilate the room where the boiler is installed r Close the fire door and doors to living areas Recommendation Do not install smoke alar...

Page 15: ...d against gnawing and nesting by animals such as rodents No flammable materials in proximity to the system 3 2 Domestic hot water Unless contrary to other national regulations the latest versions of t...

Page 16: ...e smallest individual heating capacity is to be used for systems with several heat generators 2 In systems with several heat generators with different specific water contents the smallest specific wat...

Page 17: ...high If the pressure drops below a preset value the pump draws water from the receiving tank and feeds it back into the heating system Pump controlled pressure maintenance systems with open expansion...

Page 18: ...ell as the flue gas temperatures when clean and the other flue gas values 3 6 Condensate drainage The condensate must be continuously drained into the waste water system in accordance with local regul...

Page 19: ...ained in the operating instructions for the controller NOTICE See operating instructions for boiler controller The customer is responsible for ensuring the following prior to initial start up of the s...

Page 20: ...hange the current user level Lock display switch user level 33 C Display and change the current date time Change date and time 29 D Holiday program Configure the holiday program 34 E Chimney sweeper f...

Page 21: ...evices or for PC connections Status display The status display indicates the system s operating status Constant in the set colour SWITCHED ON Boiler in an error free operating state standby heating Se...

Page 22: ...in use Remote control of the boiler is permitted Establishes connection to froeling connect Remote control of the boiler is not permitted Connection to the froeling connect server No network connectio...

Page 23: ...rows to navigate to the individual menus Tap the corresponding icon to open the menu Within the individual menus the status display is shown with current values If for example several heating circuits...

Page 24: ...keypad Dropdown list Change time window The desired time window can be set in the Times tab in the menus of the heating components heating water etc Up to four time windows are possible per day r Use...

Page 25: ...changing the settings User level Changes the current user level Code 0 Child lock Control lock Code 1 Customer Extra heating Boiler starts heating and domestic hot water tank are activated for 6 hour...

Page 26: ...of the secondary boiler and the status of the burner relay Solar Temperatures Display of the collector temperature and control of the collector pump Pellets Remaining pellet amount in storeroom Displ...

Page 27: ...the CPU and RAM capacity in percent 1 This selection merges two tiles together reducing the maximum number of information displays When using more than two store sensors it is possible to have an info...

Page 28: ...to the programs and times set the chamber discharge system remains active 4 3 4 Change boiler mode Depending on the type of boiler there are several modes available which can be changed directly in th...

Page 29: ...play for the desired DHW tank r Adjust the temperature setpoint by tapping on or NOTICE If this selection is not configured in the information display in the basic display open the components in the s...

Page 30: ...ng curve must be adapted to influence the room temperature Change room temperature heating circuit without room temperature sensor 31 When using a room temperature sensor analogue remote control FRA r...

Page 31: ...ly too low Move heating curve up in parallel Increase both points on the heating curve by the same temperature level see figure 1 Room temperature on cold days too low OK on warm days Change the slope...

Page 32: ...Procedure Icon Description OFF The heating circuit is switched off Frost protection remains active Auto The heating circuit is controlled according to the set time program Party The heating circuit i...

Page 33: ...he basic display appears It is not possible to change parameters Customer Code 1 Standard user level for normal operation of the controller All customer specific parameters are displayed and can be ch...

Page 34: ...d in which an activated boiler is not loaded If Legionella heating is set it remains active If the start date is set in the future the suitcase icon will be highlighted in green Once the set start tim...

Page 35: ...access rights configured for the room console If the boiler remote control is also activated Display icons for froeling connect remote control 22 the boiler can be switched on and off on the room con...

Page 36: ...it 30ppm Slick surfaces in the fuel store present a slipping hazard Unauthorized access prohibited Keep children away Keep the fuel store locked and store the key in a safe place No fire open flames o...

Page 37: ...aining pellet amount in store room parameter and enter the calculated value 4 5 3 Setting the automatic notification for minimum level r In the Consumption menu select the Minimum pellet level fuel st...

Page 38: ...in steps of tons or kilograms Both values are set to 0 by resetting Examples of use for the counter Monthly accounting to illustrate seasonal changes in pellet consumption Seasonal accounting e g duri...

Page 39: ...he insulated door r Open the locks on the cover of both ash containers by turning them anticlockwise r Remove the cover and check the fill level r Put the lid back on and fix it with the fasteners Res...

Page 40: ...2 Empty ash container r Open the front insulating door r Loosen the star shaped knobs and swivel to one side r Fold the cover plate forward r Pull out both ash containers r Close the opening at the re...

Page 41: ...leading to serious accidents are possible Before turning off the main switch r Switch boiler off by tapping Boiler OFF The boiler follows the shutdown procedure and switches to Boiler off status afte...

Page 42: ...ch off the main switch and take precautions to prevent accidental switching on WARNING During inspection and cleaning work on the hot boiler Hot parts and the flue gas pipe can cause serious burns Tak...

Page 43: ...4 5 Included in delivery 1 Flat scraper 2 Plastic cleaning brush 25 x 50 x 750 for cleaning the FGR duct 3 Cleaning brush 24 x 50 x 1200 for cleaning the WOS springs 4 Stainless steel cleaning brush...

Page 44: ...uge and rated pressure of the expansion tank match your installer s specifications If the system pressure decreases r Top up with water NOTICE If this happens frequently the seal of the heating system...

Page 45: ...nt this work needs to be carried out more frequently Clean the burn out ring and burners r Switch off the boiler by tapping Boiler OFF r Allow the boiler to cool for at least one hour r Activate servi...

Page 46: ...d remove the combustion chamber cover The box wrench is attached to the tool clamp on the inside of the insulating door A B B r Remove ash cone A with brush r Remove both burn out stones B and clean t...

Page 47: ...changer cover r Clean the entire flue gas collection chamber using an ash vacuum r Clean the WOS springs using a cleaning brush on both sides of the inner panel NOTICE WOS springs do not have to be re...

Page 48: ...48 B1650222_en Operating instructions PE1e Pellet r Pull out both ash containers r Remove the ash container bracket behind that r Remove the ashes under the combustion chamber Use the ash vacuum and...

Page 49: ...he seal on the induced draught unit housing r Clean the fan wheel from the inside out using a soft brush or paint brush r Remove contaminants and deposits from the induced draught unit housing Clean t...

Page 50: ...ng pipe between the boiler and chimney with a chimney sweep s brush Depending on the layout of the flue gas pipes and the chimney draught cleaning yearly may not be enough Checking the draught control...

Page 51: ...use waterproof protective gloves when handling condensate NOTICE If the condensation drain is blocked the outflow tub will fill with condensation preventing the flue gas from escaping through the chim...

Page 52: ...ger pipes the flushing device can be checked to ensure proper cleaning In the event of heavy soiling the heat exchanger must first be cleaned Clean the heat exchanger and WOS springs 47 r Manually act...

Page 53: ...valve on the water intake r Manually activate the flushing device on the controller in order to empty the flushing line System menu Manual Manual operation r In the Manual operation menu set the calo...

Page 54: ...n from the mounting plate and remove the WOS mount along with the springs r Clean WOS springs and heat exchanger pipes with the supplied stainless steel brush r Clean the entire flue gas collection ch...

Page 55: ...arator CAUTION Increased dust buildup during maintenance work on the electrostatic particle separator Therefore r Wear a dust mask of filter class FFP 2 or higher r Tap on Boiler OFF in order to turn...

Page 56: ...ove soot and ash deposits from brush A and isolator B TIP Use scouring fluid and a scouring pad to clean the isolator B r Clean air opening C using a screwdriver A r Remove the top cleaning cover r In...

Page 57: ...servicing by a heating specialist will ensure a long trouble free service life for your heating system It will ensure that your system stays environmentally friendly and operates efficiently and cost...

Page 58: ...mp with pliers and remove the measurement line from the under pressure sensor cartridge r Clean the measurement line with gentle compressed air WARNING Do not direct compressed air into under pressure...

Page 59: ...heat exchanger cover r Carefully remove impurities from the measuring ports with a fine brush and ash vacuum r Carefully close the heat exchanger cover several times so that deposits can fall out of t...

Page 60: ...hook tension springs on the connecting rod of the WOS r Lift the driver lever in the upper area A and remove the pin at the other end r Remove the driver lever and take the key out of the WOS shaft r...

Page 61: ...and heat exchanger pipes r Clean the entire flue gas collection chamber using an ash vacuum Caution when installing WOS springs r Push WOS springs with slot D downwards into heat exchanger pipes Push...

Page 62: ...tted fuels chapter r Ensure that there is adequate heat consumption on the day of the measurement e g storage tank must be able to take heat for the duration of the measurement r There must be a suita...

Page 63: ...the start of the measurement and is already ready for measurement at the set time 5 6 Replacement parts With Froling original replacement parts in your system you are using parts that match perfectly...

Page 64: ...gram r After a power failure check whether the STL high limit thermostat has tripped r Keep the doors of the boiler closed during and after the power failure at least until the induced draught fan aut...

Page 65: ...a shutdown ERROR The boiler follows the shutdown procedure and remains in Boiler off status until the problem is resolved ALARM An alarm triggers a system emergency stop The boiler shuts down immediat...

Page 66: ...tructions PE1e Pellet r Tap the Cancel icon to close the current fault and display the fault list r Tap the Cancel icon again and confirm that you have read all of the errors to return to the basic di...

Page 67: ...B1650222_en Operating instructions PE1e Pellet 67 Notes...

Page 68: ...a e 6 85609 Aschheim 49 0 89 927 926 0 info froeling com Froling srl Via J Ressel 2H I 39100 Bolzano BZ 39 0 471 060460 info froeling it Froling SARL 1 rue Kellermann F 67450 Mundolsheim 33 0 388 193...

Reviews: