background image

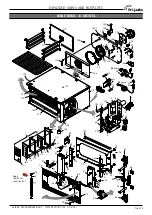
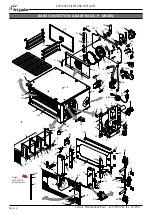
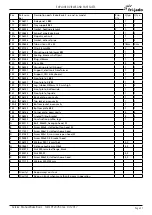
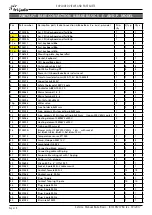
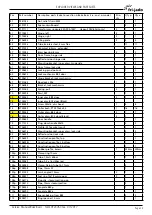
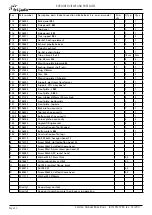
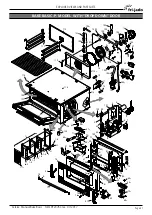
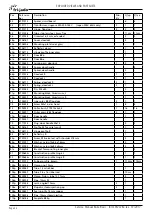
EXPLODED VIEWS AND PARTSLISTS

Page 37

Service  Manual Bake Basic    form 9123763 rev.  07/2017

UNDERFRAME  2X 9 TRAY  AND STACKING KIT

B

A

Underframe high Bake Basic 

1x

3706202

3706230

1x

4288325

80x

3706196

4x

3706195

1x

3706204

3706198

1x

3706199

1x

1x

H

L

3706197

2x

3500148

4x

3701255

8x

3701261

1x

3706194

1x

3706194

4288325 (16x)

3706196 (4x)

3706195

3500148 (4x)

4288325 (16x)

This underframe is suitable for a single BB3, a single BB5 and a double BB3 with standard 
door (which is not the “downfalling door”!).  

An assembling instruction (9123690) is delivered with the underframe and can also be found 
in the installation manual.

3709532

Stacking kit 3709535, for stacking of ovens.

It consists of:

2x 80 cm silicon tube -> 3500608

1x Skirting bracket.   -> 3706202

See installation manual for the description.

1005

Summary of Contents for BB 3-e

Page 1: ...d to be all encompassing If you have not attended a training for this product you should read in its entirety the repair procedure you wish to perform to determine if you have the necessary tools inst...

Page 2: ...Service Manual Bake Basic form 9123763 rev 07 2017 Page 2 TABLE OF CONTENTS EMPTY PAGE...

Page 3: ...ddition of Underframe and extraction hood in exploded views New chapter Upgrades added after electrical diagrams 1412 08 12 2014 Exploded views updated with the thermal switch for the cooling fan powe...

Page 4: ...e and rear panel 15 Location of parts 15 replacing the hinge of a Drop Down door 16 Exchanging the blower and shaftseal 18 Exchanging printed circuit boards 20 Trouble shooting 22 Error messages 22 Tr...

Page 5: ...old style I o board 56 Circuit diagram BB 3 e with old style i o board 56 Wiring diagram BB 3 e with old style i o board 57 Circuit diagram BB 3 p with old style i o board 58 Wiring diagram BB 3 p wit...

Page 6: ...3x 10A Fuses needed with power connection 230V 3 50 60Hz 3 Phases without neutral 3x 20A 3x 20A Fuses needed with power connection 230V 1 50 60Hz 1 Phases 16A 16A 25A Note mount other mains cable 25A...

Page 7: ...sic form 9123763 rev 03 2017 Tools Standard set of tools Metric wrenches sockets and hex socket key wrenches Multi meter and AC current clamp meter Temperature tester Insulation value tester Megger Fi...

Page 8: ...OFF Start program Stop program Adjust time Adjust temperature Service access Exit service menu Push simultaniously for 2 seconds Push simultaniously for 2 seconds Push for 5 seconds Push sequentially...

Page 9: ...en first After entering the programming mode first choose the desired program and confirm Adjust time temperature steampulses and steammode in exactly this sequence This is possible for three steps Th...

Page 10: ...P 10 0 300 sec Maximum door open time during baking S08 E P 30 0 50 C Preheat delta S09 E P 2 0 10 C Hystereses temperature controller S10 E P 120 0 180 sec Blower left and right run time S11 E P 12...

Page 11: ...e baking temperature see furtheron in this ma nual Switching ON Switching OFF Choose program Start program Stop program Adjust time Adjust temperature Adjust steam Service access Leave service menu Pr...

Page 12: ...P to confirm Any other key will exit the delete mode Checking the program Push P and choose the desired program Now push the desired parameter key for example the temperature 1x 2x or 3x depending on...

Page 13: ...l mode S13 E P 0 0 255 Access code for parameter 14 27 The code is 48 S14 E P No No Yes Demo mode no heating S15 P Yes No Yes Switch off the light when opening the door S16 E P 120 0 240 min Automatic...

Page 14: ...5 pulses in mode 1 5 pulses each minute A steampulse is made by opening the watervalve for 0 1 sec t1 Both parameters t1 and t2 are adjustable in the service menu Steam mode 0 is used for most bake o...

Page 15: ...nel Slide up and pull out the panel after removal of top In later models it might be that the panel needs to be slided down like the R side panel Removal of rear panel Remove the 2 screws at the botto...

Page 16: ...crew at each hinge if present See arrow Put the door under a 35 angle and lock both hinges with a pin or screw or screwdriver with a 3 untill 4 mm dia meter 5 Turn the door a little towards the oven 6...

Page 17: ...ers 15 Bend out the hinge 16 And push the lever in the lock position 17 Unscrew the hinge 2 screws 18 And take the hinge out with cau tion otherwise the lever can spring loose and wound your fingers 1...

Page 18: ...e steam injection pipe 4 Remove the nut M5 from the Blo wer shaft 5 Pull the turbine from the blower shaft The use of a balljoint puller is highly recommended part number 9191244s To extend the plunge...

Page 19: ...blower bracket Therefore you have to make an assembly like the picture shows to be able to mount it Slide the blower assembly on the 4 studs and fix it with 2 nuts by hand force Check the position of...

Page 20: ...ut the assembly and put it on a clean table Remove the four M3 nuts and remove the bracket Also take the 4 spacers from the old panel Reverse the procedure to mount the new CPU board assembly Power an...

Page 21: ...ve the connector from J3 with the wires 6 and 7 Remove wire 31 Disconnect wire V1 from the contac tor Disconnect the other 3 connectors J1 J2 and J5 from the board Take out the board Note J1 is not sh...

Page 22: ...rmostat Check printed circuit board No steam developing only P model Closed tap Valve dirty due to dirty water Injection pipe blocked with scale Broken valve Broken pc board Open the tap Flush the wat...

Page 23: ...0 60 59 21 80 74 75 62 61 82 20 73 74 66 65 69 70 67 68 58 76 22 3 4 5 6 7 8 9 22 11 12 19e 13 27 18 5 16 14 15 75 117 113 150 1 126 125 123 120 122 118 130 131 115 114 116 129 137 138 1 5 1 6 134 139...

Page 24: ...3 90 60 59 21 80 74 75 B A 62 61 82 20 73 74 66 65 69 70 D 67 68 58 76 22 27 18 5 16 14 15 75 11 12 13 28p 117 113 108p 107p 150 1 106p 109p 126 125 123 120 122 118 115 114 116 129 137 138 1 5 F G H 1...

Page 25: ...3701279 Fuse ceramic 3 15A slow acting 6 3x32mm Japan 200V 60Hz only 1 1 1 13 3701239 Fuse ceramic 16A slow acting 6 3x32mm 1 1 1 14 3702319 Heating element 2700W 230V 2 1 1 14 3702392 Heating elemen...

Page 26: ...1 1 73 3702380 Inner glas BB3 door 2 1 1 74 4280558 Screw M5x16 disc head 1 8 8 75 3702342 Collar bush PTFE 10x5x3 5 1 16 16 76 3702379 Outer glass BB3 door 2 1 1 77 3700669 Door handle 1 1 79 9171014...

Page 27: ...B3 1 1 138 3706257 Front plate R BB3 1 1 139 9171125 Leg rubber 40mm 50 mm high 4 4 140 3706131 Front plate bottomside 1 1 141 3706130 Front plate topside 1 1 150 1 3706123 Back plate oven cavity 1 1...

Page 28: ...ins terminal 4 5 6 1 1 9 2005006 Ventilator 80x80x40 2 1 1 10p 3500056 Water valve 2 1 11 9261019 Fuse holder 6 3x32mm 2 2 12 3701238 Fuse ceramic 2A slow acting 6 3x32mm 1 1 1 12 3701279 Fuse ceramic...

Page 29: ...pull 2 1 1 70 3702398 Pawl M3 1 1 73 3702369 Inner glas BB5 door 2 1 1 73 3702427 Inner glas BC5 door Black 74 4280558 Screw M5x16 disc head 1 8 8 75 3702342 Collar bush PTFE 10x5x3 5 1 16 16 76 3702...

Page 30: ...1 137 3706245 Front plate L BB5 1 1 138 3706246 Front plate R BB5 1 1 139 9171125 Leg rubber 40mm 50 mm high 4 4 140 3706131 Front plate bottomside 1 1 141 3706130 Front plate topside 1 1 150 1 37062...

Page 31: ...5 16 14 15 28p 117 113 108p 107p 150 1 106p 109p 126 125 123 120 122 118 115 114 116 129 137 138 1 5 1 6 134 139 112 110p 111 100 124 79 E 77p 56 55 51 51 59p 21 80p 74 75 B K 61p 82 20 73 74 66p 65p...

Page 32: ...DOOR 108e 1e 1 5 1 3 1 4 1 6 2 3 4 5 6 7 25 40 9 22 11 12 19e 13 27 18 5 16 14 15 117 113 150 1 126 125 123 120 122 118 130 131 115 114 116 129 137 138 1 5 1 6 134 139 112 110e 111 100 100 124 79 E 77...

Page 33: ...A slow acting 6 3x32mm Japan 200V 60Hz only 1 1 1 13 3701239 Fuse ceramic 16A slow acting 6 3x32mm 1 1 1 14 3702319 Heating element 2700W 230V 2 1 1 14 3702392 Heating element 2700W 200V 15 3701218 Tu...

Page 34: ...Mountingblock Aluminium R 1 73 3702302 Inner glas BB3 flap door 2 1 1 74 4280558 Screw M5x16 disc head 1 8 8 75 3702342 Collar bush PTFE 10x5x3 5 1 16 16 76 3702301 Outer glass BB3 flapdoor 2 1 1 77p...

Page 35: ...307 Support electronic transformer 1 1 134 3706173 Support CPU keyboard 1 1 137 3706128 Front plate L BB3 1 1 138 3706129 Front plate R BB3 1 1 139 9171125 Leg rubber 40mm 50 mm high 4 4 140 3706131 F...

Page 36: ...male Red full insulated 2 0 2006206 Spade terminal Red 4 0 2006222 Receptacle female Red piggyback 1 0 2006303 Bootlace ferrule Grey 0 75 qmm 21 0 2006353 Receptacle uninsulated 11 0 4310287 Wire 2 5q...

Page 37: ...1x 3706194 1x 3706194 4288325 16x 3706196 4x 3706195 3500148 4x 4288325 16x This underframe is suitable for a single BB3 a single BB5 and a double BB3 with standard door which is not the downfalling d...

Page 38: ...209 4x 3706195 1x 3706210 3706213 1x 3706212 1x 1x H L 3706211 2x 3500148 4x 3701255 8x 3701261 1x 3706194 1x 3706194 3500148 16x 3706296 4x 3706195 3500148 4x 4288325 16x This underframe is suitable...

Page 39: ...stacked 5 5 level oven An assembling instruction 9123799 is delivered with the underframe B A Underframe low Bake Basic 1x 3706202 3706230 1x 4288325 51x 3706214 4x 3706195 1x 3706215 1x 3706216 2x H...

Page 40: ...ervice Manual Bake Basic form 9123763 rev 07 2017 UNDERFRAME LOW WELDED This underframe is suitable for a stacked 5 5 level oven It is completely welded Only the adjustable legs can be ordered separat...

Page 41: ...ice Manual Bake Basic form 9123763 rev 07 2017 415 798 7 8 3 3700685 3709550 Packed UNDERFRAME BC5 BC5 This underframe is suitable for a stacked 5 5 level oven It is completely welded Only the adjusta...

Page 42: ...e 42 Service Manual Bake Basic form 9123763 rev 07 2017 HOOD FOR BAKE BASIC M 1 L N L N PE 6791003 3706219 3706226 3706218 9221001 3704522 8031364 3500241 3701258 4650001 3706217 3706225 3706220 67910...

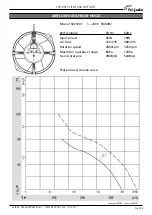
Page 43: ...form 9123763 rev 07 2017 AIRFLOW DATA FROM HOOD Blower 9221001 1 230V 50 60Hz Performance 50 Hz 60Hz Input power 45W 39W Air flow 325m h 380m h Rotation speed 2800rpm 3250rpm Maximum operative range 8...

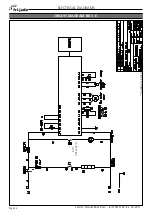
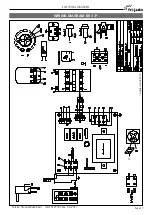
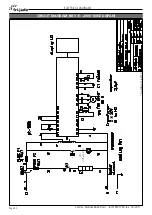
Page 44: ...Page 44 Service Manual Bake Basic form 9123763 rev 03 2017 50 C Off at 35 C Applied since 2010 CIRCUIT DIAGRAM BB 3 E ELECTRICAL DIAGRAMS...

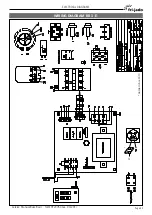
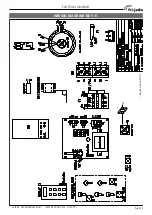
Page 45: ...ELECTRICAL DIAGRAMS Page 45 Service Manual Bake Basic form 9123763 rev 03 2017 27 Applied since 2010 WIRING DIAGRAM BB 3 E...

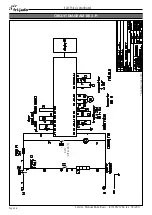
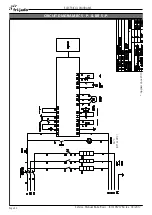
Page 46: ...ELECTRICAL DIAGRAMS Page 46 Service Manual Bake Basic form 9123763 rev 03 2017 50 C Off at 35 C Applied since 2010 CIRCUIT DIAGRAM BB 3 P...

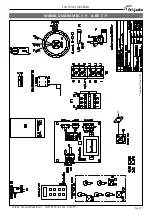
Page 47: ...ELECTRICAL DIAGRAMS Page 47 Service Manual Bake Basic form 9123763 rev 03 2017 27 Applied since 2010 WIRING DIAGRAM BB 3 P...

Page 48: ...ELECTRICAL DIAGRAMS Page 48 Service Manual Bake Basic form 9123763 rev 03 2017 50 C Off at 35 C Applied since 2010 CIRCUIT DIAGRAM BB 5 E...

Page 49: ...ELECTRICAL DIAGRAMS Page 49 Service Manual Bake Basic form 9123763 rev 03 2017 27 Applied since 2010 WIRING DIAGRAM BB 5 E...

Page 50: ...ELECTRICAL DIAGRAMS Page 50 Service Manual Bake Basic form 9123763 rev 03 2017 50 C Off at 35 C Applied since 2010 CIRCUIT DIAGRAM BC 5 P BB 5 P...

Page 51: ...ELECTRICAL DIAGRAMS Page 51 Service Manual Bake Basic form 9123763 rev 03 2017 Applied since 2010 27 WIRING DIAGRAM BC 5 P BB 5 P...

Page 52: ...ELECTRICAL DIAGRAMS Page 52 Service Manual Bake Basic form 9123763 rev 03 2017 50 C Off at 35 C Applied since 2010 CIRCUIT DIAGRAM BB 3 E 200V 60HZ JAPAN...

Page 53: ...ELECTRICAL DIAGRAMS Page 53 Service Manual Bake Basic form 9123763 rev 03 2017 Applied since 2010 27 WIRING DIAGRAM BB 3 E 200V 60HZ JAPAN...

Page 54: ...ELECTRICAL DIAGRAMS Page 54 Service Manual Bake Basic form 9123763 rev 03 2017 50 C Off at 35 C Applied since 2010 CIRCUIT DIAGRAM BB 3 P 200V 60HZ JAPAN...

Page 55: ...ELECTRICAL DIAGRAMS Page 55 Service Manual Bake Basic form 9123763 rev 03 2017 27 Applied since 2010 WIRING DIAGRAM BB 3 P 200V 60HZ JAPAN...

Page 56: ...l Bake Basic form 9123763 rev 03 2017 PKII Last update with old style I O board PKII PKII May 08 2009 May 08 2009 CIRCUIT DIAGRAM BB 3 E WITH OLD STYLE I O BOARD ELECTRICAL DIAGRAMS FOR MODELS WITH AN...

Page 57: ...ELECTRICAL DIAGRAMS Page 57 Service Manual Bake Basic form 9123763 rev 03 2017 WIRING DIAGRAM BB 3 E WITH OLD STYLE I O BOARD...

Page 58: ...LECTRICAL DIAGRAMS Page 58 Service Manual Bake Basic form 9123763 rev 03 2017 PKII Last update with old style I O board PKII PKII May 08 2009 May 08 2009 CIRCUIT DIAGRAM BB 3 P WITH OLD STYLE I O BOAR...

Page 59: ...ELECTRICAL DIAGRAMS Page 59 Service Manual Bake Basic form 9123763 rev 03 2017 WIRING DIAGRAM BB 3 P WITH OLD STYLE I O BOARD...

Page 60: ...L DIAGRAMS Page 60 Service Manual Bake Basic form 9123763 rev 03 2017 PKII Last update with old style I O board PKII PKII May 08 2009 May 08 2009 CIRCUIT DIAGRAM BB 3 E 200V 60HZ JAPAN WITH OLD STYLE...

Page 61: ...ELECTRICAL DIAGRAMS Page 61 Service Manual Bake Basic form 9123763 rev 03 2017 WIRING DIAGRAM BB 3 E 200V 60HZ JAPAN WITH OLD STYLE I O BOARD...

Page 62: ...L DIAGRAMS Page 62 Service Manual Bake Basic form 9123763 rev 03 2017 PKII Last update with old style I O board PKII May 08 2009 PKII May 08 2009 CIRCUIT DIAGRAM BB 3 P 200V 60HZ JAPAN WITH OLD STYLE...

Page 63: ...ELECTRICAL DIAGRAMS Page 63 Service Manual Bake Basic form 9123763 rev 03 2017 WIRING DIAGRAM BB 3 P 200V 60HZ JAPAN WITH OLD STYLE I O BOARD...

Page 64: ...A drilling template provided by Fri Jado drawing nr 3706307 A drilling machine with 4mm drill A tap M5 with tap wrench The Bake Basic Service manual form nr 9123763 Description 1 Remove the left side...

Page 65: ...Mount the door See service manual 6 Again tap the M5 screw thread in both hinges This is necessary because the hinge of the moun ted door comes a little higher than the 4 mm drilled hole The Tap will...

Page 66: ...Fri Jado B V P O Box 560 4870 AN Etten Leur The Netherlands tel 31 76 50 85 400 fax 31 76 50 85 444 info frijado com www frijado com...

Reviews: