NOTICE
Attempting to couple at the wrong height may
cause improper coupling, which could result in
damage to the fifth wheel or kingpin.
5.
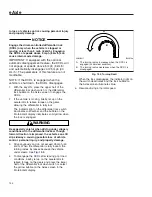
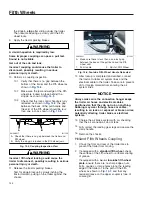
Adjust the trailer height if required.
The trailer should contact the fifth wheel at the
top of the approach ramps or approximately 4 to
6 inches (10 to 20 cm) behind the pivot point as
shown in
6.
Back the tractor slowly toward the trailer. After
picking up the trailer—
stop.
This is to prevent
hitting the kingpin too hard.
Then resume backing up slowly until the fifth
wheel locks.
WARNING
A visual inspection is required by law.
Some improper couplings can pass a pull test.
Sound is not reliable.
Get out of the cab and look.
Incorrect coupling could cause the trailer to
disconnect, possibly resulting in serious
personal injury or death.
7.
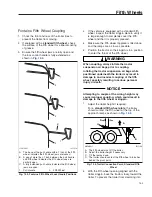
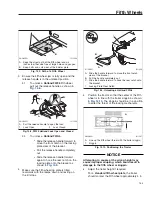
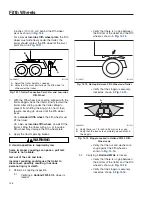
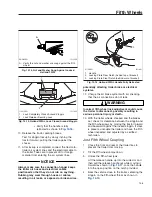
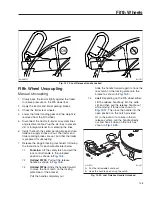
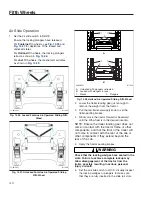
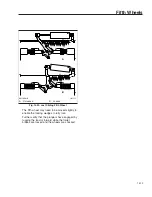
Apply the tractor parking brake, then perform a
physical check for positive kingpin lockup.
Depending on the fifth wheel model, the handle
should be fully retracted with the handle inside
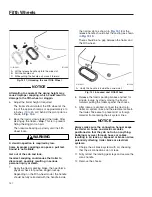
the narrow slot as shown in
or the
release handle should abut the casting as shown
in
There should be no gap between the trailer and
the fifth wheel.
8.
Release the tractor parking brakes and test for
kingpin lockup by slowly moving the tractor
forward, pulling the trailer against the chocks.
9.
After lockup is verified, connect the tractor-to-
trailer air system lines and the electrical cable to
the trailer. Take care to prevent dirt or foreign
material from entering the air system lines.
NOTICE
Always make sure the connection hanger keeps
the trailer air hoses and electrical cables
positioned so that they do not rub on anything.
Rubbing may wear through hoses or cables,
resulting in air leaks, or exposed or broken wires,
potentially affecting trailer brake or electrical
systems.
10. Charge the air brake system with air, checking
that the air connections do not leak.
11. Fully retract the landing gear legs and secure the
crank handle.
12. Remove the chocks.
f311395
11/01/2021
B
A
C
A. Lift the release handle up into the wide slot.
B. Pull the handle out.
C. While pulling the handle out, move it forward.
Fig. 14.17, Unlocking the Jost Fifth Wheel
f311396
11/01/2021
A
A. Verify the handle is inside the narrow slot.
Fig. 14.18, Locked Jost Fifth Wheel
Fifth Wheels
14.7
Summary of Contents for PX113064S T 2016
Page 4: ......
Page 10: ......
Page 18: ......
Page 58: ......
Page 86: ......
Page 112: ......
Page 122: ......
Page 142: ......
Page 154: ......
Page 155: ...12 Steering System Power Steering System 12 1...
Page 158: ......
Page 159: ...13 eAxle eAxle 2 Speed Transmission 13 1...
Page 176: ......
Page 190: ......
Page 202: ......
Page 222: ......
Page 223: ...20 Emissions Information Noise Emissions 20 1 Greenhouse Gas Emissions 20 1...
Page 229: ......
Page 236: ......

