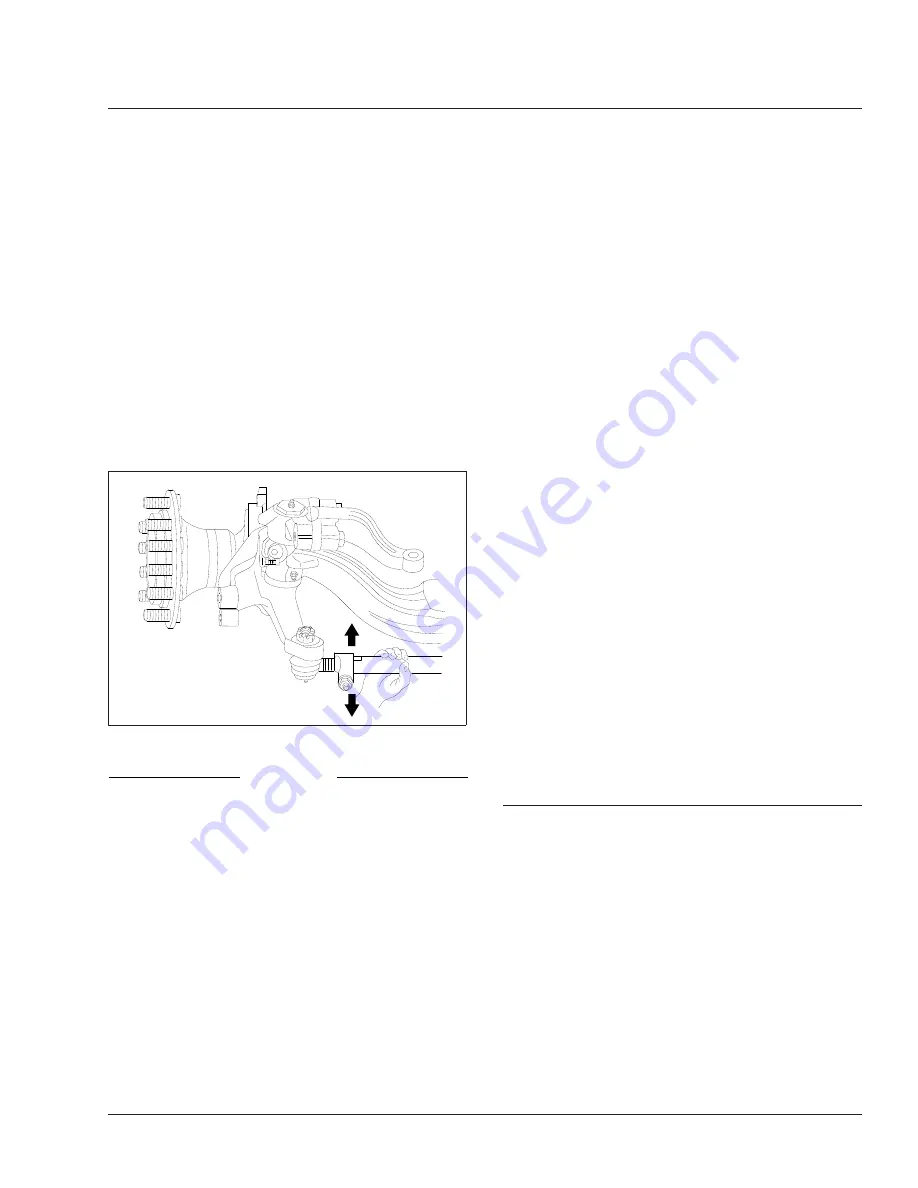
Then center the cross tube between the stop po-
sitions. If the cross tube does not rotate in either
direction, replace both tie rod ends.
5.
Position yourself directly below the ball stud
socket. Using both hands, grab the end as close
to the socket as possible, no more than 6 inches
(15.2 cm) from the end. Firmly apply about 100
pounds of hand pressure in an up and down mo-
tion several times. When moving the assembly,
check for any movement at both tie rod ends.
See
If any movement is detected at one tie rod end,
replace
both
tie rod ends. Always replace tie rod
ends in pairs, even if only one tie rod end is
damaged.
NOTICE
Do not attempt to straighten a bent cross tube.
Doing so could result in damage to the axle. Be
sure to replace the cross tube with an original
equipment cross tube with the same length, diam-
eter, and thread size as the existing cross tube.
6.
Check the cross tube for cracks or other dam-
age. If the cross tube is bent or damaged, re-
place the cross tube.
7.
Check the clamps for damage. If a clamp is
damaged, replace the clamp. Replace the entire
cross tube assembly if either clamp is welded to
the cross tube.
8.
Check for proper installation of the tie rod end
clamp to the cross tube. Make sure that the tie
rod ends are threaded in the cross tube past the
clamps and the slots at the cross tube ends.
9.
Check the zerk fittings for damage. If a zerk fit-
ting is damaged, replace it.
Some tie rod ends have no zerk fittings because
they are not greaseable. Do not install a zerk
fitting on a nongreaseable tie rod end.
10. Check that the cotter pin is in place. If it is not,
tighten the tie rod end nut to one of the following
specs depending on the axle manufacturer.
For Detroit axles, tighten the castle nut to 120 to
170 lbf·ft (163 to 230 N·m). To align the cotter
pin hole with the castle nut slot, turn the nut up
to 1/6 turn (maximum).
For Meritor axles, tighten the tie rod end nut per
the size of the stud:
•
7/8–14, 160 to 300 lbf·ft (217 to 406 N·m)
•
1–14, 250 to 450 lbf·ft (339 to 610 N·m)
•
1-1/8–12, 350 to 650 lbf·ft (475 to 881
N·m)
•
1-1/4–12, 500 to 675 lbf·ft (678 to 915
N·m)
11. Check the steering arm bolts for a minimum
torque of 300 lbf·ft (406 N·m). If the steering arm
bolt torque has fallen below this specification,
remove the bolt, clean all the threads, and apply
new Loctite® 680. Tighten the bolt 300 to 450
lbf·ft (406 to 610 N·m).
12. Remove the chocks from the tires.
33–03 Tie Rod Lubrication
Detroit and Meritor Axles
For any Detroit or Meritor axle that requires lubrica-
tion of the tie-rod ends, wipe the grease fittings
clean, then pump multipurpose chassis grease, NLGI
Grade 1 (6% 12-hydroxy lithium stearate grease) or
NLGI Grade 2 (8% 12-hydroxy lithium stearate
grease), into the tie-rod ends until all used grease is
forced out and fresh grease is seen at the ball stud
neck. See
Dana Spicer Axles
For any Dana Spicer axle that requires lubrication of
the tie-rod ends, wipe the grease fittings clean, then
10/10/2001
f330195
Fig. 6, Check Movement of Tie Rod End
Front Axle
33
108SD and 114SD Maintenance Manual, May 2017
33/3
Summary of Contents for 108SD 2021
Page 3: ......
Page 11: ......
Page 27: ......
Page 31: ......
Page 33: ......
Page 35: ......
Page 37: ......
Page 39: ......
Page 41: ......
Page 43: ......
Page 45: ......
Page 49: ......
Page 51: ......
Page 57: ......
Page 59: ......
Page 67: ......
Page 77: ......
Page 85: ......
Page 87: ......
Page 97: ......
Page 107: ......
Page 109: ......
Page 111: ......
Page 117: ......
Page 119: ......
Page 139: ......
Page 141: ......
Page 145: ......
Page 147: ......
Page 161: ......
Page 163: ......
Page 173: ......
Page 177: ......
Page 179: ......
Page 181: ......
Page 183: ......
Page 185: ......
Page 189: ......
Page 191: ......


