background image


FREEDOM DESIGNS, INC

.           

2241 Madera Rd.           Simi Valley, CA. 93065          800-331-8551          Fax 888-582-1509 


www.freedomdesigns.com 

28 

Adjustments 


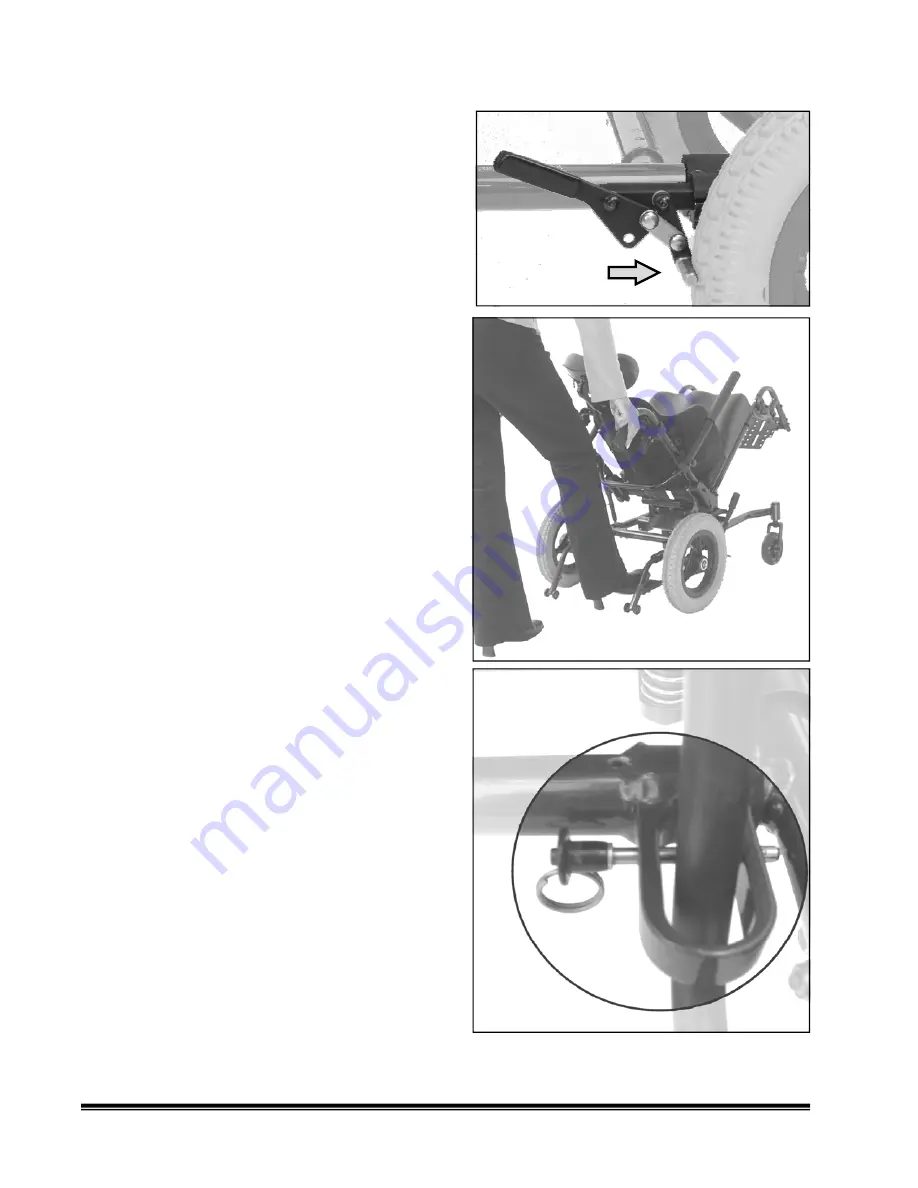
Tilting the Freedom 

CGX™ 


With the chair on a level surface: 
 
1.  Set the wheel locks. 


2.  Hold the handgrips with both hands. 
3.  Press down and hold the foot tilt lever with 
 

your right foot. 

4.  Push the back handles forward for less tilt or 
 

pull rearward for greater posterior tilt. 

5.  When the desired tilt is achieved, lift up on 

  your foot to engage the tilt lock mechanism. 


6.  Set the lockout for the foot tilt lever after the 
 

desired tilt angle has been achieved. 


Locking the Tilt Foot Lever.


A tilt lever locking pin is located on the frame (see 
picture at right). Remove this pin before adjusting 
seat tilt angle. When the desired seat angle is 
achieved, re-install the locking pin. 

The locking pin must be installed whenever 
the chair is in motion.


Changing Frame and Seat Width


The seat and frame can be widened in 1” 
increments. The frame can be widened independ-
ently to allow for additional lateral stability. 

Summary of Contents for CGX

Page 1: ...freedomdesigns com OPERATING MANUAL 06 01 08 With transport package Without transport package Supplier This manual must be given to the user caregiver of this wheelchair Rider Before using this wheel...

Page 2: ......

Page 3: ...arefully paying special attention to the Safety Precaution section It is important to read the entire Operating Manual before operating the wheelchair After consulting your Operating Manual if you fee...

Page 4: ...ings Falls Tip Overs 6 9 Center of Balance 6 Dressing or Changing Clothes 7 Wheelies 7 Obstacles 7 Reaching or Leaning 7 Moving Backward 8 Ramps Slopes Side Hills 8 Transfer 9 Curbs and Steps 9 Stairs...

Page 5: ...21 2 Wheels Tires 21 3 Footrest 22 4 Quick Release Axles 23 5 Flip Back Armrests 24 6 Casters 24 7 Wheel Locks 25 8 Wheel Lock Options 25 Freedom CGX Adjustments 26 27 1 Backposts 26 2 Backpost Seat D...

Page 6: ...n order to avoid tipping over have someone help you until you know what can cause a fall 3 Be aware that you must develop your own methods for safe use best suited to your level of function and abilit...

Page 7: ...to the rider or others Street Use In most states wheelchairs are not legal for use on public roads Be alert to the danger of motor vehicles on roads or in parking lots 1 At night or when lighting is p...

Page 8: ...ovement Do not let the chair drop the last few inches to the ground This may damage the chair or injure the rider If you fail to heed these warnings damage to your chair a fall tip over or loss of con...

Page 9: ...bstacles 3 Remove or cover threshold strips between rooms 4 Install a ramp at entry or exit doors Make sure there is not a drop off at the bottom of the ramp 5 To help correct your center of balance a...

Page 10: ...and check to be sure your path is clear If you fail to heed these warnings damage to your chair a fall tip over or loss of control may occur and cause severe injury to the rider or others Ramps Slopes...

Page 11: ...his keeps the large wheels from rolling Note This will NOT keep your chair from sliding away from you or tipping 3 Make sure to keep pneumatic tires properly inflated Low tire pressure may allow the w...

Page 12: ...o learn safe methods best suited to your abilities Transport Use 1 If possible and feasible the rider should transfer to the OEM vehicle seat and use the vehicle restraint 2 If the wheelchair is used...

Page 13: ...wheels contact the face of the curb or step Lift and roll the large wheels to the upper level If you fail to heed these warnings damage to your chair a fall tip over or loss of control may occur and...

Page 14: ...hair has been dynamically tested in a forward facing mode for a 48 km h frontal impact The wheelchair must be forward facing during transport 3 In order to reduce the potential of injury to vehicle oc...

Page 15: ...n as possible Footrests 1 At the lowest point the footrest should be AT LEAST 2 1 2 off the ground If set too LOW it may hang up on obstacles you can expect to find in normal use This may cause the ch...

Page 16: ...ol may occur and cause severe injury to the rider or others Push Handles When you have an attendant make sure that this chair has push handles 1 Push handles provide secure points for an attendant to...

Page 17: ...d Seating System Use of a seating system not approved by Freedom Designs Inc may alter the center of balance of this chair This may cause the chair to tip over 1 Do not change the seating system of yo...

Page 18: ...he Unfold Instructions in this manual 2 Solid seat back insert 3 Optional armrests will be attached to the backposts or solid seat insert Armrests may be optional dependent upon frame Solid seat back...

Page 19: ...justable footboard Individual flip up footplates Flip back or locking flip back removable adjustable height 7 13 range adjusts in 1 increments Push button double lock quick release Traditional bend 8...

Page 20: ...signs com 18 Features 1 Frame 2 Seat Frame 3 Backpost 4 Backpost Pivot Plate 5 Backpost Trigger Mechanism 6 Caster Wheel 7 Caster Fork 8 Seating 9 Footrest Assembly 10 Tilt Mechanism 11 Anti Tip Lever...

Page 21: ...ace wheels on quick release axles and push into axle receiver on frame until quick release push button pops out and wheels are secure 2 Set the wheel lock on each side 3 Unfolding the back assembly is...

Page 22: ...31 8551 Fax 888 582 1509 www freedomdesigns com 20 1 Set wheel locks 2 Flip back the armrests to the upright position 3 Pull up on the trigger mechanism for the back posts and push the backposts to th...

Page 23: ...tton at the top of the bend and pull backward The anti tip will slide free of the frame Warning Under normal use anti tip devices will prevent the wheelchair from tipping over backward Anti tip device...

Page 24: ...amps and tighten the 2 hex head screws on each side 2 To remove the footboard for transfer unscrew the knob assemblies underneath the receivers Lift the footboard upward out of the receivers 3 To atta...

Page 25: ...late to flip down 2 To adjust the height of the footplate Remove the hex head screws on the side of the hanger Seat the footplate at the desired height Insert the screws through the corre sponding hol...

Page 26: ...d until the outside quick release button pops out to its fully extended position Flip Back Arm The Freedom CGX is shipped with flip back armrest as standard equipment The flip back armrests are non re...

Page 27: ...eel locks are not designed to slow the wheelchair down when it is moving Wheel locks hold the wheelchair in place when it is at a complete stop Wheel lock Options The Freedom CGX also offers the optio...

Page 28: ...kpost Angle Adjustment The angle and depth of the backposts may be adjusted independently To adjust the back angle remove the top screw A Tilt the back to the desired angle aligning holes in the back...

Page 29: ...along the frame tubing so that the wheel lock contacts the tire in the locked position Continue to adjust until the knurled grip handle embeds into the tire approximately 1 4 when in the locked positi...

Page 30: ...ired tilt is achieved lift up on your foot to engage the tilt lock mechanism 6 Set the lockout for the foot tilt lever after the desired tilt angle has been achieved Locking the Tilt Foot Lever A tilt...

Page 31: ...e tires when rolling 4 Ensure that all fasteners are secure 5 Casters Inspect axle for proper tension Spin the caster The caster should spin freely and come to a gradual stop Storage The Freedom CGX f...

Page 32: ...horized dealer or call our customer service department Symptoms Remedies The wheelchair veers right Check that both casters contact the ground at the same time Check that the tire pressure is correct...

Page 33: ...nd wheels are secure 2 Lift up on the back assembly until it clicks into place 3 When arms are used place in the usable position Folding the Freedom CGX 1 Remove cushion from sling seat 2 Lift the bac...

Page 34: ...Designs Inc dealer and that the parts in question are returned by the Freedom Designs Inc dealer fully insured with freight pre paid to Freedom Designs Inc 2241 Madera Road Simi Valley CA 93065 withi...

Page 35: ...ed Seating Systems 15 Motor Vehicle Safety 5 10 12 Moving Backward 8 Positioning Belt 13 14 Power Drive Attachment 14 Push Handles 14 20 Quick Release Axles 4 6 14 16 19 21 23 25 29 31 32 Ramps 8 9 Re...

Page 36: ...FREEDOM DESIGNS INC 2241 Madera Road Simi Valley California 93065 USA 805 582 0077 800 331 8551 FAX 888 582 1509 Website www freedomdesigns com...

Reviews: