


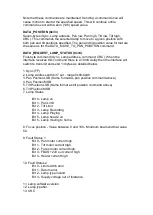


To configure the system set LAMP BUTTON No to 1. Enter 000.000.000.001
for the IP address. Set FBUS LAMP No to 0. Change LAMP BUTTON No to 2
and set IP address to 000.000.000.001. Set FBUS LAMP No to 1. Now set
LAMP BUTTON No to 3 and enter IP address 000.000.000.002. Set FBUS
LAMP No to 0.
This system will control three searchlights the first two being connected to an
FBUS interface at location A. The third lamp is controlled from a separate
FBUS interface at location B.
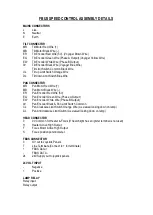
OTHER SETTINGS
LAMPS
This should be set to the total number of lamps to be controlled. Once the
settings window closes a number of lamp buttons will appear on the main
window relating to the LAMPS Setting. Note that for single lamp systems
LAMPS should be set to one.
For a single lamp there will not be any lamp buttons as there is only one
selection possible.
REFRESH RATE
This controls the rate at which data packets are sent from FBUS Control. The
value is in Milliseconds and must be set to suite the network conditions.
ENABLE FOCUS POSITION
Some lamp types provide a value relating to the lamps Focus. Setting this
checkbox displays the Focus setting in the main window.
ENABLE STATUS BUTTON
For all new systems this should be set. Its inclusion is just for compatibility
with legacy systems.
ENABLE DUAL HEAD
Some searchlights have dual heads with 2 separate lamp units. Setting this
box display buttons for control of the second head.
Once all settings are complete close the settings window using the OK button.
If settings are valid the software will restart with the new settings applied.
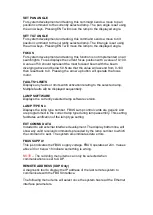
OPERATION
FBUS Control is very simple to use. The controls are detailed below; -
LAMP X Buttons (OPTION)
For systems which control just one lamp, the NUMBER OF LAMPS setting in
the SETTINGS window should have been set to one. If this is the case, there
will not be lamp buttons.
For systems with more than one lamp, the desired lamp should be selected
with the appropriate LAMP X button. The button will change colour indicating
lamp selection.
All subsequent commands will be directed to the selected lamp and all
displayed information will pertain to the selected lamp.
Summary of Contents for A7290
Page 6: ......
Page 7: ......
Page 8: ...Remove front panel for AC DC wiring connections Back To Top...
Page 9: ...INPUT 4 CORE 2 5mm TE2 50mm WELDING CABLE S50 2 CORE 1 5mm D1...
Page 10: ......
Page 15: ......
Page 22: ...FBUS Speed Control Board...
Page 50: ......
Page 51: ......
Page 52: ......
Page 53: ......
Page 54: ......
Page 55: ......
Page 56: ......
Page 57: ......


