


- 18 -
- 19 -
Installation of Exhaust Type Range Hood
36
446
54 186 54
600-650
36
446
54 186
54
230
20
156~439
600-650
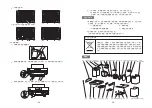
EMS6008 Installation dimension drawing
(
unit:mm
)
EMS6008-C Installation dimension drawing
(
unit:mm
)
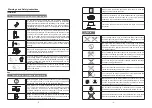
Decorative
cover hook
hook
hook
Warning :
make sure operate with protective gloves.
1. Open the packing box and remove the main body. Check the packing list
;(
see P15
)
2. Remove the fan cover and decorative hood (only for EMS6008-C): remove the 2 screws that fix the fan
cover behind the main body with a screwdriver(see Fig.6), and then grab the fan cover and decorative
hood with both hands to take them out upward(see Fig.7)
;
Fig.6 Fig.7
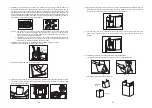
3.
Confirm the position for fixing the hook: first, draw a vertical center line at the center point where the
range hood is to be installed, then take the supporting surface of the cooking utensils on the stove as the
reference point, accurately determine the installation position of the hook on the solid wall, and make a
punch mark. The hook size of the main body is 1082mm-1132mm from the supporting surface of cooking
utensils on the stove to the bolt hole of the hook; the hook size of the decorative hood (special for
EMS6008-C) is 156mm- 439mm from the bolt hole of the main body hook to the bolt hole of the cover hook
;
1082~1132m
m
156~439m
m
Distance from the supporting
surface of cooking utensils on
the stove to the countertop
Notes: If ceramic tile, marble or glass and other decorative plates are found to protrude from the mounting
surface of the hook, please refer to Point 13 of “Installation Precautions” in P17 for operation.
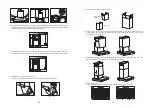
4. How to fix the hook:
;
1
)
Ceramic tile (marble) at the drilling mark: drill φ 8mm hole at the drilling mark with an electric drill, then
embed the ceramic tile expansion tube (5.3 × 32mm), fix the hook with the hook screw (ST4.2 ×
36mm), and use a spirit level to make sure the hook is level
;
2
)
Gypsum board at the drilling mark: screw the gypsum board expansion tube (4 × 40mm) directly
into the wall surface with a screwdriver at the drilling mark, then fix the hook with the hook screw
(ST4.2 × 36mm), and use a spirit level to make sure the hook is level
;
3
)
For the cover hook, two cover hook screws (ST2.9 × 19 mm) can be used to fix it to the ceiling.
Notes: The drill bit shall be selected according to the specific situation of the wall material at
the installation site.
5. Drilling the cupboard base board :First confirm the center line of the cupboard base board, then
draw the drilling line according to the drilling size of the upper cupboard base board, and finally
cut the hole in the cupboard base board along the drilling line with the wood cutting tool
;
360
28
0
The center
line
Summary of Contents for EMS6008
Page 1: ...EMS6008 EMS6008 C 吸油烟机 使用安装说明书 请在开始安装和使用前请仔细阅读此产品说明书 请保留此产品说明书 以供今后使用或后续用户使用 ...
Page 17: ......
Page 34: ...110100092508A ...


