- 16 -
- 17 -
Precautions before Installation
■
Safety Precautions
☆
Special Note: In order to ensure the safe and correct use of this product, the installation and
maintenance must be carried out by the service professionals authorized by Fotile. If the product does not
function normally due to the installation or repair by customer or any party other than Fotile’s authorized
service staff, even during the warranty period, it is not within the scope of free warranty.
Please read all the instructions carefully prior to installation. Pay special attention to the following matters:
1. If you are decorating your kitchen, please do not leave the range hood exposed: the surface of the
range hood will be corroded and lose luster due to building materials, dust, paint, coatings and the
gases they volatilize. It is suggested to install the range hood after the kitchen is decorated.
2. As this range hood is heavy and has a complex installation procedure, it must be installed according
to the instructions in the manual by installation and maintenanceprofessionals authorized by Fotile.
3. When cleaning items around the range hood (such as suspended ceiling and cupboard) that may
touch the range hood, please wear protective gloves and take other protective measures to prevent
injuries or scratches.
4. Please be careful not to damage wires and other hidden equipment when drilling holes in the wall. The
power supply cannot be switched on during installation, and the power should be turned off in the main
power box.
5. A dedicated power socket which is reliably grounded must be used for the range hood. Electric shock,
plug and socket heating and fire may easily occur when the power cable is connected in the middle, or if
extension lines or multiport wiring devices are used. Please ensure that the operation is carried out by a
professional electrician and in strict accordance with the power regulations of all applicable countries and
regions: before wiring, please turn off
the power supply and take reasonable measures to prevent
the power supply from being automatically connected.
6. If the gas stove needs to be moved before installing the range hood, please close the main gas valve first.
7. The wall on which the range hood is installed should be sufficiently strong.
8. In order to ensure safety and smooth installation, during the installation of the expansion tube, there must
be tight coordination between the expansion tube and the hole in the wall. It is strictly prohibited to drill
too much, so as to prevent the expansion tube from getting loose and accidentally falling.
9. To avoid fire hazards and keep the air fresh, the exhaust duct of the exhaust type range hood must be
connected to the outdoor to discharge the exhaust gas.
10. It is not permitted for the exhaust gas discharged from the range hood to be discharged into the hot
flue for burning gas or other fuel.
11. Try to ensure the fuselage remains horizontal during installation.
12. Confirm there are no abnormalities found in the trial operation upon installation. Please read the
manual carefully and keep it for future reference.
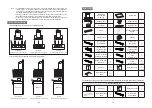
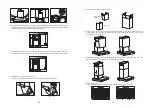
13. Where there is a step difference on the installation wall of the range hood as shown in Fig.1, if there
is a situation as shown in Fig.2, the operation shall be carried out as shown in Fig.3, i.e., the support
plates shall be added on the back of the hook and the foot-pad of the range hood. The thickness of the
support plates shall be consistent with the height of the steps.
Fig. 3
S
upport
P
lates
Fig. 1
Step
Difference
Fig. 2
415<h<500
■
Installation position
1. The range hood can only be installed in domestic kitchens, please do not use it in other situations.
2. The range hood must be installed above the stove, and the installation position is as shown in the
installation diagram.
3. The temperature of the surrounding environment of the range hood cannot exceed 40˚C.
4. The installation wall shall be noncombustible, and it is strictly forbidden to install on such flammable
walls as those made of wooden wall.
5. Please follow the installation dimensions recommended in this manual to ensure the best oil fume
suction effect.
■
Precautions before Installation
Warning: In order not to cause damage to the range hood, please make sure that no sundries enter
the exhaust outlet.
1.To estimate the position of the exhaust duct from the range hood to the outside, refer to the installation
diagram.
2.
A straight short exhaust duct will make the smoke exhaust of the range hood more effective.
3.
Try to avoid using an exhaust duct that is too long and has many bends, which will affect the smoke
exhaust effect of the range hood.
4.The connection between the exhaust duct and the wall hole shall be tightly sealed with pipe
adhesive tape. The exhaust duct must also be firmly connected to the exhaust hood
5.If the hole in the wall hole is too small, the smoke exhaust effect shall be affected. To ensure safety, it
is recommended the hole is expanded to the original size of the exhaust duct.
●
Tool preparation
The following tools are required for installation of this range hood
(1) Electric impact drill (with drill φ 8)
(2) Phillips screwdriver
(3) Wire pliers
(4) Tape measure
(5) Ribbon saw
(6) Level bar
Gypsum board
expansion
tubeφ4×40mm
2
Product
installation
manual
Product installation
manual
1
Decorative cover
screw
ST2.9×19mm
2
Foam cushion
4
Wind-guide box accessories list
Wind-guide box
1
Gypsum board
expansion tube
φ4×40mm
5
Hook screw
ST4.2×36mm
5
Product
installation
manual
Product installation
manual
1
Carbon filter list
Carbon filter
1
Summary of Contents for EMS6008
Page 1: ...EMS6008 EMS6008 C 吸油烟机 使用安装说明书 请在开始安装和使用前请仔细阅读此产品说明书 请保留此产品说明书 以供今后使用或后续用户使用 ...
Page 17: ......
Page 34: ...110100092508A ...


