background image

Operator's Manual

 3950 Series                                                                                                              FD 3950

21

Air

Ł

Open the valves (1) at both air brackets.

1

In most cases it is sufficient to open the second

and the last valve (with respect to the format

length).

closed

open

Front Paper Stop

2

3

4

5

6

7

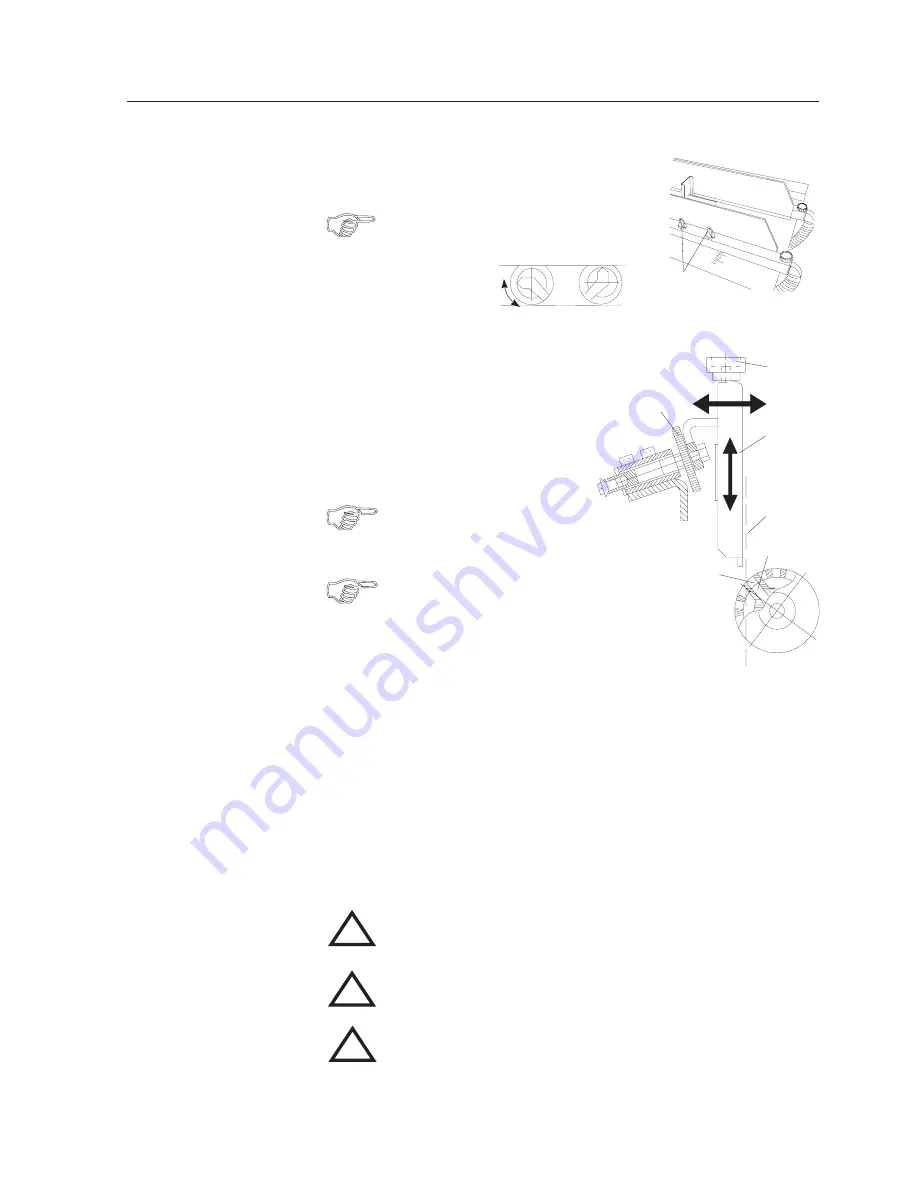
The position of the front paper stop (2) can be

adjusted in a horizontal and vertical direction.

Adjusting the horizontal position:

The horizontal position of the front paper stop

determines the suction point on the paper and

in turn depends on the position of the suction

segment in the suction drum.

The inclination of the suction segment

must be set correctly before making

the horizontal adjustment.

When the suction segment is adjusted,

the horizontal position must also be

changed accordingly.

Ł

Turn the handwheel until the openings of the suction drum (3)

are exactly above the openings of the suction segment (4).

Ł

Adjust the horizontal position of the front paper stop in such a way that it forms

a vertical line (5) with the leading edge of the suction openings.

To achieve this, turn the knurled screw (6) counter-clockwise or clockwise.

Adjusting the vertical position:

The respective paper thickness is set by adjusting the vertical position of the front

paper stop. Proceed as follows:

Ł

Place a stack of about 50 sheets on the feed table.

Ł

Start the machine.

Ł

By turning the knurled screw (7), adjust the vertical position of the paper stop

in such a way that only one sheet is pulled off the stack.

!

Exercise caution in the vicinity of rotating shafts and rollers!

Hair, loose garments and jewellery may get caught!

SERIOUS INJURY MAY RESULT!

!

Do not get close to rotating shafts and rollers while the machine is

running and the noise-absorbing cover is open!

SERIOUS INJURY MAY RESULT!

!

Exercise caution in the vicinity of the perforating- and slitting knives!

They have sharp edges for proper function!

SERIOUS INJURY MAY RESULT!

Summary of Contents for 3950 Series

Page 1: ...3950 Series Production Folders OPERATOR MANUAL First Edition 7 2007...

Page 2: ...t Kicker for Batch Counting 49 Paper Transport Control Double Sheet Detection Main Menu MONITORING 52 Paper Transport Control 52 Double Sheet Detection 53 Setting the Fold Length Main Menu SET UP 54 S...

Page 3: ...Operator s Manual 3950 Series 4...

Page 4: ...here is a choice between suction and flat pile feeders Folding Principle The infeed rollers 1 and 2 transport the sheet to be folded into the fold plate 3 As soon as it comes up against the adjustable...

Page 5: ...sumption max 10A Power consumption 1st fold unit with feeder 0 9 kW 2nd fold unit with roller table 0 9 kW Delivery 0 1 kW Pump 2 x 1 1 kW Ambient conditions Room temperature 15 40 C Air humidity 50 9...

Page 6: ...for this purpose Repairs and service should be carried out only by skilled personnel authorized by the manufacturer or his representatives The interval between inspections including safety related fun...

Page 7: ...the manual to identify instructions of particular importance General instructions and special information how to use the machine most efficiently Instructions designed to prevent injury or extensive e...

Page 8: ...conversions which might affect safety without the manufacturer s approval Adhere to prescribed intervals or those specified in the operator s manual for routine checks and inspections Selection of Pe...

Page 9: ...recommended to clean the machine once a week Before cleaning the machine always pull the power plug Exercise caution in the vicinity of the perforating and slitting knives They have sharp edges for p...

Page 10: ...he safety of the persons working with the machine The following safety features are found on these machines 1 Fixed cover at the fold roller infeed section 2 Swing up noise covers 3 Safety handwheels...

Page 11: ...rd buckle fold unit manual setting with roller table 38 separate operator s manual Mobile knife fold unit MS 45 manual setting separate operator s manual Fold unit for small formats KF 31 manual setti...

Page 12: ...2700 800 800 1900 2500 FD 3950 FD 3950 FD 3950R 8 OPERATING POSITIONS There is no fixed operator position at the machines The operator must move between the following positions 1 Feeder section for lo...

Page 13: ...each fold unit you will find the sockets for connecting the various fold units and accessories Buckle fold unit 1 1 Socket for the connection cable to the operator panel 2 Receptacle 230V for accesso...

Page 14: ...usly reloaded with the machine running There is no need to stop the machine On the register table a transport belt which runs at an angle moves the sheets against a register rail Description Component...

Page 15: ...ghten the handles 4 at the right feed guide Setting the Sheet Separation Sheet separation is achieved by the combined action of the rotating suction drum the paper stop and the air Paper weight and ty...

Page 16: ...the effect that the paper is wrapped around the suction drum 1 The sheets are easily separated from the stack and double sheets occur very rarely 1 In the batch counting mode it may happen occasionall...

Page 17: ...setting the vacuum the machine must be turned on Exercise caution in the vicinity of rotating shafts and rollers Hair loose garments and jewellery may get caught SERIOUS INJURY MAY RESULT Do not get c...

Page 18: ...the suction segment 4 Adjust the horizontal position of the front paper stop in such a way that it forms a vertical line 5 with the leading edge of the suction openings To achieve this turn the knurl...

Page 19: ...t in different sheet gaps A smaller sheet gap increases the speed of the folder independent of the cycle frequency Lever in right position Adjustment of small formats below a length of 20 cm Lever in...

Page 20: ...eam of air is blown under the separated sheet The suction drum at the front edge of the stack grips the sheet and leads it onto the register table Description Components and operating elements of the...

Page 21: ...position Button 6 Pile table down The pile table moves down but only as long as the push button is pressed Button 7 Auto mode The feeder is designed in such a way that the pile table moves down automa...

Page 22: ...k position depending on the type of paper used The gap between stack and suction drum should be 8 mm Set the gap to 8 mm by turning the setting screw 3 A scale 4 facilitates this setting Lower the fro...

Page 23: ...stall the PUR suction drum Tighten the screw 3 Replace the cover 2 1 2 3 Adjusting the Suction Segment The suction drum 4 separates the leading edge of the sheets from the stack For this purpose there...

Page 24: ...he stop rods 3 to the next set of holes 5 Tighten the separating head by turning the lock lever 2 clockwise Slide the left and right hold down rods 6 towards the outer edge of the paper stack approx 1...

Page 25: ...ipper Springs The stripper springs 4 should reach about 2 mm into the stack to prevent double sheets The position of the springs can be adjusted by means of a thumb screw 5 Turn the thumb screw counte...

Page 26: ...asily Use as little air as possible for proper function Another separator nozzle 4 is positioned between the rear separator nozzles It creates an air cushion under the separated sheet so that it attac...

Page 27: ...valve 5 and connect the air hose 6 of the individual blower in its place 1 2 3 6 4 5 Side Blowers The feeder can also be equipped with side blowers in the place of the rear edge separator see separate...

Page 28: ...he stack 4 2 2 1 3 2 Move the lateral cross bar until the side stop 4 touches the stack Adjust the air nozzles in such a way that they are approx 1 to 2 cm away from the side resp rear edge Adjust the...

Page 29: ...de A special side stop at the right hand side is part of the side blower kit This stop should be used when the paper tends to drift sideways The side stop is attached to the arm of the suction wheel a...

Page 30: ...1 to paper width using the scale and pointer Distribute the hold down bars 5 across the sheet width Place one hold down bar in front of the suction drum 6 3 4 5 6 Setting the Format Air Feeder PBA Loo...

Page 31: ...ld be removed to avoid wear of the transport belt It is recommended to use the following balls Paper grades below 60 GSM Plastic balls Paper grades from 60 150 GSM Plastic balls every 6th should be a...

Page 32: ...ription 1 Noise covers 2 Fold roller adjustment knobs 3 Handwheel 4 Main switch 5 Operator panel 6 Transfer bridge 7 Roller table 8 Alignment rail 9 Fold rollers 10 Delivery shafts MATHIA S B UERL E 1...

Page 33: ...if the paper is out of square 4 Setting knob for adjusting the lower lip of the fold plates The lower lip can be adjusted by means of a setting knob in order to increase or decrease the space for form...

Page 34: ...angle of the bridge is adjustable and can therefore be adapted to the paper quality and the type of fold Loosen the Allen screws 4 on both sides Change the angle of the bridge Tighten the Allen screw...

Page 35: ...8 prevent the sheets from jumping up during transport across the roller table Loosen the knurled screws 9 Move the outer hold down bar 7 in such a way that it is located over the outer edge of the she...

Page 36: ...he hold down rollers 5 are needed for achieving a clean fanned delivery They prevent the folded sheets from opening up on the delivery belt The hold down rollers are adjustable in two direction 6 7 Wh...

Page 37: ...n Set for paper size as follows Set the left and right guide rail 6 to paper width Move the support rails 5 accordingly Loosen the left and right clamp screws 9 and set the hold down rail 7 to the hei...

Page 38: ...ned 5 mm away from the passing paper Retighten the knurled screw 4 Position the stop 5 on the opposite side taking into account paper width and stroke of the kicker Plug the cable from the kicker into...

Page 39: ...for the operator Description Setting elements and keys with the following functions C 7 4 5 6 0 1 2 3 8 9 F1 F2 F3 F4 F5 F6 F7 F8 F9 F10 F11 F12 Computer Automated System 5 5 5 1 2 3 4 5 6 7 9 10 11 1...

Page 40: ...or which was recalled from the memory is automatically displayed A job which was not saved cannot have an identification number and is therefore not displayed The following main menus can be chosen f...

Page 41: ...amiliarize yourself with this new system the commands of the most important settings are explained step by step on the following pages The sequence of the commands is shown by numbered input lines 4 s...

Page 42: ...00000111 The figures in the display refer to a previous folding job 3 Press key F4 The total counter is cleared Clearing the Total Counter F1 F5 F2 F3 F4 TOTAL JOB NO OUTPUT REMAINDER MONITORING DOUB...

Page 43: ...livery table The following data must be entered for batch counting the desired number of sheet per batch preselection the length of the gap interval between batches Example Batches of 50 sheets 4 Ente...

Page 44: ...TCH INTERVAL TOTAL 0050 04 00000000 COUNTER AFTER ENTERING NUMBER SELECT CLEAR TOTAL 7 Press key The new interval is saved F1 F2 F3 F4 BATCH INTERVAL TOTAL 0050 04 00000000 COUNTER AFTER ENTERING NUMB...

Page 45: ...layed F1 F5 F2 F3 F4 TOTAL JOB NO OUTPUT REMAINDER MONITORING DOUBLES TRANSPORT OFF OFF 00000 0000 0000 00000000 h MONITORING SAVING COUNTER SET UP JOB 2 Press key F1 The COUNTER menu is displayed F1...

Page 46: ...LEAR TOTAL KICKER ON OFF The display INTERVAL changes to KICKER ON 4 Enter the number of sheets e g 50 The new BATCH is displayed Example Batches of 50 sheets F1 F2 F3 F4 BATCH KICKER ON TOTAL 0050 00...

Page 47: ...F1 F5 F2 F3 F4 TOTAL JOB NO OUTPUT REMAINDER MONITORING DOUBLES TRANSPORT OFF OFF 00000 0000 0000 00000000 h MONITORING SAVING COUNTER SET UP JOB KICKER ON In Menu BASIC the display KICKER ON below th...

Page 48: ...INDER MONITORING DOUBLES TRANSPORT OFF OFF 00000 0000 0000 00000000 h MONITORING SAVING COUNTER SET UP JOB 2 Press key F2 The MONITORING menu is displayed F1 F5 F2 F4 MONITORING DOUBLES OFF TRANSPORT...

Page 49: ...ch on pump and main motor Press the sheet transport key 1x 6 Press the sheet transport key 1x The paper thickness is displayed MEASURE PAPER THICKNESS DOUBLE SHEET DETECTION ON PAPER THICKNESS mm 0 10...

Page 50: ...lectors and always remain in the fold unit The fold plate stops can be set in three different ways 1 Automatic setting of pre programmed standard folds 2 Entering the fold lengths individually on the...

Page 51: ...000 0000 0000 00000000 h MONITORING SAVING COUNTER SET UP JOB Main Menu SET UP Standard Folds 1 Press key C The BASIC menu is displayed 2 Press key F3 The SET UP menu is displayed F1 F5 F2 F6 F7 F4 SE...

Page 52: ...D SET UP AFTER SELECTING FOLD 5 Press key The selected fold is confirmed F1 F5 F3 STANDARD FOLDS FOLD UNIT 1 FOLD UNIT FOLD SET UP AFTER ENTERING NUMBER FORMAT LENGTH mm 111 6 Enter the format length...

Page 53: ...F1 The second fold unit is selected F1 F5 F3 STANDARD FOLDS FOLD UNIT 2 FOLD UNIT FOLD SET UP AFTER SELECTING FOLD Since in our example a letter fold is to be made in the second fold unit the cursor m...

Page 54: ...is shown in the display 11 Enter format width 297 The new format width is displayed F1 F5 F3 STANDARD FOLDS FOLD UNIT 2 FOLD UNIT FOLD SET UP AFTER ENTERING NUMBER FORMAT WIDTH mm 297 12 Press key F1...

Page 55: ...TANDARD FOLDS FOLD UNIT FOLD UNIT FOLD SET UP SETTING FOLD STYLE FORMAT WIDTH mm 297 2 The display SETTING FOLD STYLE is flashing until the setting process is completed Then the following message appe...

Page 56: ...Standard Folds MEASURE PAPER THICKNESS DOUBLE SHEET DETECTION ON PAPER THICKNESS mm 0 10 After a few seconds the display returns to the SET UP menu F1 F5 F2 F6 F7 F4 SET UP SELECT WITH FUNCTION KEYS...

Page 57: ...is displayed F1 F5 F2 F6 F7 F4 SET UP SELECT WITH FUNCTION KEYS JOB SAVED FOLD ROLLER GAP DELI VERY SPECIAL STANDARD Special Folds This kind of set up resembles most the principle used in conventiona...

Page 58: ...in format DIN A3 297 x 420 mm is to be folded First fold unit Z fold Second fold unit Letter fold This translates into the following fold plate settings 1st fold unit Fold plate 1 140 mm Z fold Fold...

Page 59: ...mm FOLD UNIT 1 FOLD UNIT PLATE SET UP ENTER NOMINAL VALUES PLATE 1 ACT NOM 111 1 140 F1 F5 F2 F3 F4 SET UP SPECIAL FOLD mm FOLD UNIT 1 FOLD UNIT PLATE SET UP ENTER NOMINAL VALUES PLATE 2 ACT NOM 111 1...

Page 60: ...mm FOLD UNIT 1 FOLD UNIT PLATE SET UP ENTER NOMINAL VALUES PLATE 2 ACT NOM 111 1 141 F1 F5 F2 F3 F4 SET UP SPECIAL FOLD mm FOLD UNIT 1 FOLD UNIT PLATE SET UP ENTER NOMINAL VALUES PLATE 3 ACT NOM 111...

Page 61: ...ER NOMINAL VALUES PLATE 3 ACT NOM 111 1 000 12 Press key F2 Fold plate 4 is called up F1 F5 F2 F3 F4 SET UP SPECIAL FOLD mm FOLD UNIT 1 FOLD UNIT PLATE SET UP ENTER NOMINAL VALUES PLATE 4 ACT NOM 111...

Page 62: ...UP ENTER NOMINAL VALUES PLATE 4 ACT NOM 111 1 000 16 Enter fold length for the second fold unit first fold plate Example 198 F1 F5 F2 F3 F4 SET UP SPECIAL FOLD mm FOLD UNIT 2 FOLD UNIT PLATE SET UP AF...

Page 63: ...LD mm FOLD UNIT 2 FOLD UNIT PLATE SET UP ENTER NOMINAL VALUES PLATE 1 ACT NOM 111 1 198 F1 F5 F2 F3 F4 SET UP SPECIAL FOLD mm FOLD UNIT 2 FOLD UNIT PLATE SET UP ENTER NOMINAL VALUES PLATE 2 ACT NOM 11...

Page 64: ...OLD mm FOLD UNIT 2 FOLD UNIT PLATE SET UP ENTER NOMINAL VALUES PLATE 2 ACT NOM 111 1 99 F1 F5 F2 F3 F4 SET UP SPECIAL FOLD mm FOLD UNIT 2 FOLD UNIT PLATE SET UP ENTER NOMINAL VALUES PLATE 3 ACT NOM 11...

Page 65: ...mm FOLD UNIT 2 FOLD UNIT PLATE SET UP ENTER NOMINAL VALUES PLATE 3 ACT NOM 111 1 000 F1 F5 F2 F3 F4 SET UP SPECIAL FOLD mm FOLD UNIT 2 FOLD UNIT PLATE SET UP ENTER NOMINAL VALUES PLATE 4 ACT NOM 111...

Page 66: ...have been entered the next step is the command for auto matic setting of the stops 27 Press key F5 F1 F5 F2 F3 F4 SET UP SPECIAL FOLD mm FOLD UNIT 2 FOLD UNIT PLATE SET UP SETTING FOLD STYLE PLATE 4...

Page 67: ...port key 1x The paper thickness is displayed DOUBLE SHEET DETECTION ON MEASURE PAPER THICKNESS PAPER THICKNESS mm 0 10 After a few seconds the display returns to the SET UP menu F1 F5 F2 F6 F7 F4 SET...

Page 68: ...of the memory and thus find the number 1 Press key C The BASIC menu is displayed F1 F5 F2 F3 F4 TOTAL JOB NO OUTPUT REMAINDER MONITORING DOUBLES TRANSPORT ON ON 00000 0000 0000 00000000 h MONITORING...

Page 69: ...ows the number of the job which was last saved or recalled from the memory If another job is to be set up enter the number under which it is saved Example A crossfold DIN A3 297 x 420 mm was saved und...

Page 70: ...ght Fold lengths suction length as well as setting values for fanned delivery fold speed fold roller gap and sheet gap continue with key F3 This key is pressed if the new job uses the same paper size...

Page 71: ...ual corrections are taken into account All setting knobs have numbers so that the display message can be related to a specific fold roller The NOM and ACT values of the individual fold rollers can be...

Page 72: ...NTS AUTO SELECT FOLD UNIT GAP 0 10 0 10 NOM ACT When the values agree the symbol appears in the command line All rollers can be called up and set by pressing keys F1 F2 or F4 When the rollers in the f...

Page 73: ...m LENGTH WIDTH 420 297 9999 FOLD IN FOLD UNIT 1 2 JOB CONTENTS SELECT FOLD SET UP SETTING FOLD STYLE The line SETTING FOLD STYLE is flashing during set up When the set up is completed this is signalle...

Page 74: ...OTAL JOB NO OUTPUT REMAINDER MONITORING DOUBLES TRANSPORT ON ON 00000 0000 0000 00000000 h MONITORING SAVING COUNTER SET UP JOB To recall a job from memory the menu SET UP must be called up by pressin...

Page 75: ...of each individual job are displayed in the sequence in which the jobs were saved F1 F5 F2 F3 F4 JOB SAVED FORMAT mm LENGTH WIDTH 333 333 3333 FOLD IN FOLD UNIT 1 2 AFTER ENTERING NUMBER JOB CONTENTS...

Page 76: ...97 9999 FOLD IN FOLD UNIT 1 2 JOB CONTENTS SELECT FOLD SET UP 7 Press key F3 The CONTENTS menu is displayed F1 F5 F2 F3 F4 JOB SAVED DELIVERY SPEED SHEET GAP 07 08 06 9999 JOB CONTENTS SELECT FOLD SET...

Page 77: ...NOM ACT The fold rollers are be set by matching the ACTUAL and NOMINAL values see Main Menu SET UP Job Saved steps 8 10 When all rollers in the first and second fold unit are set the fold plate stops...

Page 78: ...m LENGTH WIDTH 420 297 9999 FOLD IN FOLD UNIT 1 2 JOB CONTENTS SELECT FOLD SET UP SETTING FOLD STYLE The line SETTING FOLD STYLE is flashing during set up When the set up is completed this is signalle...

Page 79: ...h If for instance very short unfolded sheets are processed it may happen that two sheets are fed during one suction cycle In this case a shorter suction length should be chosen When processing heavy s...

Page 80: ...DELI VERY SPECIAL STANDARD SUCTION LENGTH 2 Press key F3 The SET UP menu is displayed Main Menu SET UP Suction Length 3 Press key F7 The suction length is displayed FEEDER SUCTION LENGTH mm 150 AFTER...

Page 81: ...SAVED FOLD ROLLER GAP DELI VERY SPECIAL STANDARD SUCTION LENGTH If further adjustment is needed after running some sample sheets this can be done by pressing key F7 again When the job is saved the inf...

Page 82: ...length Roller gap Shingling F1 F5 F2 F3 F4 TOTAL JOB NO OUTPUT REMAINDER MONITORING DOUBLES TRANSPORT ON ON 00000 0000 0000 00000000 h MONITORING SAVING COUNTER SET UP JOB 2 Press key F4 The SAVE JOB...

Page 83: ...r must be moved to the respective fold symbol 4 Press key F3 until the respective fold symbol for the first fold unit Z fold is marked by the cursor dark rectangle F1 F5 F2 F3 F4 FOLD UNIT FOLD DATA I...

Page 84: ...mat length for job which has been set up example 420 If a format is entered that cannot be handled by the machine because it is too small or too large this is recognized by the computer and shown in t...

Page 85: ...4 FOLD UNIT FOLD DATA INPUT 1 FOLD UNIT AFTER ENTERING NUMBER 111 FORMAT WIDTH mm The format width of a previous job is shown in the display 10 Enter the format width 297 The new format width is displ...

Page 86: ...verwritten SAVE JOB NUMBER OF ALREADY SAVED JOBS 11 60 MAXIMUM JOB NO 9999 OVERWRITE If the memory space is to be overwritten proceed as follows 13 Press key SAVE JOB NUMBER OF ALREADY SAVED JOBS 11 6...

Page 87: ...F4 TOTAL JOB NO OUTPUT REMAINDER MONITORING DOUBLES TRANSPORT ON ON 00000 0000 0000 00000000 h MONITORING SAVING COUNTER SET UP JOB 2 Press key F5 Display of the actual job ACTUAL JOB FORMAT mm LENGT...

Page 88: ...ll necessary corrections of the fold lengths of a set up job can be made Key F1 will switch from the first to the second fold unit and vice versa Key F2 will display the fold lengths of all fold plate...

Page 89: ...s of information from the computer control The correct gap is calculated taking into account the selected type of fold and the paper weight and is then shown on the display This setting value must be...

Page 90: ...Operator s Manual 3950 Series Automatic Setting 94...

Page 91: ...s of information from the computer control The correct gap is calculated taking into account the selected type of fold and the paper weight and is then shown on the display This setting value must be...

Page 92: ...e ROLLER GAP menu is displayed F1 F5 F2 F3 F4 ROLLER GAP mm FOLD SET UP DONE AUTO LEARN CONFIRM 4 Press key F1 F5 F2 F3 F4 ROLLER GAP mm FORMAT LENGTH mm AUTO LEARN AFTER ENTERING NUMBER 420 5 Press k...

Page 93: ...s of information from the computer control The correct gap is calculated taking into account the selected type of fold and the paper weight and is then shown on the display This setting value must be...

Page 94: ...ay messages GAP 5 2 5 Roller 5 2 Setting knob on far side GAP1 1 1 Roller 1 1 Setting knob on operator side 8 Turn setting knob 1 operator side on the first fold unit until ACT shows the same value as...

Page 95: ...AL SETTING ROLLER GAP mm AUTO LEARN SELECT 1 Press key F8 Menu ROLLER GAP is displayed ACT 0 10 2 Correct the roller gap by means of the setting screws F1 F5 F2 F3 F4 1 FOLD UNIT GAP 1 1 NOM 0 10 MANU...

Page 96: ...OUTPUT REMAINDER MONITORING DOUBLES TRANSPORT ON ON 00000 0000 0000 00000000 h MONITORING SAVING COUNTER SET UP JOB 2 Press key F3 The SET UP menu is displayed F1 F5 F2 F6 F7 F4 SET UP SELECT WITH FUN...

Page 97: ...shows the three possible ways which all produce the same result SET UP F2 Menu BASIC Menu SET UP SPECIAL FOLD STANDARD FOLD Choose the type of fold by symbols CONTENTS CONTENTS SET UP SET UP FOLD SET...

Page 98: ...s special fold the set up was triggered by marking the fold symbols standard folds 2 Calling up the menu JOB SAVED by pressing key F6 This applies when the set up is to be made by recalling a job from...

Page 99: ...Set up Learn JOB SAVED Question Question Question Fold set up done Paper thickness learned Format length and width yes Enter job no and confirm Display of format and fold yes no no CONTENTS CONTENTS D...

Page 100: ...Y C REMOVE CAUSE CONTINUE WITH KEY C ERROR SHEET TRANSPORT IN FOLD UNIT II AT LEAST ONE SHEET WAS DELAYED REMOVE CAUSE CONTINUE WITH KEY C ERROR PHOTODETECTOR IN INFEED SECTION FOLD UNIT I IS COVERED...

Page 101: ...VERS Data F1 can only be erased by a service technician this is why a special code number is needed By pressing key F5 information about shingling speed gap etc can be shown in the display Pressing k...

Page 102: ...R OF PLATES IN 4 2 4 SELECT Confirm whether the fold unit is equipped with 2 or 4 fold plates by pressing keys F1 or F2 5 Press key F5 FOLD UNIT 2 F1 F5 F2 F3 F4 CONFIGURATION FEEDER FPF PSF EXT SELEC...

Page 103: ...ne It is possible that the value changes slightly in the course of time for example because the ambient temperature is not constant This has no influence on the function If however values above 0 30 o...

Page 104: ...folder Non compliance may cause damage to electronic components Exercise caution at the delivery end of the fold unit Do not get close to the rotating delivery shafts SERIOUS INJURY MAY RESULT The op...

Page 105: ...Operator s Manual 3950 Series Operation and Trial Folds 110 Switch off the machine in reverse order Sheet feed Main motor Pump...

Page 106: ...ing speed is changed The fold is off across the entire width of the sheets Press key and make the fine adjustment via the menu FOLD LENGTH A change in the folding speed also changes the fold length Th...

Page 107: ...the fold rollers when the two half round marks 3 face each other 1 2 3 Shadow Fold The lower lip can be adjusted by means of a setting knob 4 Basic position The wide groove is flush with the top of th...

Page 108: ...ler Roller 2 makes the 1st fold Roller 3 makes the 2nd fold Roller 4 makes the 3rd fold Roller 5 makes the 4th fold Roller 6 is the delivery shaft 20 10 0 1 1 5 0 5 1 2 The setting knobs are equipped...

Page 109: ...Operator s Manual 3950 Series Fine Adjustments and Corrections 114...

Page 110: ...scoring or slitting tools always PULL the power plug This will ensure that no other person will be able to start the machine while you are working on it Various perforating scoring and slitting tools...

Page 111: ...h The perforating knife is normally mounted on the upper delivery shaft and its counter part on the lower shaft Knives for push through perforation are always mounted on the upper shaft When perforati...

Page 112: ...s The texture of the material remains intact 1 2 3 Scoring wheels with different widths are available for scoring depending on the paper thickness Thin paper narrow scoring wheel Heavy paper wide scor...

Page 113: ...ut the delivery shaft 1 2 3 4 5 6 7 If it does not come off easily rock it slightly back and forth up to turn Loosen the delivery rollers 8 which are located in front of the position intended for the...

Page 114: ...sleeves 2 to the left and to the right over the drive pins Insert the Allen screws into the delivery shaft sleeves by means of a 5 mm key and tighten while pushing the delivery shaft sleeves outwards...

Page 115: ...oned as close as possible Do not use the rounded off edge of the lower slitting knife 7 for slitting or perforating 5 6 7 8 When the tools are not needed they can still remain on the delivery shafts J...

Page 116: ...fold plates 1 to 4 do not move SETTING FOLD STYLE remains in display 7 8 9 10 Stops and deflectors of fold plates 1 to 4 remain in base position no fold although a fold length was entered 0000 remain...

Page 117: ...connection Open electrical compartment in fold unit 1 pull out drawer set thermal overload protection to higher value Remove paper or clean photodetector Change sensibility by turning potentio meter o...

Page 118: ...fold not yet completed Round belt in register table defective The safety switch for the feed table has been activated the folder is not ready for operation Remedy Move fold plate to base position wit...

Reviews:

Related manuals for 3950 Series