background image

Forest Master Model: FM6DD/FM4DDE

22

Exploded 

Diagram 

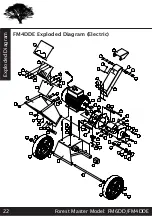
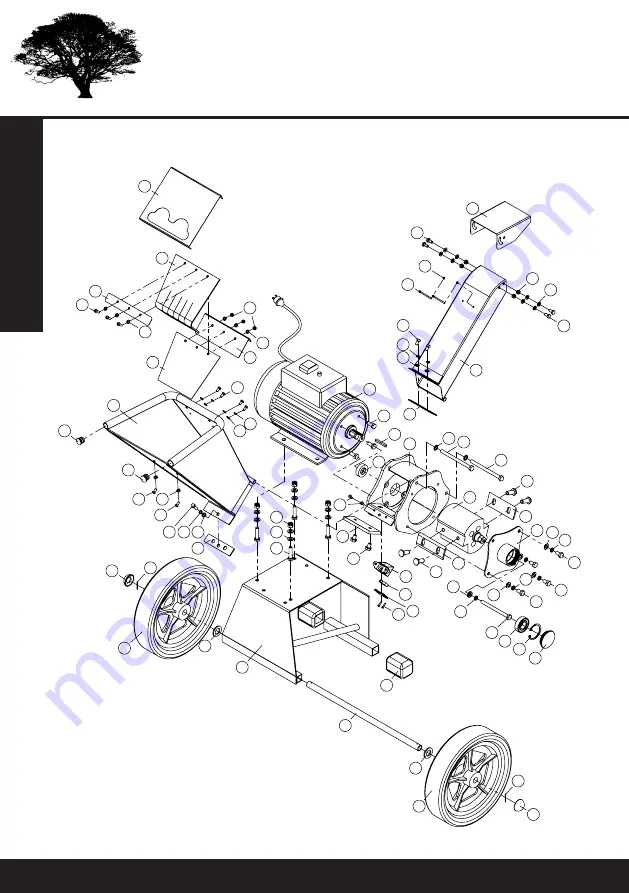
FM4DDE Exploded Diagram (Electric)

2

4

6

7

8

5

3

11

12

10

48

45

47

42

46

47

45

48

25

24

23

52

44

29

17

16

49

49

27

28

21 20

19

18

50

36

34

37

38

37

35

39

40

11

12

31

26

32

51

30

54

16

17

14

13

12

29

29

30

30

53

9

15

22

43

43

60

56

33

57

55

32

7

1

33

59 41

7

41

58
41

7

33

8

Summary of Contents for FM4DDE

Page 1: ...Model FM6DD FM4DDE IMPORTANT Read this manual fully before assembly and use and observe all safety rules and operating instruc tions Forest Master Direct Drive Wood Chipper FM6DD FM4DDE...

Page 2: ...diameter NOTE Do not insert wood over the diameter specified roots or trunks stones plastic metal or any other objects that are not specifically wood branches Do not insert seasoned wood as the chippe...

Page 3: ...Contents Contents Title Page No Specifications 4 Safety Instructions 5 Assembly 8 Operation 12 Maintenance 15 Troubleshooting 17 Warranty 19 Exploded Diagram FM6DD 20 Parts List FM6DD 21 Exploded Diag...

Page 4: ...08cc 4 Stroke Forest Master 4hp 2800W Electric Motor Fuel Input Petrol 230V Chipper Blade Twin Reversible Blades Twin Reversible Blades Overall Height 780mm 780mm Overall Length 910mm 910mm Overall Wi...

Page 5: ...rated by one person only Any other bystanders must always be at least 50 feet from the work area Do not chip wood over the specified maximum diameter 50mm 2 Do not chip seasoned wood the chippers are...

Page 6: ...state Only use Forest Master spare parts for replacements Contact us to arrange Never use the wood chipper with damaged or worn cables Never under any conditions remove bend cut fit weld or otherwise...

Page 7: ...of the waste Allow the engine to cool completely before storing in any enclosure Never store a machine that has gas in the tank or a fuel container near an open flame or spark such as a water heater s...

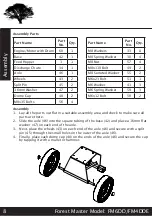
Page 8: ...5 through the small holes on the outer of the axle 46 4 Finally place each dome cap 48 on the ends of the axle 46 and secure the cap by tapping it with a mallet or hammer Part Name Part No Qty Engine...

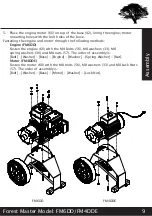
Page 9: ...and motor through the following methods Engine FM6DD Fasten the engine 60 with the M8 bolts 56 M8 washers 33 M8 spring washers 30 and M8 nuts 57 The order of assembly is Bolt Washer Base Engine Washe...

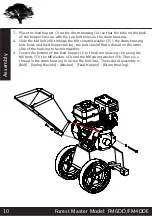
Page 10: ...ted washer 55 the drum housing bolt holes and feed hopper tubing the bolt should find a thread on the other side of the housing to fasten together 9 Fasten the bottom of the feed hopper 1 to the drum...

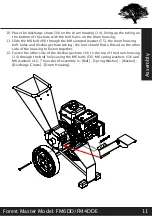
Page 11: ...ugh the M8 serrated washer 55 the drum housing bolt holes and discharge chute tubing the bolt should find a thread on the other side of the housing to fasten together 12 Fasten the other side of the d...

Page 12: ...pulls usually starts the engine Move the choke lever if used for warm engine slowly back to the RUN position when the engine is running well If the wood chipper has not been running cold engine warm...

Page 13: ...injury Do not reach or step across the exit chute whilst the wood chipper is running This is very unsafe and could result in serious injury The chipper works best with the discharge chute pointing upw...

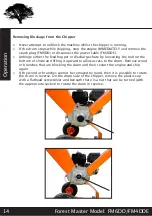
Page 14: ...discharge chute by loosening the bolt on the bottom of chute and lifting it upward to allow access to the drum Remove wood or branches that are blocking the drum and then restart the engine and chip a...

Page 15: ...E Regular Maintenance Checklist Procedure Before Each Use Every 25 Hours Every 100 Hours Check Engine Oil Level X Check General Equipment Condition X Check Blades for Sharpness and Wear X Clean Engine...

Page 16: ...inge to access the drum Loosen the bolts holding the blade to the drum and remove the blade There are two blade positions on the drum and both blades will need to be maintained equally Note The blades...

Page 17: ...t out hold a rag over the plug hole and pull the recoil cord several times to blow out any oil in the cylinder then wipe off the plug and reinsert it Is there sufficient oil Check the engine oil level...

Page 18: ...level and adjust if needed Engine smokes Petrol Check the oil level and adjust as needed Check the air filter and clean or replace if needed You may be using the wrong oil too light for the temperatur...

Page 19: ...MPORTANT NO RESPONSIBILITY IS ACCEPTED FOR INCORRECT USE OF THIS PRODUCT MODIFICATION OF THIS PRODUCT UNLESS SAID MODIFICATION HAS BEEN AUTHORISED BY FOREST MASTER WILL VOID THE WARRANTY The Warranty...

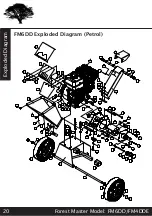
Page 20: ...ol 2 4 6 7 8 5 3 11 12 10 48 45 47 46 47 45 48 25 24 23 52 44 29 17 16 49 49 27 28 56 33 42 21 19 18 50 36 34 37 38 37 35 39 40 11 12 31 26 32 51 57 30 55 16 17 14 12 29 29 30 30 53 54 9 15 22 43 43 6...

Page 21: ...1 17 Drum Blade Bolt M10x25 4 19 Hopper Opening Micro Switch 1 22 Drum Housing Outer Plate 1 23 Drum Bearing 20 42 12 1 24 Bearing Circlip 1 25 Drum Housing Outer Plate End Cap 1 26 Bottom Blade 1 27...

Page 22: ...ploded Diagram Electric 2 4 6 7 8 5 3 11 12 10 48 45 47 42 46 47 45 48 25 24 23 52 44 29 17 16 49 49 27 28 21 20 19 18 50 36 34 37 38 37 35 39 40 11 12 31 26 32 51 30 54 16 17 14 13 12 29 29 30 30 53...

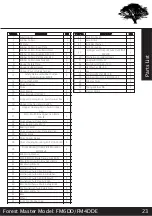
Page 23: ...m Blade Bolt M10x25 4 19 Hopper Opening Micro Switch 1 22 Drum Housing Outer Plate 1 23 Drum Bearing 20 42 12 1 24 Bearing Circlip 1 25 Drum Housing Outer Plate End Cap 1 26 Bottom Blade 1 27 Drum Spa...

Reviews: