background image

-67-

Climate control

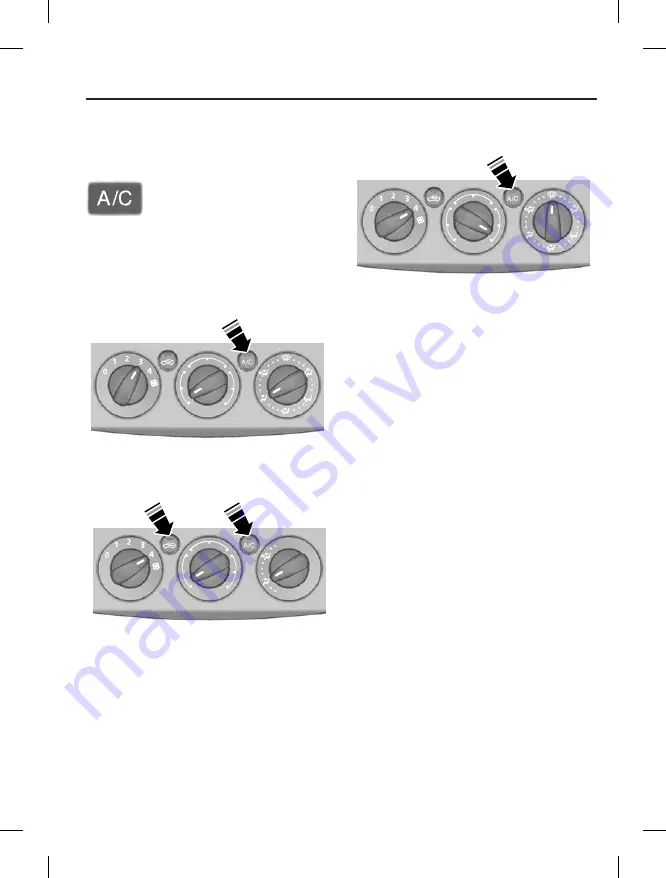
Air conditioning

Switching the air conditioning on 

and off

If you turn the blower off, the air 
conditioning will turn off. When you turn 
the blower on again, the air conditioning 
will come on automatically.

Cooling with outside air

Cooling the interior quickly

E71382

Defrosting and demisting the 

windscreen

When the temperature is above 
4°C, the air conditioning will switch 
on automatically. Make sure that the 
blower is on. The indicator in the switch 
will illuminate during defrosting and  
demisting.

If you move the air distribution control 
to a position other than 

A

, the 

A/C

 will 

remain on.

You can switch the air conditioning and 
recirculated air on and off while the air 
distribution control is set to position 

A

.

If necessary, switch the heated windows 
on. See 

Heated windows and 

mirrors

 (page 68).

Note:

 To defrost or demist the rear side 

windows, set the second row air vents 
to the defrosting and demisting position. 
See 

Air vents

 (page 65).

E71380

Summary of Contents for FOCUS LV

Page 1: ...ded keys 30 Arming the engine immobiliser 30 Disarming the engine immobiliser 30 Alarm Arming the alarm 31 Disarming the alarm 31 Steering wheel Adjusting the steering wheel 32 Audio control 32 Wipers...

Page 2: ...Diesel 78 Catalytic converter 79 Fuel filler flap 79 Refuelling 80 Transmission Manual transmission 81 Automatic transmission 81 Brakes Principle of operation 84 Hints on driving with ABS 84 Parking...

Page 3: ...er cables 111 Battery connection points 112 Wheels and tyres General information 113 Changing a road wheel 113 Tyre care 118 Using snow chains 119 Technical specifications 120 Vehicle identification V...

Page 4: ...ehicle When you see these symbols read and follow the relevant instructions in this handbook before touching or attempting adjustment of any kind PARTS AND ACCESSORIES Now you can be sure that your Fo...

Page 5: ...adiator grille Radiator grille Front and rear bumper Exterior mirror Introduction Look for the Ford logo on the following parts Sheetmetal Bonnet Wings Doors Luggage compartment lid or tailgate E89927...

Page 6: ...educed with the aid of modern technology For example in addition to front and rear crash absorbing zones your vehicle also has lateral impact protection areas in the side doors The safety restraint sy...

Page 7: ...ns of the equipment manufacturers Fuel cut off switch where fitted In the event of an accident the safety switch will automatically cut off fuel supply to the engine The switch can also be activated t...

Page 8: ...page 65 B Audio unit See Audio page 124 C Hazard warning flasher switch See Lighting page 37 D Air vents See Climate control page 65 E Multi function lever See Information displays page 56 See Lighti...

Page 9: ...page 27 Quick start G Instrument cluster See Instruments page 50 H Wiper lever See Wipers and washers page 34 I Lighting control See Lighting page 37 J Instrument lighting dimmer See Convenience featu...

Page 10: ...g wheel page 32 Engine idle speed after starting The engine may idle at a higher speed than normal immediately after starting from cold See Starting the engine page 75 Direction indicators Note Tap th...

Page 11: ...When the engine is started the brake pedal and the selector lever button must be depressed before the selector lever can be moved from the park position P See Transmission page 81 Fuel filler flap WAR...

Page 12: ...ng loaded inhibitor will open if the correct size nozzle is detected This will prevent filling up with the wrong fuel Insert the filler up to the first notch on the nozzle and keep it in position on t...

Page 13: ...e that has been closed up in sunny weather they could burn a small child Check seat covers and buckles before you place a child anywhere near them Selecting a child restraint system To provide protect...

Page 14: ...of child restraint systems vehicle seats and seat belts all child restraint systems may not fit all seating positions Before purchasing a child restraint system it is recommended that the child restra...

Page 15: ...d restraint system can be thrown around the vehicle in a collision or sudden stop and injure someone The rear seats are the safest place for children The side curtain air bags will not interfere with...

Page 16: ...only suitable for child restraints conforming to Australian Standards AS1754 1991 or later If your child restraint does not have an approved latched hook attaching clip as shown you should consult an...

Page 17: ...e used until the child is tall enough for the lap sash seat belt to fit properly If the seat belt touches or crosses the child s neck then the child needs a booster seat WARNING Never wear a seat belt...

Page 18: ...18 Child safety CHILD SAFETY LOCKS WARNING You cannot open the doors from inside if you have put the child safety locks on A Lock B Unlock E73697 A B...

Page 19: ...bang will be heard when an airbag deploys and it is normal to see a cloud of harmless powdery residue The airbag system comprises the following Single stage inflatable nylon bags airbags with gas gen...

Page 20: ...use any accessory seat covers that are not specifically designed for seats with side airbags These seat covers must be fitted by properly trained technicians WARNING Always wear the seat belt and keep...

Page 21: ...rly trained technicians E72326 E78294 Always keep the areas in front of the airbags free Never affix anything to or over these areas These areas should only be wiped with a damp cloth never with a wet...

Page 22: ...t tightly around the body Seat belt pretensioner WARNING The belt pretensioners must not be removed If the pretensioners are deployed during an accident they must be replaced Have the pretensioners se...

Page 23: ...teadily It may lock if you pull it sharply or if the vehicle is on a slope Press the red button on the buckle to release the belt Let it retract completely and smoothly E74124 E85817 SEAT BELT HEIGHT...

Page 24: ...le is moving The audible warning will go off after five minutes but the seat belt reminder warning lamp will remain on until you fasten your seat belts USING SEAT BELTS DURING PREGNANCY The Australian...

Page 25: ...y the driver s door and the luggage compartment lid are unlocked Pressing the unlock button again unlocks all the doors GENERAL INFORMATION ON RADIO FREQUENCIES WARNING The radio frequency used by you...

Page 26: ...folding key blade Insert a screwdriver as far as 1 possible into the slot on the side of the remote control push it towards the key blade and remove the key blade E107998 Twist the screwdriver in the...

Page 27: ...ection indicators will flash once When you lock the doors the direction indicators will flash twice Note If your vehicle has double locking the direction indicators will only flash twice once you have...

Page 28: ...onds Closing the luggage compartment lid A recessed grip is incorporated inside the luggage compartment lid to facilitate closing Automatic relocking The doors will relock automatically if you do not...

Page 29: ...ndows page 47 Global opening To open all the windows press and hold the unlock button for at least three seconds Press either the lock or the unlock button again to stop the opening function Global cl...

Page 30: ...s You can also obtain additional keys from your Ford Dealer ARMING THE ENGINE IMMOBILISER The engine immobiliser is armed automatically a short time after you have switched the ignition off The indica...

Page 31: ...gine without a valid key or to remove the audio system sounds the alarm again Automatic arming delay The 20 seconds arming delay begins when the bonnet luggage compartment and all doors are closed DIS...

Page 32: ...ion page 69 WARNING Make sure that you fully engage the locking lever when returning it to its original position 1 2 2 E95178 3 E95179 Audio Control Select Radio CD or AUX mode on the audio unit The f...

Page 33: ...select the next or previous track E78047 E78048 Mode Briefly press the button on the side In radio mode this will locate the next pre set radio station In CD mode this will select the next CD if a CD...

Page 34: ...013 C A B WINDSCREEN WASHERS WARNING Do not operate the washer for more than 10 seconds at a time and never when the reservoir is empty While the button at the end of the lever is pressed the washer w...

Page 35: ...nds at a time and never when the reservoir is empty While the lever is pulled towards the steering wheel the washer will work in conjunction with the wipers Once the wash wipe cycle is completed the w...

Page 36: ...blade at a right angle to the wiper arm Remove the blade from the arm and replace it Rear window wiper blades Lift the wiper arm and position the wiper blade at a right angle to the wiper arm To remo...

Page 37: ...Pull the lever slightly towards the steering wheel Home safe lighting Switch the ignition off and pull the direction indicator lever towards the steering wheel to switch the headlamps on You will hea...

Page 38: ...and visibility is more than 50 metres Lighting E71096 E71097 HAZARD WARNING FLASHERS Note Depending on applicable laws and regulations in the country for which your vehicle was originally built the h...

Page 39: ...on when you switch off the ignition It will go off automatically after a short time or when you start or restart the engine If you set the switch to position C with the ignition switch off the courtes...

Page 40: ...ill need to remove the headlamp to change the headlamp side lamp or front direction indicator bulbs See Removing a headlamp page 39 Note You will need to remove the rear lamp to change the brake lamp...

Page 41: ...on indicators Remove the headlamp See 1 Removing a headlamp page 39 Turn the bulb holder anti clockwise 2 and remove it E97755 2 3 4 2 3 E97794 Gently press the bulb into the bulb 3 holder turn it ant...

Page 42: ...peaters Lighting 1 2 E98658 Tip the mirror as far down as 1 possible Using a suitable implement release the retaining clip Remove the cover 2 Using a suitable implement release 3 the retaining clip Re...

Page 43: ...r lamp See 1 Removing a rear lamp page 39 Turn the bulb holder anti clockwise 2 and remove it Remove the bulb 3 2 2 A B E78871 4 door A Brake lamp B Reversing lamp C Direction indicator lamp D Fog and...

Page 44: ...er anti clockwise 2 and remove it Remove the bulb 3 Central brake lamp 5 door Remove the screws 1 Remove the lamp 2 1 2 E78879 3 4 E79601 Unclip the bulb holder 3 Remove the bulb 4 4 door Remove the c...

Page 45: ...mp 1 Turn the bulb holder anti clockwise 2 and remove it Remove the bulb 3 Lighting 4 E78881 1 3 2 E79605 1 2 3 E79606 Number plate lamp Remove the screws 1 Remove the lens 2 Remove the bulb 3 Front i...

Page 46: ...indicator PY21W 21 Brake and tail lamp 5 door PR21 5W 21 5 Brake and tail lamp 4 door P21W 21 Fog and tail lamp 4 door P21 5W 21 5 Rear fog and reversing lamp 5 door P21W 21 Reversing lamp 4 door P21...

Page 47: ...itches on the door trim panel of the driver s door Opening and closing the windows automatically Press or lift the switch to the second action point and release it completely Press or lift it again to...

Page 48: ...p function is deactivated until you have reset the memory After the battery has been disconnected from the vehicle you must reset the memory separately for each window Lift and hold the switch until t...

Page 49: ...rror B Off C Right hand mirror Mirror tilting positions The electric exterior mirrors are fitted with a heating element that will defrost or demist the mirror glass See Heated windows and mirrors page...

Page 50: ...50 Instruments GAUGES A Tachometer B Engine coolant temperature gauge C Fuel gauge D Speedometer E Information display See Information displays page 56 E98738 A B C E D...

Page 51: ...he fuel filler cap is located WARNING LAMPS AND INDICATORS The following warning lamps and indicators will come on briefly when you switch the ignition on to confirm that the system is operational ABS...

Page 52: ...ate of flashing warns of a failed indicator bulb See Changing a bulb page 40 Doors open warning lamp It will illuminate when you switch the ignition on if you have not closed the doors the bonnet or l...

Page 53: ...e headlamp flasher Message indicator It will illuminate when a new message is stored in the information display See Information messages page 56 Oil pressure warning lamp CAUTION Do not resume your jo...

Page 54: ...t indicator It will illuminate to inform you that shifting to a higher gear may give better fuel economy and lower CO2 emissions It will not illuminate during periods of high acceleration braking or w...

Page 55: ...eat belt to avoid the seat belt reminder function The restraint system can only work properly if passengers have buckled up their seat belts Note Placing objects on the front passenger s seat when it...

Page 56: ...Controls To scroll through the trip computer displays To scroll through and highlight the options within a menu Note To scroll automatically hold the rotary control in the upward or downward position...

Page 57: ...All Set Clock 24 Hour Mode Help Screen Display Configure Reset Trip Messages ESP Clock Setup English Language German Italian French Spanish Turkish Russian Dutch Polish Swedish Portuguese Measure Uni...

Page 58: ...onsumption Indicates the average fuel consumption since the function was last reset Average speed Indicates the average speed calculated since the function was last reset Outside air temperature Shows...

Page 59: ...the rotary control to enter the 1 main menu Highlight 2 Clock and press the SET RESET button Highlight 3 Set Clock and press the SET RESET button The hours start to flash Use the rotary control to ad...

Page 60: ...this display will affect the following displays Distance to empty Average fuel consumption Instantaneous fuel consumption Average speed Outside air temperature Use the rotary control to enter the 1 ma...

Page 61: ...n rectified Message symbols See Owner s handbook Have the system checked at the next service Have the system checked as soon as possible Stop your vehicle as soon as it is safe to do so Viewing curren...

Page 62: ...red Locks Luggage comp open red Locks Bonnet open red Locks Door ajar close door amber Locks Close all the doors to start the car Lighting Message Warning lamp System Brake light fault red Brake lamp...

Page 63: ...tronic acceleration control EAC The vehicle can be driven but the acceleration rate will be noticeably reduced Maximum vehicle speed will be maintained Have the system checked by a Ford Dealer as soon...

Page 64: ...t In these extreme conditions the transmission will disengage drive in order to prevent damage You will not be able to drive until the transmission has cooled Transmission malfunction amber Automatic...

Page 65: ...conditioning Note The air conditioning operates only when the temperature is above 4 C Note If you use the air conditioning the fuel consumption of your vehicle will be higher Air is directed through...

Page 66: ...set the air distribution control to any position between the symbols A E75470 Blower A Off Note If you switch the blower off the windscreen may mist up Recirculated air Press the button to toggle bet...

Page 67: ...will switch on automatically Make sure that the blower is on The indicator in the switch will illuminate during defrosting and demisting If you move the air distribution control to a position other th...

Page 68: ...or demist the rear window Note The heated windows operate only when the engine is running Heated rear window Heated exterior mirrors Electrically operated door mirrors also have a heating element to c...

Page 69: ...far forwards as possible remaining comfortable Keep sufficient distance between yourself and the steering wheel We recommend a minimum of 250 millimetres between your breastbone and the airbag cover...

Page 70: ...re that it is fully engaged in its catch Adjusting the lumbar support Adjusting the height of the driver s seat Each pull or press on the lever will raise or lower the height by a small amount Adjusti...

Page 71: ...the head restraint REAR SEATS WARNINGS When folding the seatbacks down take care not to get your fingers caught between the seatback and seat frame Make sure that the seats and the seatbacks are secu...

Page 72: ...rs between the seat 2 cushion and seatback and fold the seat cushion forwards Push down the rear head 3 restraint s and fold the seatback s forwards Note When the red marking in the unlocking button i...

Page 73: ...et to power 12 volt appliances that have a maximum current rating of 10 Amperes Use only Ford accessory connectors or connectors specified for use with SAE standard sockets Auxiliary power sockets are...

Page 74: ...AUXILIARY INPUT AUX IN SOCKET The AUX IN socket is located in the glove box or some vehicles in the centre console storage compartment See Audio page 124 USB PORT where fitted See Audio page 124 Conve...

Page 75: ...abled Note Do not leave the ignition key in this position for too long to avoid discharging the battery II The ignition is switched on All electrical circuits are operational Warning lamps and indicat...

Page 76: ...recommend that you have an engine block heater fitted Note Continue cranking the engine until it starts Note You can only operate the starter for a maximum of 30 seconds at a time Vehicles with manua...

Page 77: ...ion Select park or neutral 1 Fully depress the brake pedal 2 Start the engine 3 SWITCHING OFF THE ENGINE Vehicles with a turbocharger CAUTION Do not switch the engine off when it is running at high sp...

Page 78: ...lling after the fuel nozzle stops the second time Additional fuel will fill the expansion space in the fuel tank which could lead to fuel overflowing Fuel spillage could be hazardous to other road use...

Page 79: ...not crank the engine for long periods Do not run the engine when a spark plug lead is disconnected Do not push start or tow start your vehicle Use booster cables See Using booster cables page 111 Do n...

Page 80: ...an ungrounded fuel container To avoid static build up Place the approved fuel container on the ground Do not fill the container whilst in the vehicle or utility tray Keep the nozzle in contact with t...

Page 81: ...ATIC TRANSMISSION WARNING It is not possible to tow start or push start a vehicle fitted with an automatic transmission See Using booster cables page 111 Selector lever positions P Park R Reverse N Ne...

Page 82: ...s with a 4F27E transmission WARNING Do not hold the selector lever permanently in or CAUTION The transmission will automatically downshift when the engine speed is too low and upshift when too high No...

Page 83: ...ccelerator pedal fully with the selector lever in the drive position to select the next lowest gear for optimum performance Release the accelerator pedal when you no longer require kickdown Emergency...

Page 84: ...ent when You drive too close to the vehicle in front of you The vehicle is aquaplaning You take corners too fast The road surface is poor PARKING BRAKE All vehicles WARNING Vehicles with an automatic...

Page 85: ...edal It will provide maximum braking efficiency as long as you press the pedal Emergency brake assist can reduce stopping distances in critical situations USING STABILITY CONTROL Note The system will...

Page 86: ...u to set a speed E75456 Setting a speed Press to store and maintain your current speed The cruise control indicator will illuminate See Warning lamps and indicators page 51 Changing the set speed WARN...

Page 87: ...ator will not illuminate but the system will retain the speed that you previously set E95393 A B E75453 Resuming the set speed The cruise control indicator will illuminate and the system will attempt...

Page 88: ...and rear axle loads for your vehicle See Vehicle identification page 121 Heavy loads when placed in the passenger compartment should be on folded rear seats as shown See Rear seats page 71 CAUTIONS Do...

Page 89: ...roof rack CAUTION Do not exceed the maximum permissible roof load of 75 kilograms including the roof rack Check the security of the roof rack and tighten its fittings as follows Before starting After...

Page 90: ...iler size and specification The maximum permissible towed weight is dictated by vehicle particularly transmission type and must not exceed the maximum towbar design There are also legal limits which d...

Page 91: ...l 90kg on manual petrol and 100kg on diesel The load imposed on the rear tyres of the towing vehicle must not exceed the maximum rear axle load of 975Kg Trailer type Powertrain Petrol Automatic Petrol...

Page 92: ...action Aftermarket load levelling kits or weight distribution hitches are not suitable for use on the Ford approved Towbar Braking Allow a greater stopping distance than normal to prevent excessive br...

Page 93: ...ine DRIVING THROUGH WATER CAUTIONS Drive through water in an emergency only and not as part of normal driving Engine damage can occur if water enters the air filter In an emergency the vehicle can be...

Page 94: ...94 Emergency equipment FIRST AID KIT 4 door and 5 door Space is provided in the luggage compartment WARNING TRIANGLE 4 door and 5 door Space is provided in the luggage compartment E78856 E78859...

Page 95: ...see or smell leaking fuel Turn the ignition switch to position 0 Check fuel system for leaks If no fuel leak is apparent reset the switch by pushing in the button see illustration Status after a colli...

Page 96: ...l system of your vehicle in any way Have repairs to the electrical system and the replacement of relays and high current fuses carried out by properly trained technicians Switch the ignition and all e...

Page 97: ...Passenger junction box supply 2 5 Not used 6 60 Glow plug diesel only 7 30 ABS stability control pump 8 20 ABS stability control valves 9 20 Powertrain control module 10 30 Climate control blower 11 2...

Page 98: ...5 Automatic transmission 27 10 Air conditioning clutch 28 10 Glow plug monitoring diesel only 29 Not used 30 3 Powertrain control module automatic transmission 31 10 Battery sensor smart charging 32 1...

Page 99: ...trument cluster battery supply on board diagnostics 108 7 5 Accessory to cluster audio and navigation unit 109 20 Cigar lighter rear auxiliary power socket 110 Not used 111 15 Fuel pump petrol engine...

Page 100: ...lamps right hand side 126 Not used 127 25 Electric windows 128 Not used 129 20 Windscreen wipers 130 Not used 131 15 Rear window wiper 132 15 Brake lamps 133 25 Central locking relays passenger door m...

Page 101: ...ke servo and the power steering pump do not operate unless the engine is running Press the brake pedal harder and allow for increased stopping distances and heavier steering CAUTIONS Too much tension...

Page 102: ...ssion do not tow your vehicle faster than 30 km h If the stated speed or distance is to be exceeded the drive wheels must be lifted clear of the ground In the event of a mechanical failure of the tran...

Page 103: ...tion system parts after you have switched the ignition on or when the engine is running The system operates at high voltage Keep your hands and clothing clear of the engine cooling fan Under certain c...

Page 104: ...t and allow it to drop from under its own weight for the last 20 30 centimetres Maintenance OPENING AND CLOSING THE BONNET Opening the bonnet WARNING To prevent damage to or loss of the key remove the...

Page 105: ...ke and clutch fluid reservoir See Brake and clutch fluid check page 108 D Engine oil filler cap See Engine oil check page 107 E Battery See Vehicle battery page 111 F Engine compartment fuse box See F...

Page 106: ...C Brake and clutch fluid reservoir See Brake and clutch fluid check page 108 D Engine oil filler cap See Engine oil check page 107 E Battery See Vehicle battery page 111 F Engine compartment fuse box...

Page 107: ...when the engine is cold If the engine is hot wait 10 minutes for the engine to cool down Do not remove the filler cap when the engine is running Remove the filler cap CAUTION Do not top up further th...

Page 108: ...p slowly Any pressure will escape slowly as you unscrew the cap CAUTIONS Do not spill coolant on any part of the engine Do not top up further than the MAX mark Top up with fluid that meets the Ford sp...

Page 109: ...e of the rear window or use abrasives or chemical solvents to clean it Use a clean lint free cloth or a damp chamois leather to clean the inside of the rear window Cleaning the chrome trim CAUTION Do...

Page 110: ...CAUTION Remove apparently harmless looking substances from the paintwork immediately e g bird droppings tree resins insect remains tar spots road salt and industrial fall out You should repair paintwo...

Page 111: ...equipment Connect the positive terminal 3 of vehicle B with the positive terminal of vehicle A cable C Connect the negative terminal of 4 vehicle B to the ground connection of vehicle A cable D See Ba...

Page 112: ...112 Vehicle battery BATTERY CONNECTION POINTS CAUTION Do not connect to the negative terminal of the flat battery E114494...

Page 113: ...ers from the other fitted wheels these rules must be followed Do not exceed 80 km h Drive the shortest possible distances Do not fit more than one spare wheel on your vehicle at any one time Do not us...

Page 114: ...g capacity of 1 5 tonnes and a lifting plate with a minimum diameter of 80 millimetres A Jack B Wheel brace C Space for locking wheel nut key Your vehicle jack and wheel brace are located in the spare...

Page 115: ...ing and lifting points CAUTION Use only the specified jacking points If you use other positions you may damage the body steering suspension engine braking system or the fuel lines A Emergency use only...

Page 116: ...ad Switch off the ignition and apply the parking brake If your vehicle has a manual transmission select first or reverse gear If it has an automatic transmission select park Have the passengers leave...

Page 117: ...e tyre is 4 clear of the ground Remove the wheel nuts and the 5 wheel E71948 Installing a road wheel WARNINGS Use only approved wheel and tyre sizes Using other sizes could damage the vehicle and will...

Page 118: ...uction to the road wheels have this replaced as soon as possible TYRE CARE To make sure the front and rear tyres of your vehicle wear evenly and last longer we recommend that you swap the tyres from f...

Page 119: ...ehicle is fitted with wheel trims remove them before fitting snow chains Note The ABS will continue to operate normally Only use small link snow chains Only use snow chains on the front wheels Vehicle...

Page 120: ...driver s door opening at the B pillar Tyre size Normal load Full load Front Rear Front Rear bar psi bar psi bar psi bar psi 195 65 R 15 2 1 30 2 3 33 2 4 35 2 8 41 205 50 R 17 2 3 33 2 3 33 2 5 36 2 8...

Page 121: ...eight The vehicle identification number and maximum weights are shown on a plate located on the lock side of the passenger door aperture at the bottom E85610 C B E D A VEHICLE IDENTIFICATION NUMBER VI...

Page 122: ...Dimension description Dimension in mm A Wheelbase 2640 B Maximum length 4337 4351 C Overall height EC kerb weight 1458 1497 D Front track 1535 1545 D Rear track 1531 1541 E Overall width including ext...

Page 123: ...s 4 door Item Dimension description Dimension in mm A Wheelbase 2640 B Maximum length 4481 C Overall height EC kerb weight 1458 1497 D Front track 1535 1545 D Rear track 1531 1541 E Overall width incl...

Page 124: ...s and consequently playback cannot be guaranteed in Ford and Sony CD audio units and jamming could occur Irregular shaped CDs and CDs with a scratch protection film or self adhesive labels attached sh...

Page 125: ...125 Audio Audio Units Type 1 Type 2 1 2 3 4 5 6 7 8 9 10 11 12 13 14 15 16 17 18 19 20 21 22 23 1 2 3 4 5 6 7 8 9 10 11 12 13 14 15 16 17 18 19 20 21 22 24 23...

Page 126: ...iPOD track browsing Menu adjust Clock adjust key 9 Confirm key 10 Radio preset skip CD USB iPOD track browsing Menu adjust Clock adjust key 11 Radio preset skip CD USB iPOD track browsing Menu adjust...

Page 127: ...that must be entered before the unit will operate Normally the Ford Dealer does this during the predelivery inspection If the battery is disconnected for any reason or the audio unit is removed from t...

Page 128: ...ntry attempt may be made immediately If the display shows Retry 1 of 10 in_ _ _ _ the unit will be locked for a certain time Wait until the timer counts down to zero When Keycode is displayed enter th...

Page 129: ...Use the left or right button to select the setting required ON OFF control Press the ON OFF control This will also operate the unit for up to one hour with the ignition turned off The radio will switc...

Page 130: ...e audio unit to operate via the ON OFF button without the ignition turned on The audio unit will display the date and time when you power off the unit or the 1 hour mode is disabled Note Removing the...

Page 131: ...buttons for more than 2 seconds The station will be stored into the associated preset Repeat on each waveband FM 87 50 AutoStore control AutoStore can be used to store the stations with the strongest...

Page 132: ...his mode AF OFF will be displayed every time the unit is turned on Press the MENU button briefly Use the up or down arrow buttons unit AF is displayed Use the left or right arrow button to turn the fu...

Page 133: ...indicate its location The display will change to Loading all CDs and then the word Insert CD followed by the number of the slot will appear again At this point you can load another CD disc Note You ca...

Page 134: ...ce by pressing the preset button which has the number corresponding to the disc you want to play Please wait is displayed and an icon shows the disc selected The audio unit remembers which discs are a...

Page 135: ...ns include Shuffle folder to play all tracks on the disc The Shuffle all option will play all the tracks on the loaded disc in random order Repeat compact disc tracks Press the repeat playback key rep...

Page 136: ...our CD writing software Multi session This is a recording method that enables adding of data using the Track At Once method Audio Conventional CDs begin at a CD control area called the Lead in and end...

Page 137: ...the first folder then move onto the second folder and so forth For example if folder 1 has folders 1a and 1b within it and folder 2 contains folder 2a the playing sequence will be folder 1 1a 1b 2 2a...

Page 138: ...n and playback will be heard through the vehicle speakers AUX will appear in the vehicle audio unit display Volume treble and bass can be adjusted on the vehicle audio unit as normal Audio be happy be...

Page 139: ...or example some larger hard drives Note Access time to read the files on the external device will vary depending upon factors such as the file structure size and device content Connectivity The system...

Page 140: ...thod preset the iPod volume to maximum and turn off any equalizer settings before making the connections Connect the headphone output of the iPod to the AUX IN socket Connect the USB cable from the iP...

Page 141: ...ack Note If you wish to jump to the top level of the USB device contents press and hold the left button Audio control Press the left or right buttons to skip backwards and forwards through tracks Pres...

Page 142: ...albums Refer to the list for an explanation of these icons To navigate the iPod contents use the up or down buttons to scroll through lists and the left or right buttons to move up or down within the...

Page 143: ...143 Change of ownership...

Page 144: ...144 Change of ownership...

Page 145: ...145 Change of ownership...

Page 146: ...146 Change of ownership...

Page 147: ...147 Change of ownership...

Page 148: ...148 Change of ownership...

Page 149: ...See Using booster cables 111 Booster cushions 17 Booster seat 17 Brake and clutch fluid check 108 Brakes 84 Bulb changing See Changing a bulb 40 Bulb specification chart 46 C Car wash See Cleaning the...

Page 150: ...in 93 Driving through water 93 E Electric exterior mirrors 49 Mirror tilting positions 49 Electric windows 47 Anti trap function 47 Driver s door switches 47 Global opening and closing 47 Opening and...

Page 151: ...ad restraints 71 Removing the head restraint 71 Heated windows and mirrors 68 Heated exterior mirrors 68 Heated windows 68 Heating See Climate control 65 Hints on driving with ABS 84 I Immobiliser See...

Page 152: ...66 Air conditioning 67 Air distribution control 66 Blower 66 Heating the interior quickly 66 Recirculated air 66 Ventilation 66 Manual seats 69 Adjusting the angle of the seatback 70 Adjusting the he...

Page 153: ...Roof racks and load carriers 89 Running in 93 Brakes and clutch 93 Engine 93 Tyres 93 S Safety precautions 78 Seat belt height adjustment 23 Seat belt reminder 24 Seats 69 Sitting in the correct posi...

Page 154: ...lamps and indicators 51 ABS warning lamp 51 Airbag warning lamp 52 Brake system lamp 52 Direction indicator 52 Doors open warning lamp 52 Engine warning lamp 52 Front fog lamp indicator 52 Frost warni...

Reviews: