background image


Warning 

 
This equipment has been tested and found to comply with the limits for a 
Class A digital device, pursuant to Part 15 of FCC Rules. These limits are 
designed  to  provide  reasonable  protection  against  harmful  interference 
when  the  equipment  is  operated  in  a  commercial  environment.  This 
equipment generates, uses, and can radiate radio frequency energy and, 
if not installed and used in accordance with the instruction manual, may 
cause  harmful  interference  to  radio  communications.  Operation  of  this 
equipment in a residential area is likely to cause harmful interference, in 
which case the user will be required to correct the interference at his own 
expense. 


Summary of Contents for USF-105AS

Page 1: ...USF 105AS Universal System Frame USF 105PS Power Supply Unit 1st Edition Rev 2 OPERATION MANUAL ...

Page 2: ...ground the unit to gas lines units or fixtures of an explosive or dangerous nature Operation Hazard Do not operate the unit under hazardous or potentially explosive atmospheric conditions Doing so could result in fire explosion or other hazardous results Hazard Do not allow liquids metal pieces or other foreign materials to enter the unit Doing so could result in fire other hazards or a unit malfu...

Page 3: ...nd disconnect the power cord to avoid potentially hazardous conditions If problems similar to the above occur contact an authorized service representative before attempting to operate the unit again Rack Mount Brackets Ground Terminal and Rubber Feet Caution To rack mount or ground the unit or to install rubber feet do not use screws or materials other than those supplied Doing so may cause damage...

Page 4: ...t If damage has occurred or items are missing inform your supplier immediately USF 105AS Box ITEM QTY REMARKS USF 105AS 1 AC Cable 1 set Includes an AC cord retaining clip DVD ROM 1 Operation Manual PDF Air duct unit 1 Install this unit into slot 5 if 12G SDI module is installed Setup Guide 1 USF 105PS Option ITEM QTY REMARKS USF 105PS 1 Redundant Power Supply Unit AC Cable 1 set Includes an AC co...

Page 5: ... Replacing a USF Module 16 5 1 Removing a Front Module 16 5 2 Removing a Rear Module 16 6 Installing or Replacing a Power Supply Unit 17 6 1 Installing a Power Supply Unit 17 6 2 Removing a Power Supply Unit 18 7 Control Module 19 7 1 Internal Control Module Settings 19 8 Web Control 21 8 1 Connecting USF 105AS to a PC 21 8 1 1 Connecting LAN 1 Port 21 8 1 2 LAN A Port 23 8 2 PC System Requirement...

Page 6: ...g Alarm sensors Fan Stop Power Unit Voltage Error Temperature Error and status indicators Power Fan Temperature are shown on front LEDs Alarm data able to output from rear ports A genlock input BB or Tri level sync with loop through Input reference signal able to be supplied to all frame modules installed in the unit EIA Standard 1U size Monitoring with SNMP available High speed connection of each...

Page 7: ...ap toward the unit 2 Insert the anchor into the hole next to the AC IN socket 3 Lightly fasten the clip around the AC cord 4 Plug in the power cord 5 Slide the clip on the ladder strap toward the plug 6 Fasten the clip tightly 7 Gently pull on the AC cord to ensure it is secured Unplugging the AC cord 1 Push the tab on the retention clip up to unfasten the clip 2 Push the tab on the ladder strap u...

Page 8: ...is LED lights red when a voltage error occurs in power module 2 FAN This LED lights red when at least one fan has stopped TEMP This LED lights red when a temperature error occurs in the power supply module s Lower the environmental temperature to continue operation 2 FAN1 Cooling fans Operation status can be monitored by WebGUI Status Tab Refer to Sec 9 1 Status Tab 3 FAN2 4 FAN3 5 FAN4 DC 1 and D...

Page 9: ...he thumbscrews Cooling fans stop while the front panel is open IMPORTANT An OPEN alarm sounds intermittently every 30 seconds when the front panel is opened After 5 minutes the alarm will sound continuously until the front panel is closed In case the power is on complete the procedure in a short period of time 3 Pull out the front panel as shown in the figure below IMPORTANAT Carefully pull out th...

Page 10: ... the respective modules Supplies GENLOCK signal to respective slots 4 USF Module Slots Dedicated USF module slots Front USF modules For details on module operation refer to the respective operation manuals Redundant Power Supply System Two power supply units can be mounted in the USF 105AS By mounting two power supply units and turning both units on operation can continue without the DC power supp...

Page 11: ...ils Refer to Sec 9 2 Alarm Tab for details on USF 105AS alarm terminal settings 5 LAN 1 Provides access to USF 105AS and Slot 1 to 5 modules via a built in switching hub See Sec 8 1 1 Connecting LAN 1 Port for details 6 LAN A Provides access to USF 105AS and Slot 1 to 5 modules via a built in router See Sec 8 1 2 LAN A Port for details 7 GENLOCK Used for reference signal input black burst or tri l...

Page 12: ...he fan vents Rear Panel Front Panel Air Flow Diaram 3 8 Internal SDI Bus The USF 105AS frame provides 4 slot grouping internal SDI bus which allows SDI signals to be transferred bi directionally The signal application differs for each module Refer to the operation manual of each module for details Internal bus connections Slot1 to Slot4 Slot1 Slot2 Slot4 Slot3 ...

Page 13: ...3 ALARM 3 4 ALARM 4 5 ALARM 5 6 ALARM 6 7 GND GND 8 GND GND 9 GND GND Open collector alarm output ALARM 1 to 6 Maximum current limit 24VDC 50mA 3 9 1 Example of Alarm Connection Example of ALARM Open Collector Output Circuit Matching connector 9 pin D sub male Using inch screws Power Supply USF 105AS Side Set the resistance so that the output pin current stays within 50mA R External power supply M...

Page 14: ...valent material to equalize the electrical potential of the USF 105AS unit and the worker s body Do not touch the PCB wiring or parts legs directly with your fingers while working Each USF Module can be installed and uninstalled while the power is on in case of emergency Shut down the power for non emergency work When installing uninstalling the front module while the power is on the front panel w...

Page 15: ...ont module slowly 3 Push the handle until the front module clicks into the connectors IMPORTANT Inserting the module by pressing on other than the handle may damage the module When a front module is installed with power on maximum 1 minute is required until the module is detected and identified on the web 4 Turn on the USF 105AS and close the front panel Refer to Sec 3 2 Opening the Front Panel fo...

Page 16: ...ng the front module while the power is on the front panel will be open state The fans will stop during the procedure so it is essential to complete the installation within a short period and to close the front panel immediately The procedure for replacing a module in Slot 2 is described below as an example 5 1 Removing a Front Module 1 Open the front panel and shut down the USF 105AS power supply ...

Page 17: ...nt panel is open so the installation should be completed in a short time to avoid overheating Close the front panel immediately after the operation is completed 6 1 Installing a Power Supply Unit The procedure for installing a USF 105PS unit into the PS2 Slot is explained as an example 1 Open the front panel Refer to Sec 3 2 Opening the Front Panel 2 Insert the USF 105PS power supply unit by pushi...

Page 18: ... 3 2 Opening the Front Panel 2 Shut down to remove the Power Supply See figure below 3 Grab the power supply handle and slowly pull out the power supply See figure below 4 Close the front panel immediately Grab handle Grab handle Power Supply 1 switch Power Supply 2 switch ...

Page 19: ...d normally Micro SD CARD Connector For maintenance purposes only Do not connect a Micro SD CARD DS1 Settings No Factory Setting Description 1 On Do not change the setting Fan speed control 2 On Do not change the setting Fan speed control 3 Off Do not change the setting 4 Off Do not change the setting 5 Off Do not change the setting 6 Off Do not change the setting 7 Off Do not change the setting 8 ...

Page 20: ...172 16 0 10 The lost IP address is displayed on the web browser page 3 Off Do not change the setting 4 Off Do not change the setting 5 Off Do not change the setting 6 Off Do not change the setting 7 Off Do not change the setting 8 Off Do not change the setting IMPORTANT If DS2 SW2 is turned On while the network cable is connected IP address will return to the factory setting LAN1 192 168 0 10 15 L...

Page 21: ...espective modules 8 1 Connecting USF 105AS to a PC Connect LAN 1 or LAN A connector to a PC via a hub LAN 1 and LAN A have different functions See the figure below 8 1 1 Connecting LAN 1 Port Each slot network module is connected to the USF 105AS internal switching hub The LAN 1 port on the rear panel are also connected to the internal switching hub This requires different IP addresses other than ...

Page 22: ... So it is not possible to directly access USF 105AS Web GUI from LAN A port Refer to Sec 9 3 Network Tab for details LAN1 LED Lit Green Connected Flashing Orange Transmitting and receiving data USF 105AS Rear panel Web Browser SNMP Manger ALARM 1 2 AC100 240V 50 60Hz IN LAN 1 LAN A GENLOCK ...

Page 23: ...work settings Connection Example 8 2 PC System Requirements WebGUI requires the following minimum PC specifications OS Windows 7 Professional 32 64 bit Windows 8 1 or 10 Pro 32 64 bit CPU Intel Core 2 Duo processor 2 GHz or more Memory 2 GB or more Display Resolution of 1280 1024 pixels or higher recommended Must be capable of full color 24 bit display Network port Ethernet at least one port 100BA...

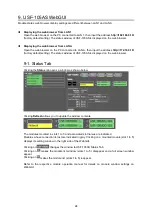
Page 24: ...05AS is displayed on the web browser 9 1 Status Tab Clicking the Status tab opens a window as shown below Clicking Refresh allows you to update the window contents The modules mounted in slots 1 to 5 and associated slot names are indicated Modules whose connection is lost are indicated in gray Clicking on a mounted module slot 1 to 5 displays its setting window in the right side of the WebGUI Clic...

Page 25: ... information Power Unit 1 Status Power Unit 2 Status DC Output DC output status of the Power Unit is indicated Normal Functioning Abnormal Not functioning Immediately turn off the power supply and contact your supplier Not indicated when the power is turned on for a power supply that is not installed Front Fan Status Fan 1 4 Status of front FAN 1 to FAN 4 Refer to Sec 3 1 Front Panel for FAN locat...

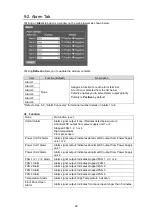
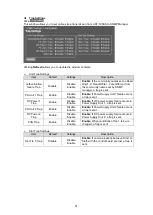
Page 26: ...wer supply unit 1 or 2 Stopped FAN 1 2 3 or 4 High temperature Front panel open Power Unit1 2 Alarm Alarm signal output Indicates abnormal DC output from Power Supply unit 1 or 2 Power Unit1 Alarm Alarm signal output Indicates abnormal DC output from Power Supply unit 1 Power Unit2 Alarm Alarm signal output Indicates abnormal DC output from Power Supply unit 2 FAN 1 2 3 4 Alarm Alarm signal output...

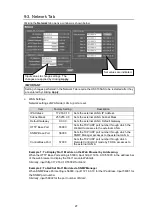
Page 27: ... 56000 Sets the TCP UDP port number through which the SNMP Manager accesses to the external LAN A Control Base Port 57000 Sets the TCP UDP port number through which Remote Control Unit made by FOR A accesses to the external LAN A Example 1 To Display Slot 1 Module on the Web Browser by Addressing When the HTTP Base Port setting is 55000 input http 172 16 0 10 55001 in the address bar of the web br...

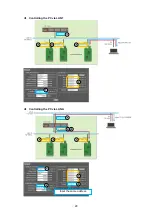
Page 28: ...ress and Gateway should be the same address when utilizing the router function to control the Web display and SNMP together through LAN A IMPORTANT LAN 1 and modules in Slot 1 to 5 are connected to the built in USF 105AS switching hub Accordingly avoid using the same IP addresses of LAN 1 port and Slot 1 to 5 as those of devices in the network If the addresses are improperly set network failure ma...

Page 29: ...29 Controlling the PC via LAN1 Controlling the PC via LAN A Input the same address ...

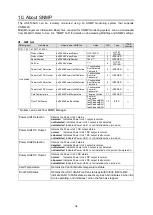
Page 30: ...ownloading of MIB Management Information Base file The MIB file can be downloaded according to the following procedure 1 Click Download MIB File 2 Click Save of FORA USF 105AS MIB zip file 3 Unzip the file and load it to SNMP Manager Community Settings Item Number of Characters Description Read Only1 2 Under 31 Characters Read only community name of SNMP Read Write1 2 Under 31 Characters Read and ...

Page 31: ...wer Supply Unit 1 failure occurs a trap is sent DC Power 1 Trap Enable Disable Enable Enable If DC power supply failure occurs in Power Supply Unit 1 a trap is sent PS Unit 2 Trap Enable Disable Enable Enable If Power Supply Unit 2 failure occurs a trap is sent DC Power 2 Trap Enable Disable Enable Enable If DC power supply failure occurs in Power Supply Unit 2 a trap is sent FAN Trap Enable Disab...

Page 32: ...Restart is clicked Other tab windows cannot be accessed until this window is closed Click OK to execute restart Parameter Backup Exports saves as a file USF 105AS setting parameters Imports this saved file and restore settings Export Click to save the settings to a file USF 105AS csv Select a folder and save the file Import Click and select the file USF 105AS csv saved by Export Click to load sett...

Page 33: ...n to modules installed into Slots 1 to 5 Input names in Slot1 to Slot5 and click Apply Example Input FS1 to FS5 in Slot1 to Slot5 box respectively and click Apply The set names are displayed next to respective modules in the left pane ...

Page 34: ...opped fan1Stopped Bit0 fan2Stopped Bit1 fan3Stopped Bit2 fan4Stopped Bit2 12 BITS No item can be set from SNMP Manager Power Unit1 Detection Obtains the Power Unit 1 status detected Indicates Power Unit 1 output is normal notDetected Indicates Power Unit 1 output is not detected notInstalled Indicates Power Unit 1 is not installed when turned on Power Unit1 DC Output Obtains the Power Unit 1 DC ou...

Page 35: ...pply Unit2 Detection Change usf105ASPowerUnit2DetectionChanged 3 USF 105ASPowerUnit2Detection INTEGER Power Supply Unit2 Status Change usf105ASPowerUnit2StatusChanged 4 USF 105ASPowerUnit2DcStatus INTEGER Front FAN Status Change usf105ASFrontFanStatusChanged 5 USF 105ASFrontFanStatus BITS Module Status Change usf105ASSlotStatusChanged 6 USF 105ASSlotNumber USF 105ASSlotStatus INTEGER Power Supply ...

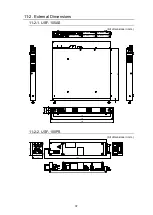
Page 36: ...ondensation Power 100 to 240 V AC 50 60Hz Power Consumption 100 VA at 100 to 120 V AC at maximum output current Maximum Output Current 12V DC 8 3A Dimensions 444 W x 44 H x 403 D mm Weight 5 6 kg USF 105PS not included Consumables in constant operating 24 hours a day at normal temperature Power supply unit Replace every 5 years Cooling fan Replace every 6 years 11 1 2 USF 105PS Power Supply 100 to...

Page 37: ...dimensions in mm TEMP FAN DC 2 DC 1 ALARM ON POWER USF 105S ALARM 1 2 AC100 240V 50 60Hz IN 480 462 6 32 6 22 22 44 444 403 436 UNIVERSAL SYSTEM FRAME LOCK LOCK LAN 1 LAN A GENLOCK t 2 11 2 2 USF 105PS All dimensions in mm POWER 40 52 261 5 221 ON OFF ...

Page 38: ...en the equipment is operated in a commercial environment This equipment generates uses and can radiate radio frequency energy and if not installed and used in accordance with the instruction manual may cause harmful interference to radio communications Operation of this equipment in a residential area is likely to cause harmful interference in which case the user will be required to correct the in...

Page 39: ...3166 USA Tel 1 305 931 1700 Fax 1 714 894 5399 FOR A Europe S r l Via Volturno 37 20861 Brugherio MB Italy Tel 39 039 91 64 811 Fax 39 039 878 140 FOR A UK Limited Trident Court 1 Oakcroft Road Chessington KT9 1BD UK Tel 44 0 20 3044 2935 Fax 44 0 20 3044 2936 FOR A Italia S r l Via Volturno 37 20861 Brugherio MB Italy Tel 39 039 881 086 103 Fax 39 039 878 140 FOR A Corporation of Korea 1007 57 5 ...

Reviews: