background image

EN

- 3 -

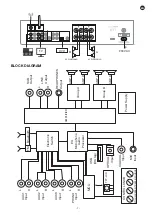
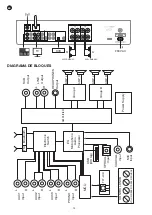
BACK PANEL

1

2

3

4

5

6

7

8

9

9
10
11
12
13

8
7

6

5
4

3

2

1

1 2

3

4 5 6

7

8

9

10

11

14

12

13

1.- 

BLUETOOTH

®

 ANT

: bluetooth signal antenna. 


2.- 

FM ANT

: input for connecting an antenna for FM signal. 


3.- 

AUX 1/AUX 2/AUX 3

:


stereo auxiliary inputs for connection of audio devices such as mixer, computers, 

etc. Connectors 2xRCA.

4.- 

PHONO: 

stereo input for turntable connection, connector 2xRCA.

5.- 

LINE

: line out, connectors 2xRCA.

6.- 

SUB

: subwoofer line output, RCA connector.

7.- 

PRE OUT/AMP IN

: stereo output of pre-amplifier stage signal (PRE OUT) and stereo input of amplifier 

stage (AMP IN), 2xRCA connectors. These inputs and outputs have a jumper to connect these 2 stages 
for the equipment to function as a whole. If you want to use only the pre-amp stage, remove the jumper 
and connect your amplifier to the PRE OUT output; or if you want to use the amp stage, remove the 
jumper and connect your mixer/pre-amp output to the AMP IN input.

8.- 

OPTICAL

: optical digital audio input, toslink connector.

9.- 

COAX

: coaxial digital audio input, RCA connector.

10.- 

SPEAKER OUTPUT

: stereo outputs from low impedance speakers, screw terminals or banana terminals. 

Please note that the choice of low impedance speakers must conform to the amplifier specifications for 
serial or parallel connection to obtain power and impedance appropriate to the amplifier output.

11.- 

AC SELECT

: power supply voltage selector. If you need to change the voltage you should be aware 

that the fuse must be modified as specified on the product.

12.- 115/230 VAC amplifier power supply input .
13.- 

FUSE

: fuse holder.

REMOTE CONTROL

1.- 

BASS

: boosts/attenuates low frequencies. 

2.- 

BT PAIR

: button to pair a Bluetooth audio transmitter device. If it is already 

paired with another device, pressing this button will unpair and wait for it to 
be paired again. 

3.- 

FM/USB/

1

2

3

4

5

6

7

8

9

9
10
11
12
13

8
7

6

5
4

3

2

1

1 2

3

4 5 6

7

8

9

10

11

14

12

13

/AUX 1-3/PHONO/OPTIC/COAX

: direct selection buttons of 

the input source to be played on the amplifier outputs.

4.- 

 /  : in USB mode, allows you to select the previous/next folder. Press OK 

to validate the selection.

5.- 

: in USB mode, select the repeat mode. Press OK to validate the selection. 

The options are: OFF plays all songs in normal order), ALL (plays all songs 
in random order, or FOLDER (plays all songs in a folder in random order). 

6.-   /   : in USB and Bluetooth mode, a short press of these buttons allows you 

to select the Previous/Next song that is currently playing.


In Radio Mode, a short press on these buttons switches to the Previous/Next 
stored station. A long press allows fine tuning of the frequency; press   /   to change the frequency 
value and OK to validate the selection. 


On the menu, it scrolls through the menu options.

1

2

3

4

5

6

7

8

9

9
10
11
12
13

8
7

6

5
4

3

2

1

1 2

3

4 5 6

7

8

9

10

11

14

12

13

Summary of Contents for AS-170PLUS

Page 1: ...INSTRUCTION MANUAL MANUAL DE USUARIO MODE D EMPLOI MANUAL DE INSTRU ES AS 170PLUS STEREO AMPLIFIER AMPLIFICADOR EST REO AMPLIFICATEUR ST R O AMPLIFICADOR EST REO...

Page 2: ...otate the wheel to nscroll through the menu options and press to select the option displayed on the screen For more information please refer to the MENU section SPECIFIC FUNCTION FOR ACTIVE MODE USB F...

Page 3: ...btain power and impedance appropriate to the amplifier output 11 AC SELECT power supply voltage selector If you need to change the voltage you should be aware that the fuse must be modified as specifi...

Page 4: ...OPTION X OPTION 1 OPTION 2 OPTION 3 OPTION X OPTION 1 OP O 2 OP O 3 OP O 1 OP O X volume and BALANCE MIC EQ ECHO VOL SET VOL MAX EXIT VOL INIT A B GR XXXXXXX XXXXXXX XXXXXXX GROUP A GROUP B GROUP A B...

Page 5: ...d select the destination memory position where you want to move the previously selected station and press OK to move ct the desired frequency ccione la frecuencia deseada ctionnez la fr quence souhait...

Page 6: ...sired mode by having the signal connected to the corresponding connector input on the rear panel of the amplifier Activate the audio device player mixer PC smartphone etc connected to the input to sta...

Page 7: ...KNOB VOLUME BASS TREBLE SOURCE MIC Input HEADPHONES Output EQ Microphone Audio Processor Group A AMP_L AMP_R AMP_L AMP_R Group B Power Supply OPTICAL Input USB ID3 tag Electronic Switch MCU COAXIAL I...

Page 8: ...16 A and B 8 16 screw terminals or bananas 1 stereo headphones 6 3 mm jack 1 line 2 x RCA 1 pre out 2 x RCA 1 SUB line for active subwoofer connection RESPONSE 20 20 000 Hz 3 dB S N RATIO 85 dB DISTOR...

Page 9: ...modo seleccionado Gire el control para navegar por las opciones de men y pulse para seleccionar la opci n que se muestra en pantalla Para m s informaci n vaya al apartado MEN FUNCI N ESPEC FICA PARA E...

Page 10: ...e baja impedancia debe ajustarse a las especificaciones del amplificador para que realice su conexionado en serie o paralelo y se obtenga una potencia e impedancia adecuadas a la salida del amplificad...

Page 11: ...graves del canal derecho o EQ OFF sin ecualizaci n BALANCE MIC EQ ECHO VOL SET VOL MAX EXIT VOL INIT XXXXXXX XXXXXXX XXXXXXX FOLDER RANDOM REPEAT ID3 TAG ALBUM FILE OFF TITLE ARTIST OPCI N 2 OPCI N 3...

Page 12: ...e souhait e a frequ ncia desejada MOVE MANUAL MEMO MOVE CHANNEL 1 2 Select memory location Seleccione la posici n de memoria S lectionnez la position de m moire Selecione a posi o de mem ria M01 XX X...

Page 13: ...endo conectada la se al a la entrada del conector correspondiente del panel trasero del amplificador Active el dispositivo de audio reproductor mesa de mezclas PC smartphone etc conectado a dicha entr...

Page 14: ...NTROL KNOB VOLUME BASS TREBLE SOURCE MIC Input HEADPHONES Output EQ Microphone Audio Processor Group A AMP_L AMP_R AMP_L AMP_R Group B Power Supply OPTICAL Input USB ID3 tag Electronic Switch MCU COAX...

Page 15: ...B 4 16 A y B 8 16 terminales roscados o bananas 1 auriculares est reo jack 6 3 mm 1 l nea 2 x RCA 1 pre out 2 x RCA 1 l nea SUB para conexi n a subwoofer activo RESPUESTA 20 20 000 Hz 3 dB RELACI N SE...

Page 16: ...nu du mode s lectionn Tournez le bouton de commande pour faire d filer les options du menu et appuyez pour s lectionner l option affich e l cran Pour plus d informations consultez la section MENU FONC...

Page 17: ...it tre adapt aux sp cifications de l amplificateur pour tre c bl s en s rie ou en parall le afin de fournir une puissance et une imp dance ad quates la sortie de l amplificateur 11 AC SELECT s lecteur...

Page 18: ...es grave du canal droit ou EQ OFF pas d galisation BALANCE MIC EQ ECHO VOL SET VOL MAX EXIT VOL INIT XXXXXXX XXXXXXX XXXXXXX FOLDER RANDOM REPEAT ID3 TAG ALBUM FILE OFF TITLE ARTIST OPCI N 2 OPCI N 3...

Page 19: ...de mem ria M01 XX X T0 M02 MEMORY OK OK OK Choose the channel you want to move Elija el canal que desea mover Choisissez le canal que vous souhaitez bouger Escolha o canal que deseja mover OK Select t...

Page 20: ...uhait en ayant le signal connect l entr e du connecteur correspondant sur le panneau arri re de l amplificateur Activez le p riph rique audio lecteur mixeur PC smartphone etc connect cette entr e pour...

Page 21: ...NTROL KNOB VOLUME BASS TREBLE SOURCE MIC Input HEADPHONES Output EQ Microphone Audio Processor Group A AMP_L AMP_R AMP_L AMP_R Group B Power Supply OPTICAL Input USB ID3 tag Electronic Switch MCU COAX...

Page 22: ...A B s lectionnables A ou B 4 16 A et B 8 16 bornes vis ou bananes 1 casque st r o jack 6 3 mm 1 ligne 2 x RCA 1 pr out 2 x RCA 1 ligne SUB pour la connexion un subwoofer actif R PONSE 20 20 000 Hz 3 d...

Page 23: ...r entrar no menu do modo selecionado Rode o controlo para navegar pelas op es de menu e pressione para selecionar a op o apresentada no ecr Para mais informa o consulte a sec o MENU FUN O ESPEC FICA P...

Page 24: ...ncia deve ajustar se s especifica es do amplificador para efetuar a liga o em s rie ou paralelo e obter uma pot ncia e imped ncia adequadas sa da do amplificador 11 AC SELECT seletor de voltagem de a...

Page 25: ...HO VOL SET VOL MAX EXIT VOL INIT XXXXXXX XXXXXXX XXXXXXX FOLDER RANDOM REPEAT ID3 TAG ALBUM FILE OFF TITLE ARTIST OPCI N 2 OPCI N 3 OPCI N 1 OPCI N X OPTION 2 OPTION 3 OPTION X OPTION 1 OPTION 2 OPTIO...

Page 26: ...P B GROUP A B fun es de personaliza o das emissoras guardadas na mem ria desired frequency e la frecuencia deseada nez la fr quence souhait e a frequ ncia desejada MOVE MANUAL MEMO MOVE CHANNEL 1 2 Se...

Page 27: ...cione o modo desejado tendo j ligado o sinal entrada do conetor correspondente do painel posterior do amplificador Ative o dispositivo de udio reprodutor mesa de mistura PC smartphone etc na entrada p...

Page 28: ...ROL KNOB VOLUME BASS TREBLE SOURCE MIC Input HEADPHONES Output EQ Microphone Audio Processor Group A AMP_L AMP_R AMP_L AMP_R Group B Power Supply OPTICAL Input USB ID3 tag Electronic Switch MCU COAXIA...

Page 29: ...ou B 4 16 A e B 8 16 terminais de rosca ou banana 1 auscultadores est reo jack 6 3 mm 1 linha 2 x RCA 1 pre out 2 x RCA 1 linha SUB para ligar a subwoofer ativo RESPOSTA 20 20 000 Hz 3 dB RELA O SINA...

Page 30: ......

Page 31: ......

Page 32: ...www fonestar com...

Reviews: