Q
UICK
S
TART
T
HE
P
REVIEW
S
CREEN
11
•
Connect the MX-4 power supply to the power supply jack on the rear panel.
•
Connect the MX-4’s power cord to a suitable outlet.
•
Turn on all devices (the MX-4 power switch is located on the right end of the unit) and let
the tapes roll.
For more detailed information about setting up your equipment, refer to Chapter 3,
Installing the
MX-4
.
The Preview Screen
NOTE
In the user interface, the MX-4 provides a small preview with the sources you have connected. The
images are scaled down in size, therefore, don’t play as smoothly as they would in a single-source
video monitor image. This does not affect the quality of the video going to the output — it is always
highest quality. In addition you will be able to view beforehand your source images before running
your transitions. Take advantage of the ability to adjust the Brightness, Color Saturation, Contrast
and Hue while viewing it on your preview screens. Refer to the video adjustment menu section in
Chapter 4 for these adjustments.
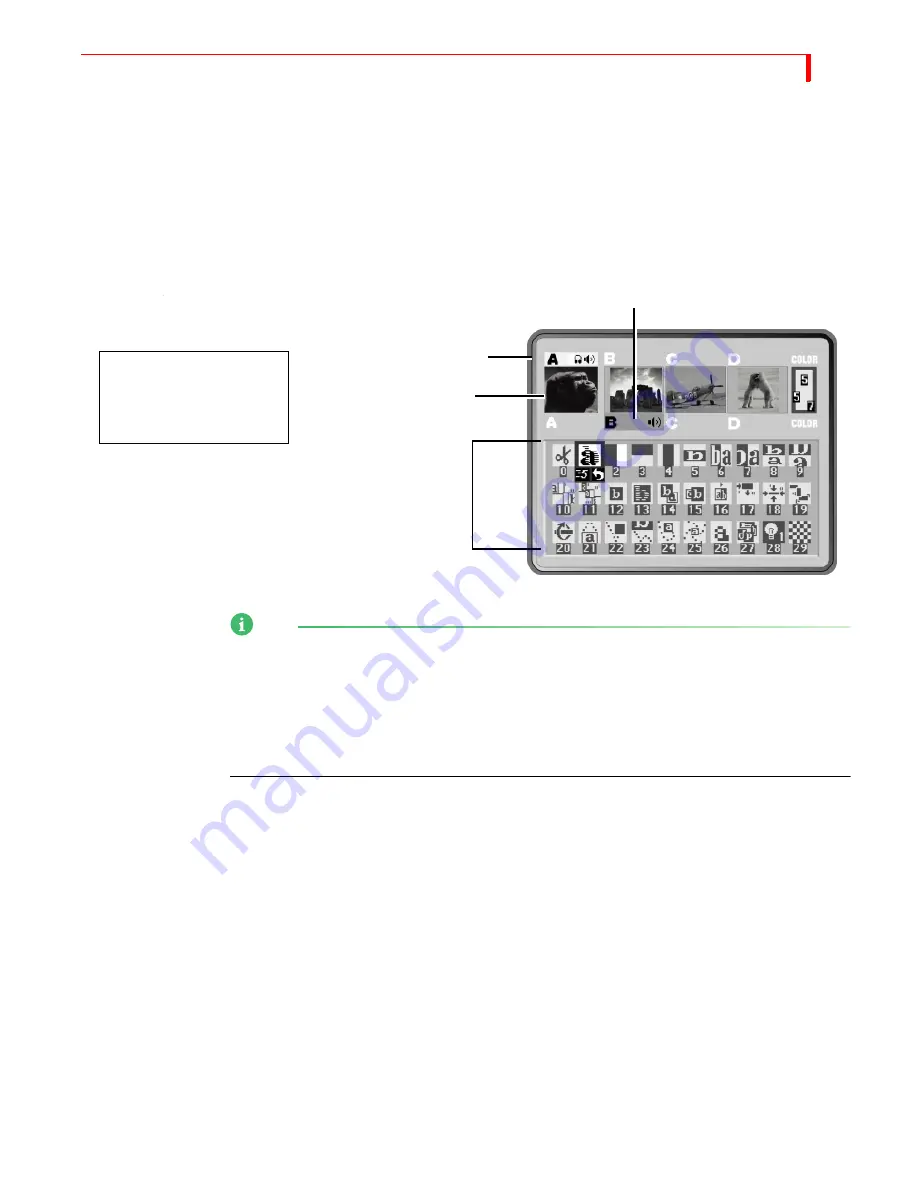
The PREVIEW screen contains the elements you need to run transitions:
CURRENT Source
— The signal currently playing on your Output monitor. The MX-4 high-
lights the CURRENT source in yellow (just above the preview images).
NEXT Source
— The signal that will play on the Output monitor after the transition runs. The
MX-4 highlights the NEXT source in green.
Transitions Menu
— Rows and columns of icons representing some of the transitions avail-
able. The MX-4 highlights the currently selected transition in blue. The icons also show the
speed and direction for the selected transition.
Near the upper-right corner of the Preview screen is the color channel. The swatch uses numbers to
indicate the current background color, border color, and border style.
For more detailed information about controlling the content of the Preview screen, see “Using the
Preview Screen” beginning on page 35.
CURRENT Source
NEXT Source
Transitions Menu
Previews
You should see a Preview
screen similar to this on
your Preview monitor.
Summary of Contents for MX-4
Page 1: ...MX 4 User Guide ...
Page 50: ...NOTES ...
Page 70: ...NOTES ...
Page 102: ...NOTES ...
Page 108: ...NOTES ...
Page 136: ...MX 4 USER GUIDE CHAPTER 13 132 ...
Page 138: ...MX 4 USER GUIDE APPENDIX A 134 BASIC TRANSITIONS ...
Page 154: ...NOTES ...
Page 168: ...NOTES ...


