background image

S

uggeSted

 C

leaning


M

aintenanCe

 g

uide

Step 1

Clean all accessible surfaces and cabinet with a non-flammable mild 
cleaning solution or cleaning wipes.

DO NOT USE SOLVENT BASED CLEANING AGENTS OR FLUIDS WITH 
FLASHPOINTS BELOW 100°F.

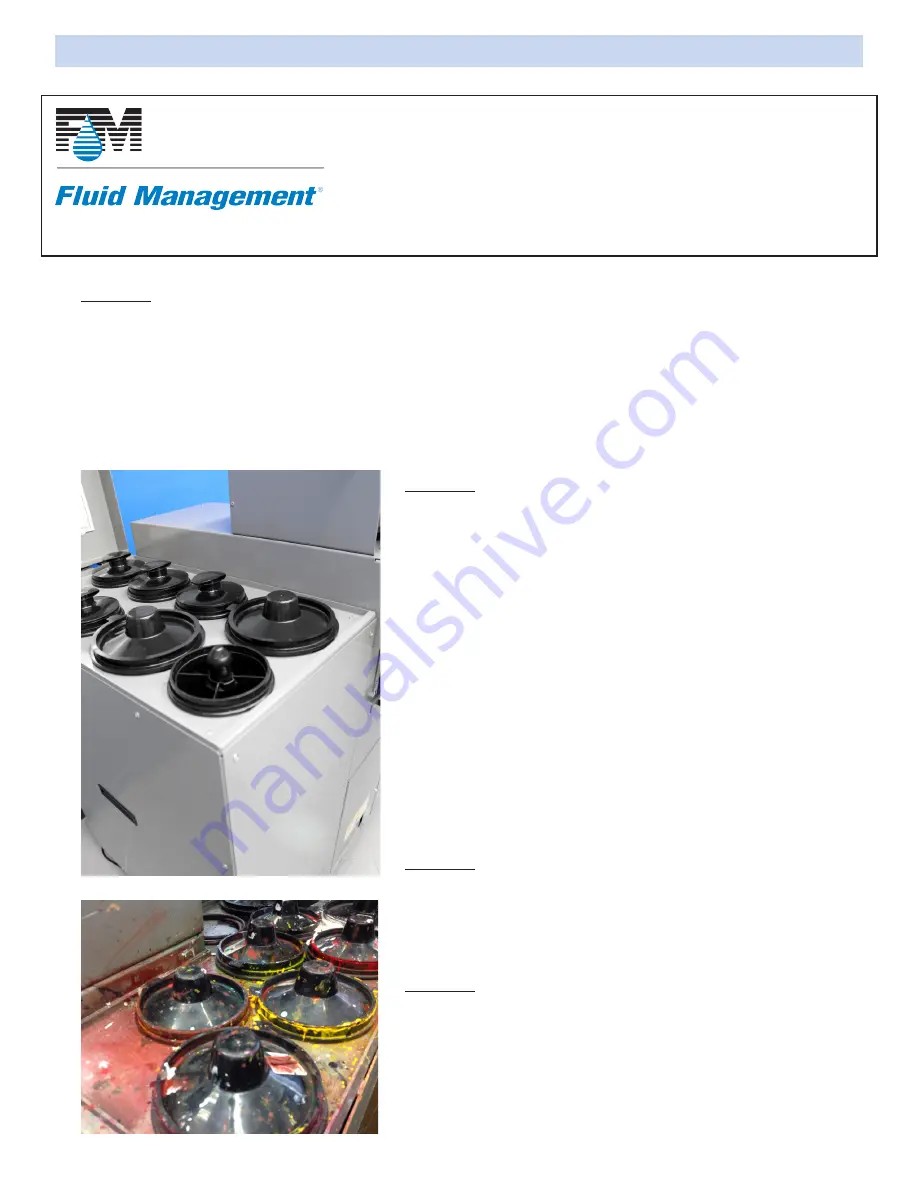
Step 2

When cleaning spill tray and around 
canisters,

 Use caution around each 

canister so that liquids do not spill into 
the machine chassis.

Use caution around the O-rings (on select 
machines) between the canisters and the 
top spill tray as to not damage them.


Do not attempt to lift or remove 
canisters from spill tray.

Step 3

Spilled or excess liquids should be 
removed immediately.

Step 4

Replace damaged decals. 
If O-rings 

(on select machines) 

are 

damaged, contact Fluid Management to 
replace them.

Appendix A: Suggested Cleaning Maintenance Guide

Summary of Contents for Accutinter 1600

Page 1: ...Accutinter 1600 Accutinter 1600 HS End User Guide GettingStarted Maintenance and Care Troubleshooting Warranty Part No Rev B 10 2020 ...

Page 2: ......

Page 3: ...nization while still maintaining its deep values and history As industry leaders Fluid Management provides trend setting creativity in the design products and services it offers United with FMDirectSM our nationwide service team we provide after sales support around the clock when you need them Being factory direct employees FMDirect technicians are experts on Fluid Management equipment and unders...

Page 4: ...state laws Fluid Management FMDirect ColorPro DVX Harbil Blendorama Accutinter Duraflow Fast Fluid Management GyroFlex GyroMixer Infina MicroTint TintMaster V1 and VR1 are trademarks of Fluid Management registered in the U S and or other countries Every effort has been made to ensure that the information in this guide is accurate Fluid Management is not responsible for printing or clerical errors ...

Page 5: ...466 Accutinter 1600 3 FluidManagementAccutinter1600 Once you ve installed your Accutinter 1600 Dispenser what s next In this booklet you ll find more information to help you get the most from your new Fluid Management Accutinter 1600 Accutinter1600 ...

Page 6: ... 14 Connecting the label printer optional 14 Connecting the barcode scanner optional 17 Preparing and refilling the canisters 19 Preparing the system 20 Using the shelves Basic Operations 21 Welcome to ColorPro4 22 Main menu 23 Dispensing from Formula Book 25 Manual dispensing 26 Using an external data source and dispense queuing 27 Adjusting formulas 28 Using color scaling 29 Purging the lines 30...

Page 7: ...here are precautions you can take to avoid damage to the equipment or bodily injury before operating By carefully following the instructions in this document and the warning and maintenance labels on the machine you can help protect yourself from hazards and create a safer work environment Equipment can become damaged due to misuse or neglect Some product damage is serious enough that the product ...

Page 8: ... injury to you or minor damage to the dispenser When you see a Caution notice in this guide read it carefully and be sure you understand it before continuing GeneralSafetyInformation DO NOT attempt to service a product yourself unless instructed to do so by Fluid Management Customer Service Use only a Fluid Management Authorized Service Technician to repair your equipment Please note that some par...

Page 9: ...conditions Excessive cold or hot conditions can have an adverse effect on the liquid crystal display of the monitor Communication Regulation Information Safety and regulatory compliance Information See the affixed labeling on the machine ETL Listed conforms to UL STD 1450 Certified to CAN CSA STD C22 2 NO 68 FCC Compliance Statement This device complies with part 15 of the FCC Rules Operation is s...

Page 10: ...tween 50o F 10o C and 104o F 40o C Relative humidity between 5 and 85 withoutcondensation OptionalAccessories Computer with Flat Screen Monitor Keyboard Mouse Label Printer BarcodeScanner Surge Protector Monitor Keyboard Stand Quart Pint Gallon Container Shelf 5 gallon Container Shelf Top Cover Canisters Spill Tray Service Panel NOTE Environmental conditions are strictly based on the types of colo...

Page 11: ...e between 50o F 10o C and 104o F 40o C Relative humidity between 5 and 85 withoutcondensation OptionalAccessories Computer with Flat Screen Monitor Keyboard Mouse Label Printer BarcodeScanner Surge Protector Monitor Keyboard Stand Quart Pint Gallon Container Shelf 5 gallon Container Shelf Top Cover Canisters Spill Tray Service Panel NOTE Environmental conditions are strictly based on the types of ...

Page 12: ...ve software allows operators to learn tinting fast Tips to Improve Operation Clean nozzles daily for consistent and accurate dispense Purge each colorant once a day Follow the preventative maintenance schedule for your Accutinter 1600 Accutinter 1600 HS DO NOT use solvents in your Accutinter 1600 Accutinter 1600 HS Keep ColorPro software current DO NOT load screen savers onto your Accutinter 1600 ...

Page 13: ...never used an Accutinter dispenser or are new to paint dispensers read this section for instructions on getting started and installing your machine If you are an experienced user you may already know enough to get started Be sure to look over the information in the Welcome to ColorPro section of this guide to find out more about the new features and capabilities in ColorPro Monitor Mouse ...

Page 14: ...that is capable of supporting the weight 700 pounds 317 kg Make sure there is enough room for service personnel to have access to the rear of the machine I maintenance may be difficult to perform 5Position the monitor keyboard and computer Place the monitor and keyboard on the keyboard support on the left of the machine See Figure 1 Warnings ALWAYS shut off the power and unplug your machine from t...

Page 15: ...mp dedicated electrical outlet 7 Turn on machine a Locate the front panel below the nozzle closer in the center of the machine b Locate and unscrew the two Phillips head machine screws provided c Open the front panel and locate on the red toggle switch near the bottom of the compartment d The red toggle switch needs to be in the ON position on or RESET position for the Accutinter to work properly ...

Page 16: ...bles Follow these steps to connect the printer Unpack the printer Make sure you have these items CD ROM Quick Start Guide Roll of labels USB cable Label writer printer Power cable Power adapter c Plug the power cord into the power adapter Plug the power adapter into the power connector on the bottom of the printer Plug the other end of the power cord into a power outlet Plug the USB cable into the...

Page 17: ...dor includes the barcode scanner the cable and a quick start guide Follow these steps to install the barcode scanner Unpack the barcode scanner Make sure the barcode scanner and the cable are included Turn on the computer Plug the interface cable modular cord into the port in the bottom of the scanner s handle Connect the scanner cable to the keyboard cable from the Accutinter1600 NOTE If the keyb...

Page 18: ... keyboard it must be enabled in ColorPro Follow these steps to enable the barcode scanner Type in service when you are prompted for the password Close After enabling the barcode scanner you can test the scanner by dispensing Select a formula Click the Dispense button If you receive a prompt that says Please Scan the Base Barcode you have successfully enabled the bar code scanner ...

Page 19: ... Check the label inside the top cover for capacity and colorant locations DO NOT overfill the canisters After the canisters are filled ColorPro or your manufacturer s software must be updated See page 18 Raise the top cover of the Accutinter so you can see the canisters inside Remove the caps from each canister one at a time and prepare to fill them with colorant Cautions DO NOT operate the dispen...

Page 20: ...Menu UsetheFillMenu to updatethesoftware after you havefilled allof thecanistersfor thefirsttime When refilling select All F2 orthecorrect individualcolorant Select Fill To Top F2 button When prompted are you sure click Yes Select Done Esc to return to the Main Menu NOTE When refilling update the canistersbyenteringtheamountofcolorant you added in the text box Press Enter NOTE Repeatentireprocessf...

Page 21: ...y Purging This will only purge colorants that have not been recently used Purge colorants Click on the colorant to be purged or select ALL button to purge entire system Click the Purge F3 button Place a container underneath the nozzle with nozzle closer open NOTE In the Accutinter 1600 HS the nozzle will open automatically after step 5 At this point just place the container aligned with the nozzle...

Page 22: ...o the pint quart or one gallon position labeled Push shelf in to lock it in place Make sure the shelf is sturdy before using To move shelf from locked position lift shelf upward and outward slightly and slide shelf to desired container height Place the quart pint can directly onto the shelf beneath the red LED can locator light Using the shelves ...

Page 23: ...g paint ColorPro4Features Dispense all your database formulationsormanually createyour own colors Storecustomerinformation and color requirements so you can provide consistent service time and time again Integrates with spectrophotometer hardwareandsoftware Customize settings to meet yourbusiness volumeneeds Easyto usescreens will assist youin routine maintenance Run diagnostics on the machine for...

Page 24: ...e to go to the Formula Book Manual Dispense andDispenseQueue menus Maintenance Click here to add colorant purge lines agitatecolorants Reports Click here to run reports for a selected date range in csv file format Help Menu Click here for training videos to get answers to your ColorPro and Accutinterquestions About Click here to see ColorPro andAccutinterinformation ...

Page 25: ...r choose Clear Formula F9 Formula Information Select the Brand of formula you are searching for by using the drop down menus EntertheFormulaName or use the drop down menus to search for the Formula Number in your database Select the desired Product Finish and Container Size using the drop down menus ChooseDispense F2 todispense theformulanow Whendispensing place container under nozzle Prompt will ...

Page 26: ... the number of jobs queuing Adjust Click here F6 to adjust individual formulas See page 28 SaveAsCustom Click here F7 to save as a customcolororcustomer information Send To Queue Choose Send to Queue F10 to dispense the formula later Price Clickhere F3 to estimate the cost of a job or pricefor a specificformula optional Coverage Estimator ClickCoverageEstimator F8 to estimate how much paint is nee...

Page 27: ...nt that you require Repeat the steps for each colorant in that formula SaveAsCustom Click here F7 to save customformulainformation Brand Select the Brand of paint you are creating a formula for by using the drop down menu Ingredients From the ingredient list select the first colorant by double clicking on the button Get Base After selecting brand and colorants click here to select Base and size to...

Page 28: ...This number indicates the number of jobs queuing Input List The Input List F4 displays all the formulas waiting to be dispensed from an external source orpreviouslyrequested The number of jobs queuing is located in top right corner Search for a job by clicking on any of the input tabs Remove Job Click here to remove the highlighted dispense from the input list Dispense Choose Dispense F2 after sel...

Page 29: ...ngredients On the Adjust Ingredients tab the original formulacolorant amounts are displayed Selected Ingredients In the Change fields type the amount to add or subtract from the original formula for eachcolorant Thetotals will change based upon amountsyouenter Dispense Total Click Dispense Total F3 to dispense the original formula plus adjustedamounts Dispense Change Click Dispense Change F2 to di...

Page 30: ...er formula by selecting Percent Change and selecting a value from drop down box orselectContainer Size and select a different paint container size from drop down box Click here F9 to return to original formulasettings Click Dispense Total F3 to dispense the original formula plus adjustedamounts Click Dispense Change F2 to dispense the incremental added colorantamounts Using color scaling ...

Page 31: ...g This will only purge colorants that have not been recently used Purge colorants Click on the colorant to be purged or select All button to purge entire system Click the Purge F3 button Place a container underneath the nozzle with nozzle closer open NOTE In the Accutinter 1600 HS the nozzle will open automatically after step 5 At this point just place the container aligned with the nozzle tip Cli...

Page 32: ... Maintenance F3 or F11 The Agitate tab allows you to stir colorants in the canister Click on Agitate tab In the Duration in Minutes F4 field type in the amount of time colorants should stir Click Agitate F2 to begin agitation cycle Progress bar will appear confirming agitation cycle Click Done Esc NOTE The default cycle is 30 seconds per hour Fluid Management recommends 4 minutes for manual agitat...

Page 33: ...s and dispensing ColorPro Find information about dispensing with ColorPro maintaining the machine and customization Quick Start Guide Overviews regarding dispensing maintaining and customizing yourAccutinter Maintenance Includesinformation about canister nozzle and preventative maintenance and line purging Troubleshooting Containsinformation regarding dispensing color tinting and other operational...

Page 34: ...y a Fluid Management authorized service technician This should be performed by a Fluid Management authorized service technician Maintenance Care and Use Accutinter 1600 PERFORM EVERY DAY Remove all excess colorant and debris from the nozzle and nozzle area Empty and clean the drip tray Replace if necessary Moist sponge daily to keep colorant from drying PERFORM EVERY WEEK Clean the spill trays aro...

Page 35: ... sponge Removecupholderfrom nozzlecloser Slide black cup holder left Remove cup from bracket and place to the side Replacecup holder to Clean nozzle Clean each opening with included nozzle cleaning pick Use a circular motion to make sure opening is clear Purgecolorants Clean cup Remove sponge insert Clean inside of cup liner with water and paper towel Closenozzle closer Replacespongeinsert nozzlec...

Page 36: ... dispensing accurately Compare the canister contents with the fill settings Adjust if necessary 1 Look inside the canister and compare the contents with what the fill settings in ColorPro show 2 If they do not match fill the canister and adjust the colorant level in ColorPro see page 17 Clean the nozzles 1 Clean each nozzle opening with a nozzle cleaning tool 2 Remove all excess colorant from arou...

Page 37: ...ter with colorant see page 16 2 Agitate for up to three minutes 3 Purge the line If the canister is full clean the nozzle and complete a purge using ColorPro see page 28 Repeat if necessary Complete a purge using ColorPro see page 28 Repeat if necessary A colorant canister needs to be filled Follow the Preparing and refilling canisters instructions on page 16 The canister cover and lids need to be...

Page 38: ...s the surge protector turned on Make sure the power cord is plugged in Replace the power cord is damaged Check the circuit breaker Turn on the surge protector replace if necessary The printer is not printing Is the power cord firmly connected to the computer and functioning properly Is the USB cable connected at both ends Make sure the printing device is properly connected Unplug the power to the ...

Page 39: ...button Is the power cord plugged in Make sure the power cord is plugged into the rear of the computer and to a working electrical outlet The monitor screen is blank Is the power turned on and are the cables attached Make sure the USB cable is plugged into the back of the monitor and to the back of the computer Make sure the power cord is plugged to the back of the computer and to a working electri...

Page 40: ...ting information Make sure the communication cable connects the computer to the dispenser If screen savers have been installed recently they may conflict with ColorPro Uninstall the screen savers Restart the computer Press the on off button of the computer Wait thirty seconds and turn the computer back on If none of these suggestions work call Customer Service A message in ColorPro says Communicat...

Page 41: ...ontaining Call Customer Service The optional barcode scanner does not work You must have ColorPro Professional for barcoding capability Make sure the Barcode Scanning Enabled box is checked in FM_Customizer see pages 14 15 If you suspect a problem with the label printer Contact the printer manufacturer at 1 800 426 7827 If you suspect a problem with the colorants Contact your department manager or...

Page 42: ...d that the product is unplugged from any power source before you attempt the replacement DO NOT attempt to service a product yourself unless instructed to do so by a Customer Service Representative Use only a service provider who is approved to repair your particular product ObtainWarrantyService First follow the advice in this guide If the unit still does not function call Customer Service for in...

Page 43: ...CLAIMS Warranty claims must be asserted during the warranty period While Paint Equipment is under warranty no repair or part replacement should be undertaken without first contacting Fluid Management at 800 462 2466 To expedite the process the model and serial numbers of the Paint Equipment should be available at the time of the call WARRANTY CONDITIONS EXCLUSIONS AND LIMITATIONS Fluid Management ...

Page 44: ...d Service Representatives determines to have been caused by or attributable to damage during or after shipment colorant in the wrong canister colorant related issues e g beads in colorant colorant contamination colorant thickening changes in colorant viscosity defective recalled colorant etc overfilling of canisters improper operation or misuse lack of daily maintenance power surge power outage vo...

Page 45: ...MANAGEMENT OR ANY OF ITS AUTHORIZED SERVICE REPRESENTATIVES HAVE I ANY LIABILITY FOR ANY CLAIM LOSS DAMAGE INJURY LIABILITY OBLIGATION COST OR EXPENSE THAT DIRECTLY OR INDIRECTLY RELATES TO OR ARISES OUT OF THE PERFORMANCE OF ANY SERVICES OR THE USE FAILURE OR MALFUNCTION OF ANY EQUIPMENT COMPONENT OR PART OR II ANY LIABILITY FOR INDIRECT SPECIAL PUNITIVE OR CONSEQUENTIAL DAMAGES INCLUDING BUT NOT...

Page 46: ...spense 5 8 9 11 12 16 20 26 29 DVX 8 F filling canisters 9 11 16 17 29 formulas 20 22 26 formula book 21 22 fuses 11 G grounding 7 I installation 7 10 12 K keyboard 8 10 12 14 15 35 L labels 5 6 11 13 23 37 M maintenance 5 8 9 11 17 21 30 31 mis tints 28 32 monitor 6 8 12 N nozzle 5 8 9 11 28 30 33 35 nozzle cleaning tool 38 P preventative maintenance 5 9 printer 8 9 11 13 34 36 pumps 9 purge 5 9 ...

Page 47: ...e caution around each canister so that liquids do not spill into the machine chassis Use caution around the O rings on select machines between the canisters and the top spill tray as to not damage them Do not attempt to lift or remove canisters from spill tray Step 3 Spilled or excess liquids should be removed immediately Step 4 Replace damaged decals If O rings on select machines are damaged cont...

Page 48: ...Accutinter 1600 Fluid Management Inc 1023 Wheeling Road Wheeling IL 60090 p 800 462 2466 f 847 537 3221 www fluidman com ...

Reviews: