13
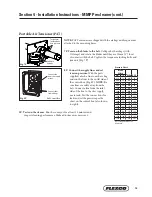
Fig. 8P
NOTE: PAT Tensioners are shipped with the air bags and torque arms
attached to the mounting bases.
7P. Tension the blades to the belt. Collapse both air bags (with
C-clamps) and rotate the blades until they are 25mm (1") short
of contact with the belt. Tighten the torque arm locking bolts and
jam nuts (Fig. 7P).
8P. Connect the supply lines and set
tension pressure. With the parts
supplied, attach a line to each air bag
and run the lines to the outlet side of
the control box (Fig. 8P). NOTE: Be
sure lines are safely away from the
belt. Connect a line from the inlet
side of the box to the site’s supply,
or air tank. Test the connections for
leaks and set the pressure per the
chart on the control box (also shown
to right).
9P. Test run the cleaner. Run the conveyor for at least 15 minutes and
inspect cleaning performance. Make adjustments as necessary.
Portable Air Tensioner (PAT)
Connect line
from site supply
or tank
Connect lines
from air bags
PAT Control Box
Section 4 - Installation Instructions - MMP Precleaner (cont.)
Fig. 7P
Torque arm
locking bolts
and jam nuts
Collapse
air bags
Pressure Chart
Blade
Width
MPa PSI*
mm.
in.
450
18"
.034
5#
600
24"
.041
6#
800
32"
.055
8#
900
36"
.062
9#
1050
42"
.076
11#
1200
48"
.090
13#
1350
54"
.097
14#
1500
60"
.110
16#
1650
66"
.117
17#
1800
72"
.131
19#
1950
78"
.145
21#
2100
84"
.152
22#
2250
90"
.165
24#
2400
96"
.172
25#
2550
102"
.186
27#
2700
108"
.193
28#
2850
114"
.207
30#
* PSI setting is based on the
belt width.
Summary of Contents for MMP Precleaner
Page 1: ...www flexco com Installation Operation and Maintenance Manual MMP Precleaner...
Page 25: ......
Page 26: ......


