background image


21

 
MAINTENANCE OF THE HEATING SYSTEM 

 
MAINTENANCE OF THE STOVE 


Our wood stoves are designed so that they will require little maintenance: 
 
-  It is wise to perform a visual inspection of the stove approximately once a month, in order to insure that no 

parts have been damaged, in which case repairs must be performed without delay. 

 
-  If the glass on your stove breaks, you must replace it with one of the same type, namely, a   3\16" (5 mm) 

 thick ceramic glass; never replace the glass with another material.  

 
-  To replace the glass, remove the screws retaining the window moldings inside the door, (except for the 

Royal Comfort where the screws are located on the outside of the door). Remove the moldings and 
replace the damaged glass with a new one.  

 
-  Never wash the windows with a product that may scratch it. Use a specialized product, available in the 

stores where wood stoves are sold. 

 
-  Windows should be washed only when they are cold.  
 
-  It is recommend that you change the fiber ceramic gasket that makes the door on your stove airtight. 

Replacement should take place once a year under normal conditions. This is  important to insure good 
control over the combustion, maximum efficiency, and security.  To change your door gasket, simply 
remove the old gasket and carefully clean the door groove. Install the new gasket by carefully following 
the instructions on the gasket packaging.  

IMPORTANT:  different models of Flame wood stoves 

require different types of gasket.  You need to buy the original gasket supplied by the 
manufacturer.  Avoid low density gasket, which often comes with liquid glue.  Only high 
temperature silicone should be used.  Consult your dealer. 

 
-  You should regularly dispose of the ashes, as soon as they prevent you from placing a normal load of 

logs.  We recommend that you always leave one to two inches of ashes in the bottom of the stove in order 
to insure maximum efficiency.  

 
-  Always use a metal container with a lid to save the cooled ashes you remove from the stove.  Make sure 

that there are no live embers.  Moreover, it is important  to place the metal container on a non 
combustible surface. 


-  Never bang the door and never hit the glass.  When you close the door, make sure the logs are placed in 

such a way that they do not lean on the glass. Otherwise, someone could open the stove door and cause 
the burning logs to fall on the floor. 

 
-  It is possible to give your wood stove a brand new look by repainting it with a 1200

°

 F (649 

o

C) heat 

resistant paint.  For this purpose, simply rub the surface  with fine sand paper #180. The closer to the 
metal you go, the tougher the paint coat will be. Clean the stove and apply thin coats of paint 
successively.  Remember that upon ignition of the stove, the new paint will go through a “curing” process 
and will produce smoke and odors.  This is normal.  Leave a window open.   


Summary of Contents for The Advantage I

Page 1: ...AME WOOD STOVE MANUAL By STOVE BUILDER INTERNATIONAL INC 1700 Leon Harmel Quebec City Quebec Canada G1N 4R9 Tel 418 527 3060 Fax 418 527 4311 All Flame stoves are tested by Warnock Hersey according to CSA and ULC standards ...

Page 2: ...N 4 CLEARANCES TO COMBUSTIBLE MATERIALS 5 INSTALLATION OF A HEAT RADIATION SHIELD 6 STEP BY STEP INSTALLATION OF YOUR CHIMNEY 8 COUPLINGS 15 EXTERIOR AIR INTAKE 16 AIR CIRCULATION SYSTEM 16 OPERATING YOUR FLAME WOOD STOVE 17 FUEL 17 IGNITION 18 MAINTENANCE OF THE HEATING SYSTEM 21 MAINTENANCE OF THE STOVE 21 MAINTENANCE OF THE CHIMNEY 22 PROCEDURES IN CASE OF FIRE 22 FREQUENTLY ASKED QUESTIONS 23 ...

Page 3: ...ION REQUIREMENTS AND FOR THE NEED TO OBTAIN A PERMIT BEFORE YOU INSTALL YOUR WOOD STOVE KEEP THIS INSTRUCTION MANUAL FOR FUTURE REFERENCE WOOD HEATING Many consumers choose wood as the main or auxiliary energy source for heating their dwelling or secondary residence This source of energy has the advantage of being abundant relatively cheap and easy to store so that you are assured of energy autono...

Page 4: ...The Lieutenant II it is strictly forbidden to install your wood stove in a mobile home Important A wood stove must never be installed in a hallway or near a staircase since it may block the way in case of fire or fail to respect required clearance The wood stove must not be hooked up to a hot air distribution system since an excessive accumulation of heat may occur FLOOR PROTECTION Your woodstove ...

Page 5: ...457 mm 7 2 13 m The Ambasador 24 610 mm 26 660 mm 26 660 mm 7 2 13 m Single pipe Double pipe Single pipe Double Pipe Single pipe Double pipe The Lieutenant II 15 381mm 7 180mm 16 406mm 12 305mm 8 203mm 5 130mm 7 2 13 m The Lieutenant II Mobile Home 15 381mm 10 255mm 16 406mm 14 360mm 8 203mm 6 150mm 7 2 13 m Height from floor protection to ceiling You may decrease these clearances by installing he...

Page 6: ... tile or an equivalent fire proof material resting on fire proof brackets spaced 1 25 4mm apart by fire proof braces 50 33 Ceramic tile or an equivalent fire proof material built on a fire proof base resting on sheet metal of at least 0 013 0 33 mm thick spaced 1 25 4mm by fire proof braces 67 50 Solid bricks spaced 1 25 4mm from the rear wall using fire proof braces 50 N A Solid bricks resting on...

Page 7: ...5 mm on the diameter ex For a stove with an exhaust of 6 the chimney flue should not exceed 7 of diameter Note that it is the chimney and not the stove which creates the draft effect your stove s performance is directly dependent on an adequate draft from your chimney The following recommendations may be useful for the installation of your chimney 1 It must rise above the roof at least 3 0 9 m fro...

Page 8: ...dequate number of wall bands one for every 8 feet of chimney excluding the roof portion A stove pipe adapter One insulated tee plug A chimney cap Roof guys if required Stove pipe An adequate number of stove pipe sections A 90o elbow 1 Start by positioning your stove where you would like it to go taking into account the minimum clearances to combustible material You will then be able to determine w...

Page 9: ...e a short chimney length attached to the tee through the wall thimble The chimney must extend at least 3 inches into the living space where it attaches to the stove pipe 5 You can now install the wall support Simply slide the wall support up to the tee ensuring that the adapter on the support engages with the female coupler on the bottom of the tee When the wall support is level and properly posit...

Page 10: ...be installed through your soffit install a roof flashing above and finishing plate below where the roof is cut Consult the following section called CEILING SUPPORT SYSTEM for more details 7 Authorities require that the chimney extend not less than 3 feet above the highest point where it passes through the roof of a building and not less than 2 feet above any portion of the building within 10 feet ...

Page 11: ...roof A ceiling support kit with stove pipe adapter An attic insulation shield A roof flashing kit A chimney cap Roof guys if necessary Stove pipe Suitable lengths of stove pipe 1 Place your stove where you would like it located and use a plumb line to mark the ceiling directly above your stove flue You will probably have to adjust this position slightly to ensure that your chimney will run between...

Page 12: ...ust slide the assembly into the framed opening from below Once you ensure that the finishing plate is flush with the underside of the ceiling and assembly is level secure it with screws 4 Once the support is secure you can begin to assemble the chimney by lowering the first section into the support Make sure that the male coupler is pointing upwards as indicated by the arrow on the chimney label 5...

Page 13: ...ey to clear an obstruction or to avoid having to cut joists 7 Once you have cut through your roof and framed the joists it is time to work outdoors Authorities require that the chimney extend not less than 3 feet above the highest point where it passes through the roof of a building and not less that 2 feet above any portion of the building within 10 feet You will need to install a roof flashing T...

Page 14: ...he roof deck roof guys with telescoping legs and draw bands are required 9 You are now ready to connect your chimney to your stove Simply install the inter connecting stove pipe between the stove pipe adapter and the stove You can follow the instructions in the following sections of this manual under COUPLINGS ...

Page 15: ...ections to one another with three equidistant metal screws The connectors must be short and straight All sections installed horizontally must slope at least 1 4 inch per foot with the upper end of the section toward the chimney To insure a good draft the total length of the exhaust system should never exceed 8 to 10 feet Except for cases of vertical installations or cathedral roof where the smoke ...

Page 16: ...silicone in order to insure continuity to the vapor barrier Attach the unit to the floor using the two screws provided for this purpose AIR CIRCULATION SYSTEM In order to improve air circulation in the room where the wood stove is installed certain options are available for specific stove models Blower A variable speed control blower is available Consult your dealer Thermodisc kit Available on mos...

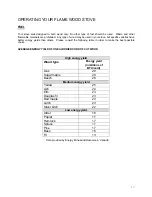
Page 17: ...an others Please consult the following table in order to make the best possible choice AVERAGE ENERGY YIELD OF ONE AIR DRIED CORD OF CUT WOOD High energy yield Wood type Energy yield in millions of BTU cord Oak 29 Sugar maple 28 Beech 26 Medium energy yield Yellow 25 Ash 24 Elm 23 Douglas fir 23 Red maple 23 Larch 23 Silver birch 22 Low energy yield Alder 18 Poplar 17 Hemlock 17 Spruce 17 Pine 17 ...

Page 18: ...irebricks are lined up properly If applicable remove the plastic protector covering the gold trims Make sure that the chimney and flue pipe are well installed according to specifications Respect all clearances to combustibles and floor protection according to the unit you have chosen If you are not sure that your installation is adequate do not hesitate to contact your Flame dealer IGNITION The in...

Page 19: ... increase the draft and will eliminate the smoke which is stagnant in a state of slow combustion Then bring the red embers to the front of the stove and reload the unit Use only the quantity of wood required depending on the circumstances for example in severe cold weather load the stove to maximum During milder temperatures the stove should be only half loaded CAUTION DO NOT PLACE LOGS TOO CLOSE ...

Page 20: ...tain the temperature of your exhaust gases between 250 F and 475 F Keep in mind that the most difficult months for wood heating are October and November Indeed during this period the atmosphere is often very heavy and humid and may hinder the chimney draft Moreover the wood is often too damp since it has not had a sufficient drying period or it has been stored outside in the rain Combustion proble...

Page 21: ...by carefully following the instructions on the gasket packaging IMPORTANT different models of Flame wood stoves require different types of gasket You need to buy the original gasket supplied by the manufacturer Avoid low density gasket which often comes with liquid glue Only high temperature silicone should be used Consult your dealer You should regularly dispose of the ashes as soon as they preve...

Page 22: ... at least one chimney sweeping per year or more if your visual inspection reveals creosote deposits exceeding 1 4 6 mm It is important to remove all creosote which has been detached with the sweeping brush in order to prevent if from igniting when you start your next fire PROCEDURES IN CASE OF FIRE IN CASE OF FIRE POSITION THE AIR INTAKE OF THE STOVE AT THE MINIMUM TO DEPRIVE IT FROM OXYGEN CALL I...

Page 23: ... cold will sometimes be hard to light and cause smoking problems 2 Negative pressure can also be caused by a vacuum effect in the room or the house The air in a house is constantly moving Hot air rises cold air moves down Air can also be mechanically expulsed outside of the house with the use of air moving devices such as a range hood a air exchanger a dryer a bathroom fan etc Furthermore air goes...

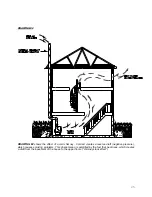
Page 24: ...g under normal and adequate conditions Heat rises to the upper floors and the room where the stove is located has an adequate supply of oxygen The chimney draft is sufficient and the combustion gases are evacuated normally through the exhaust system ...

Page 25: ... cold chimney Cold air creates a reverse draft negative pressure which causes smoking problems This phenomenon is amplified by the fact that heat rises which creates a draft from the basement of the house to the upper floors chimney stack effect ...

Page 26: ... the effect of negative pressure caused by an air moving device inside the house In the example above the range hood draws air from inside the house which is replaced by air coming from the chimney The result is a smoking problem ...

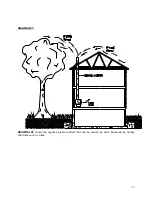
Page 27: ...27 DRAWING 4 DRAWING 4 shows the negative pressure effect caused by wind influenced by nearby structures such as a building ...

Page 28: ...28 DRAWING 5 DRAWING 5 shows the negative pressure effect that can be caused by wind influenced by nearby structures such as a tree ...

Page 29: ...would wear out prematurely It could also become too hot and cause objects or structures nearby to catch fire If you notice that some firebricks are disintegrated and the steel is directly in contact with the fire or embers replace the firebricks immediately If you only notice cracks on some firebricks it is not necessary to replace them The frequency at which you will change your firebricks depend...

Page 30: ...oval of the manufacturer Labour cost and repair work to the account of the manufacturer are based on predetermined rate schedule and must not exceed the wholesale price of the replacement part The manufacturer at its discretion may decide to repair or replace any part or unit after inspection and investigation of the defect The manufacturer may at its discretion fully discharge all obligations wit...

Reviews: