background image

Supply air unit VEKA 

Integrated Control Equipment Curo

10


Fläkt Woods 

9965 GB 2016.09.27


Specifications are subject to alteration without notice

4 Control pAnEl, opErAtionS, CommiSSioning

4.1 gEnErAl 
hmi 

This section provides an introduction to the touchscreen LCD 
control panel, also known as the ‘Human Machine Interface’, or 
simply, HMI. 
The HMI serves two main purposes:  To provide information about 
the current operational state of the unit. To allow the unit to be 
setup and configured. 

touCh SCrEEn tipS 

To select an item, touch the center of the icon or option. Do not 
press too hard, the touch screen is sensitive enough to pick up 
light, firm touches. Use the tip of your finger or the back of a  
pencil to touch the required option. Be careful not to touch any 
other options. 

ClEAning thE SCrEEn

Disconnect the power cord. Gently wipe the screen with a soft, 
dry non-abrasive cloth. If the marks remain, moisten the cloth 
slightly with a detergent that is de signed for LCD or mobile 
screens and wipe the screen gently from top to bottom. Never 
use other detergents, as these may contain ammonia or other 
additives.

importAnt:

• Never spray, or pour liquids directly on to the screen.
• Do not clean the screen while the system is on.

ConVEntionS uSEd Within thiS mAnuAl

The following buttons and symbols are universal and available on 
many menu pages.

Home key, to return to the Home Screen.

Back button, to cancel and return to the previous 
page.

Confirm button to confirm and proceed.

Changing a value:

option 1:

 Press the arrow keys to increase or  

decrease the value.

option 2:

 Press the displayed number to  

numerically adjust the value.

uSing thE unit

poWEring on 

Each time power is applied, the unit will run through a series of 
internal system tests which take approximately 20 seconds to 
complete. 
Once the internal system tests have been completed, the HMI will 
always display the Home screen. The unit will be in Manual Mode 
the first time that power is applied. 

homE SCrEEn 

From the Home screen it is possible to determine how the unit is 
operating as well as navigating to further screens to configure the 
unit to suit the demands of the end system. 

From the Home Screen, it is possible to: 
Navigate to further configuration screens to setup system para-
meters. 

•  Manually adjust the fan speed. 
•  Determine the operating status of the product.
•  Interrogate and acknowledge system alarms. 

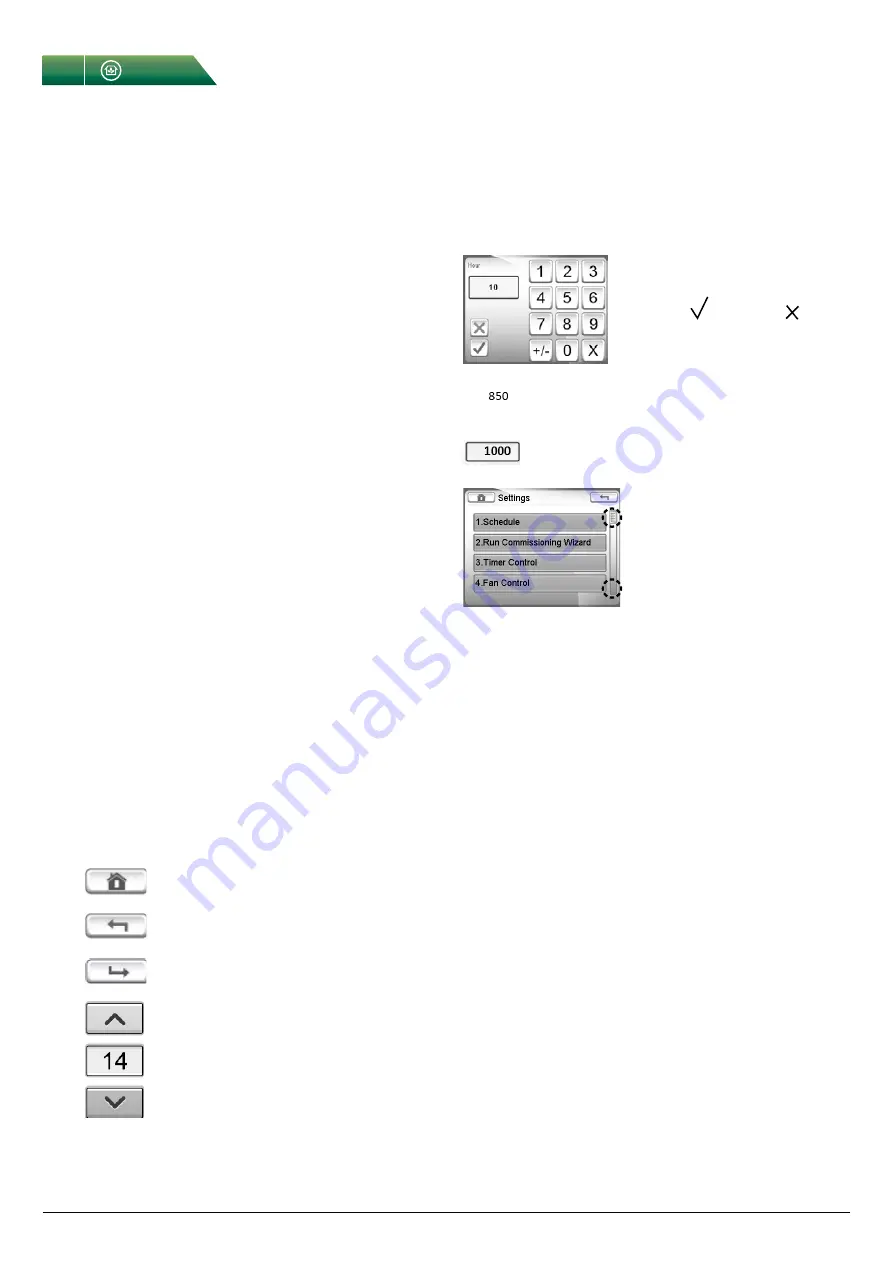
Use the number buttons to enter 
a value.

Confirm with      or cancel with     .

Values that can only be read, but not written,  
are displayed without a surrounding window.

Values that can be both read and written,  
are displayed with a surrounding window.

Some submenus has several 
pages. Touch the upper or the 
lower part of the scroll list to 
navigate between pages.

Summary of Contents for VEKA ver C Series

Page 1: ...Air Treatment VEKA ver C Air Comfort Integrated Control Equipment Curo VEKA ver C Supply air unit...

Page 2: ...s 5 2 7 Extended Forced Ventilation 6 2 8 Fire protection function 6 2 9 Summary alarm 6 2 10 External exhaust fan 6 2 11 Filter guard 6 3 Wiring diagram 7 Page 4 Control panel operations commissionin...

Page 3: ...2 1 x 230 V 30 1 50 kW 0 75 kW x 2 6 6 A 3 3 A x 2 1 x 230 V 1 2 Electrical post heater Size Power kW Current A Voltage V 20 9 13 3 x 400 V 20 15 22 3 x 400 V 20 21 30 3 x 400 V 30 24 35 3 x 400 V 1...

Page 4: ...ivered from factory and provided with a magnet for easy handling For wall mounting see below 2 Lift the display out of the enclosure 3 Push the connection cable through a suitable hole and if needed m...

Page 5: ...ard 2 The current consumption for CP1 and CP2 is limited to 2 A A separate safety switch for the pump is needed if it is a long distance between the pump and the AHU 2 Connection of external component...

Page 6: ...unction 5 Timer 1 Timer 2 Stop 0 0 Manual Automatic Mode 1 0 Stop 0 1 Normal 1 1 2 8 FIRE PROTECTION FUNCTION External fire alarm to stop the unit can be connected to terminals in the control box Smok...

Page 7: ...et card DO8 Rel kort 11 Ref A B 66 67 A01 64 65 A02 62 63 A03 58 59 A05 104 105 29 G0 G 30 21 25 27 26 28 22 Y M G G0 Y M Y M Y M 23 21 Y M G G0 22 24 Supply fan 2 parallel Alt 1 Start Electrical Heat...

Page 8: ...9 40 DI10 16 DI3 17 23 24 DI10 18 DI8 35 21 22 DI5 36 AI1 46 52 Brun Vit Brun Vit M B M B M B M B C NO C NO C C NO NC C NO C NO C C NO NC C NC C NC Brun Vit Brun Vit 53 AI4 47 AI2 48 49 AI3 50 51 24 V...

Page 9: ...46 47 48 49 50 51 52 53 64 65 68 69 70 C NO C NO C NO C NO C NO C NC NO C B M B M B M B M Y M Ref A B TMR2 Ext Timer input 2 GP1 Supply Filter Alarm FF Ext LExhaust Fan Alarm CP1 Alarm Input Heating...

Page 10: ...The following buttons and symbols are universal and available on many menu pages Home key to return to the Home Screen Back button to cancel and return to the previous page Confirm button to confirm a...

Page 11: ...t heater active Cooling active 4 Control panel operations commissioning 18 C 11 08 Operating status Alarm No alarm Alarm B Alarm A Manual mode Automatic mode Timer 1 Timer 2 Timer 1 Timer 2 Stop Shut...

Page 12: ...ng 4 2 Home screen cont Stop ManuAl Auto matic Alarm See section 4 3 Shortcut to set the temperature set point User Settings See section 4 3 Shortcut to set the time and date Select operating mode See...

Page 13: ...the Alarm Screen User Settings Temperature status The temperature set point is used to determine when the post heater if fitted starts to warm the supply air entering the property The temperature set...

Page 14: ...on 2 Push the spanner button 3 In this menu you set the date time and language It is also possible for installers and service personnel to log in and access additional parameters Date time 2 Set the t...

Page 15: ...ed opera tions that are available from the Home Screen via the passcode protected Advanced Settings option Numerous system parameters can be adjusted through the Settings Screen however only those tha...

Page 16: ...COMMISSIONING WIZARD There are two ways to start the wizard 1 Press the question mark on the start screen The question mark is not shown if the wizard has been started earlier 2 Choose 2 Run Commissi...

Page 17: ...m button to proceed to next step Option 1 Use buttons Option 2 Use the numerical keypad confirm with Make the appropriate settings for the supply fan 4 Control panel operations commissioning option 1...

Page 18: ...without notice Enter desired temperature setpoint value If using outdoor temperature compensation or room control also set the minimum and maximum temperature for the supply air 4 Control panel opera...

Page 19: ...troller has three types of internal time schedules Weekly Single date and Date period First program the weekly schedule with the required times Then use any single date programs and the period to ente...

Page 20: ...00 18 00 2 Weekly 2 Fan speed Stop Tem Setpoint Rel 0 C From To Fri Fri Daily 17 00 18 00 Example 3 Below is an example of a weekly schedule configured to run the fans at normal speed from 08 00 to 18...

Page 21: ...one off schedule that automati cally starts and finishes on the same date Example The unit must be switched off on 6 June Date period schedule 1 4 A date period schedule is defined as a one off schedu...

Page 22: ...the controller must be chang ed from standard mode to cascade mode Then control mode is selected by changing the cascade reference to room control 0 or outdoor temperature compensation 1 Below is a d...

Page 23: ...Max temp 25 C Sets highest supply air temperature Example 1 1 Setpoint 18 C 2 Outdoor air temperature 2 C This means that the new calculated setpoint for the supply air controller is Calculated setpo...

Page 24: ...See table below for connection of Modbus For more information see the separate Modbus ins Component Terminal Connection Note Modbus RS485 Modbus 47 48 49 REF A B 6 2 MODBUS TCP IP The unit has a buil...

Page 25: ...gnal Pre Heater R 0 100 Not for VEKA Output signal Heat Recovery R 0 100 Not for VEKA Output signal Cooling R 0 100 Control mode Calculated Set point R 15 35 C Temperature Status Parameter Type of val...

Page 26: ...0 360 min 30 Not f r VEKA 4 2 COP CAV Not f r VEKA 5 Heating Cooling 5 1 Pre Heater Not for VEKA 5 2 Heating Cooling Temperature control option R W 1 2 1 1 Standard supply air control See section 5 2...

Page 27: ...larm Configuration 7 1 Alarm Settings Dirty Filter alarm time R W 0 600 days 0 Set to 0 to deactivate the filter alarm A and B on first Relay R W Yes No Yes Enable temperature alarm R W Yes No Yes Tem...

Page 28: ...999 s 60 Not for VEKA 7 4 Contact function DI1 Timer 1 R W NO NC NO DI2 Timer 2 R W NO NC NO DI3 RHE Rotation Guard R W NO NC NO Not for VEKA DI4 Defrost pressure switch R W NO NC NO Not for VEKA DI5...

Page 29: ...values are reset 8 7 Login settings Auto Logout R W Yes No Yes Set Password 1 R W To change password 8 8 About Software Version Control Panel R Software Version Control Board R Bootloader version Cont...

Page 30: ...2100 Maskins kerhet Allm nna konstruktionsprinciper Riskbed mning och riskreducering Safety of machinery General principles for design Risk assessment and risk reduction EN 60204 1 Maskins kerhet Mask...

Page 31: ......

Page 32: ......

Page 33: ......

Page 34: ...manufacturing of a wide range of products and solutions for Air Movement Air Treatment Air Distribution Air Management and Air Diffusion with focus on two major benefits Air Comfort and Fire Safety W...

Reviews: